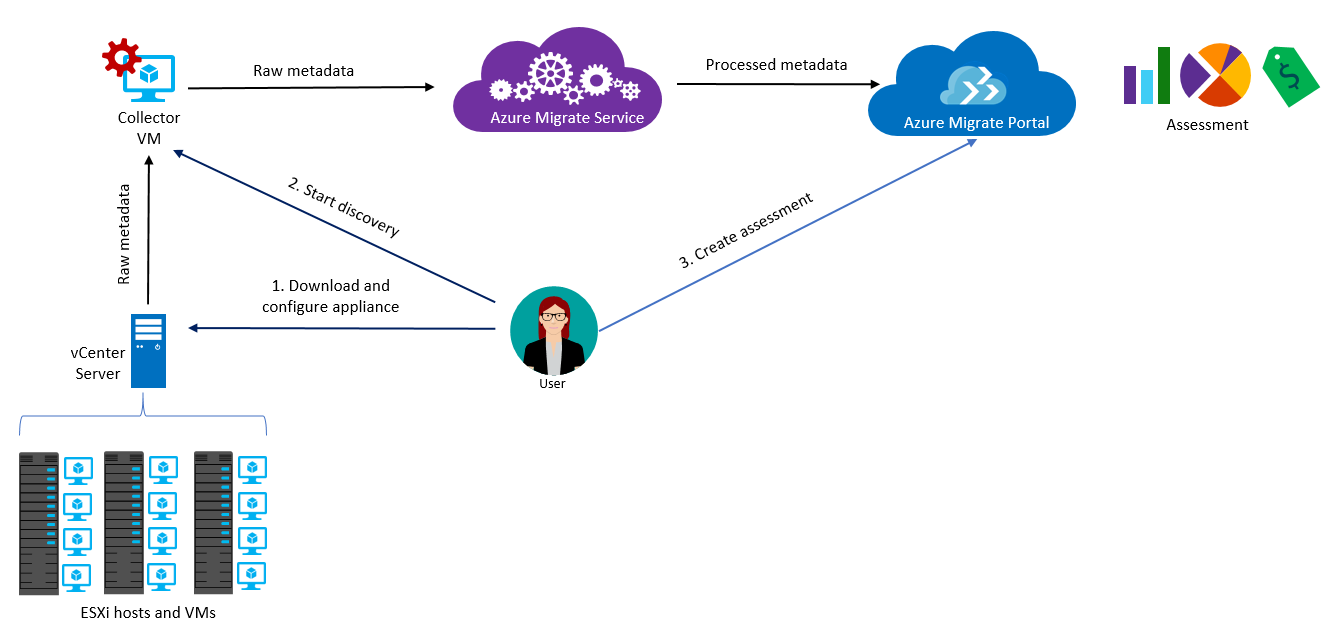
Azure Migrate provides a centralized hub to assess and migrate to Azure on-premises servers, infrastructure, applications, and data. This service:
- Assesses whether on-premises servers are ready for migration to Azure.
- Estimates the size of Azure virtual machines (VMs), Azure SQL configuration, or number of Azure VMware Solution nodes after migration.
- Estimates costs for running on-premises servers in Azure.
- Identifies cross-server dependencies and optimization strategies for moving interdependent servers to Azure.
If you're considering a lift-and-shift approach or are in the early assessment stages of migration, this service is for you. After completing the assessment, use Azure Migrate to execute the migration.
Create a new project
Begin server discovery, assessment, and migration by using the following steps for Azure Migrate:
- Select Azure Migrate.
- In Overview, select Discover, assess and migrate.
- Select Add tools.
- In Project, select your Azure subscription, then create a resource group if you don't have one.
- In Project Details, specify the project name and geography where you want to create the project, then select Create.
- After creating the project, tools are visible in project and user can start with Discovery.
Dependency analysis
Dependency analysis identifies dependencies between discovered on-premises servers. It provides the following advantages:
- Gather servers into groups for a better assessment.
- Identify servers to migrate together. This step is useful if you're unsure which servers are part of an app deployment that you want to migrate.
- Identify whether servers are in use and which servers you can decommission instead of migrate.
- Analyze dependencies to ensure that nothing is left behind and avoid surprise outages after migration.
Azure Migrate
Azure Migrate is a one-stop, extensible migration experience. Use Azure Migrate to track your Azure migration journey from assessment to migration. You can choose your migration tools, and track your migration progress in the tools.
Azure Migrate is a centralized hub where you can assess and then migrate on-premises servers, infrastructure, applications, and data to Azure. Azure Migrate offers these features:
- Unified platform, with assessment, migration, and progress tracking.
- Enhanced assessment and migration capabilities:
- Assess on-premises servers, including SQL Server instances, and migrate them to Azure Virtual Machines or Azure VMware Solution.
- Agentless migration of VMware virtual machines to Azure.
- Assess on-premises databases and migrate them to Azure SQL Database or Azure SQL Managed Instance.
- Assess on-premises web applications and migrate them to Azure App Service by using Azure App Service Migration Assistant.
- Assess your on-premises virtual desktop infrastructure and migrate it to Azure Virtual Desktop.
- Migrate large amounts of data to Azure quickly and cost-effectively using Azure Data Box products.
- Extensible approach with ISV integration (such as Cloudamize).
To perform a migration using Azure Migrate, follow these steps:
- Search for Azure Migrate under All services. Select Azure Migrate to continue.
- In Get started, select Discover, assess and migrate.
- Select Add tools.
- In Project, select your Azure subscription, then create a resource group if you don't have one.
- In Project Details, specify the project name and geography where you want to create the project, then select Create.
- After you create the project, tools are visible in the project, and the user can start with discovery.
Note
For guidance specific to your scenario, see the tutorials and Azure Migrate documentation.
Learn more
Azure Database Migration Service
Azure Database Migration Service is a fully managed service that enables seamless migrations from multiple database sources to Azure data platforms, with minimal downtime (online migrations). Database Migration Service performs all of the required steps. You can initiate your migration projects assured that the process takes advantage of best practices recommended by Microsoft.
Create an Azure Database Migration Service instance
The first time you use Azure Database Migration Service, you must register the resource provider for your Azure subscription:
- Select All services. Under General, select Subscriptions, and choose the subscription to use.
- Select Resource providers.
- Search for
migration. In the search results, to the right of Microsoft.DataMigration, select Register.
After you register the resource provider, create an instance of Azure Database Migration Service.
- Select + Create a resource and search Marketplace for Azure Database Migration Service.
- Complete the Create Migration Service wizard, then select Create.
The service is now ready to migrate the supported source databases to target platforms such as SQL Server, MySQL, PostgreSQL, or MongoDB.
Azure App Service Migration Assistant
The Azure App Service Migration Assistant is part of a larger suite of applications that help organizations with their transition to the cloud. The Migration Assistant provides a guided, wizard-like experience that performs two tasks.
- Azure App Service Migration Assistant assesses a specific web app that's installed on a computer running Windows Server. Migration Assistant runs pre-migration compatibility checks on the web app to see whether it can migrate to Azure App Service without modification.
- If the assessment shows that the web app can be migrated without being modified, Migration Assistant migrates the app. You'll need to give Migration Assistant access to your Azure account. You also select the resource group to use and enter a name for the web app, among other details.
Alternatively, the Migration Assistant generates an Azure Resource Manager template that you can use to migrate the web application in a more automated and repeatable way.
Migrate a web app to Azure App Service
The Migration Assistant begins the migration process by collecting key details from you about your Azure account and then does the migration.
First, you'll sign in to your Azure account and associate your Migration Assistant session with your account by using a unique code. Next, you'll choose the subscription, the resource group, and the website's domain name. You can choose to create a new Azure App Service plan to host the web app or select an existing plan. The choice you make affects the geographical region from which your web app is hosted. You'll also have a chance to associate this migration effort with an existing Azure Migrate project. Finally, you can either choose to skip database setup or choose to set up a hybrid connection to enable a database connection.
After the Migration Assistant collects and verifies your selections, it creates required Azure App Service resources in the selected region and resource group. It zips the web app's source files and uses the Azure App Service deployment API to deploy the files. It completes final, optional migration steps, like helping you set up a hybrid connection.
After a successful migration, some post-migration tasks might include:
- Manually move application settings and connection strings in your
web.configfile to Azure App Service. - Migrate data from an on-premises SQL Server instance to an Azure SQL Database instance.
- Set up an SSL certificate.
- Set up custom domain names.
- Set up permissions in Azure Active Directory.
You might also decide to change the Azure App Service hosting plan and other settings like autoscaling and deployment slots.
For more information, see Migrate ASP.NET applications to Azure.
Data Migration Assistant
Data Migration Assistant helps you upgrade to a modern data platform. It detects compatibility issues that can affect database functionality in your new version of SQL Server or Azure SQL Database. Data Migration Assistant recommends performance and reliability improvements for your target environment. You can use Data Migration Assistant to move your schema, data, and uncontained objects from your source server to your target server.
Data Migration Assistant is integrated with Azure Migrate, so you can track assessment progress in the Azure Migrate dashboard. Open Data Migration Assistant in Azure Migrate by adding the Azure Migrate database assessment tool. Add your database assessment to Azure Migrate by selecting Upload to Azure Migrate in Data Migration Assistant.
Note
For large migrations (in terms of number and size of databases), we recommend that you use Azure Database Migration Service, which can migrate databases at scale.
To begin using Data Migration Assistant:
- Download and install Data Migration Assistant from the Microsoft download center.
- Create an assessment by selecting the New (+) icon, then select the Assessment project type.
- Set the source and target server type, then select Create.
- Configure the assessment options as required (recommend all defaults).
- Add the databases to assess.
- Select Next to start the assessment.
- View results in Data Migration Assistant.
For an enterprise, we recommend following the approach outlined in Assess an enterprise and consolidate assessment reports with DMA. You assess multiple servers, combine the reports, and then use provided Power BI reports to analyze the results.
For more information, including detailed usage steps, see these resources:
- Data Migration Assistant overview
- Assess an enterprise and consolidate assessment reports with DMA
- Analyze consolidated assessment reports created by Data Migration Assistant with Power BI
SQL Server Migration Assistant
Microsoft SQL Server Migration Assistant (SSMA) automates database migration to SQL Server from Microsoft access, DB2, MySQL, Oracle, and SAP ASE. The general concept is to collect, assess, and then review with these tools. But due to the variances in the process for each of the source systems, review the detailed SQL Server Migration Assistant documentation.
For more information, see SQL Server Migration Assistant overview.
Database Experimentation Assistant
Database Experimentation Assistant is an A/B testing solution for SQL Server upgrades. Database Experimentation Assistant helps you evaluate a targeted version of SQL for a specific workload. If you're upgrading from an earlier version of SQL Server (SQL Server 2005 and later) to any current version of SQL Server, you can use these analysis metrics.
The Database Experimentation Assistant contains the following workflow activities:
- Capture: The first step of SQL Server A/B testing is to capture a trace on your source server. Usually, the source server is the production server.
- Replay: The second step of SQL Server A/B testing is to replay the trace file that was captured to your target servers. Then, collect extensive traces from the replays for analysis.
- Analysis: The final step is to generate an analysis report by using the replay traces. The analysis report can help you gain insight about the performance implications of the proposed change.
Azure Cosmos DB data migration tool
Azure Cosmos DB data migration imports data from various sources into Azure Cosmos DB collections and tables. You can import from JSON files, CSV files, SQL, MongoDB, Azure Table Storage, Amazon DynamoDB, and even Azure Cosmos DB for NoSQL collections. You can also use the data migration tool when migrating from a single partition collection to a multipartition collection in Azure Cosmos DB for NoSQL.
The tools in this article include:
- Azure Migrate
- Azure pricing calculator
- Azure TCO calculator
- Azure Cost Management + Billing
- Azure Advisor
The processes described in this article may also require a partnership with IT managers, finance, or line-of-business application owners.
- Estimate VM costs prior to migration
- Estimate and optimize VM costs during and after migration
- Tips and tricks to optimize costs
Prior to migration of any asset (infrastructure, app, or data), there is an opportunity to estimate costs and refine sizing based on observed performance criteria for those assets. Estimating costs serves two purposes: it allows for cost control, and it provides a checkpoint to ensure that current budgets account for necessary performance requirements.
Cost calculators
For manual cost calculations, there are two handy calculators that can provide a quick cost estimate based on the architecture of the workload to be migrated.
- The Azure pricing calculator provides cost estimates for the Azure products you select.
- Sometimes decisions require a comparison of the future cloud costs and the current on-premises costs. The total cost of ownership (TCO) calculator can provide such a comparison.
These manual cost calculators can be used on their own to forecast potential spend and savings. They can also be used in conjunction with the cost forecasting tools of Azure Migrate to adjust the cost expectations to fit alternative architectures or performance constraints.
Azure Migrate calculations
Prerequisites: The remainder of this tab assumes the reader has already populated Azure Migrate with a collection of assets (infrastructure, apps, and data) to be migrated. The prior article on assessments provides instructions on collecting the initial data. Once the data is populated, follow the next few steps to estimate monthly costs based on the data collected.
Azure Migrate calculates monthly cost estimates based on data captured by the collector and Service Map. The following steps will load the cost estimates:
- Navigate to Azure Migrate assessment in the portal.
- In the project Overview page, select + Create assessment.
- Select View all to review the assessment properties.
- Create the group, and specify a group name.
- Select the machines that you want to add to the group.
- Select Create assessment, to create the group and the assessment.
- After the assessment is created, view it in Overview > Dashboard.
- In the Assessment details section of the portal navigation, select Cost details.
The resulting estimate, pictured below, identifies the monthly costs of compute and storage, which often represent the largest portion of cloud costs.
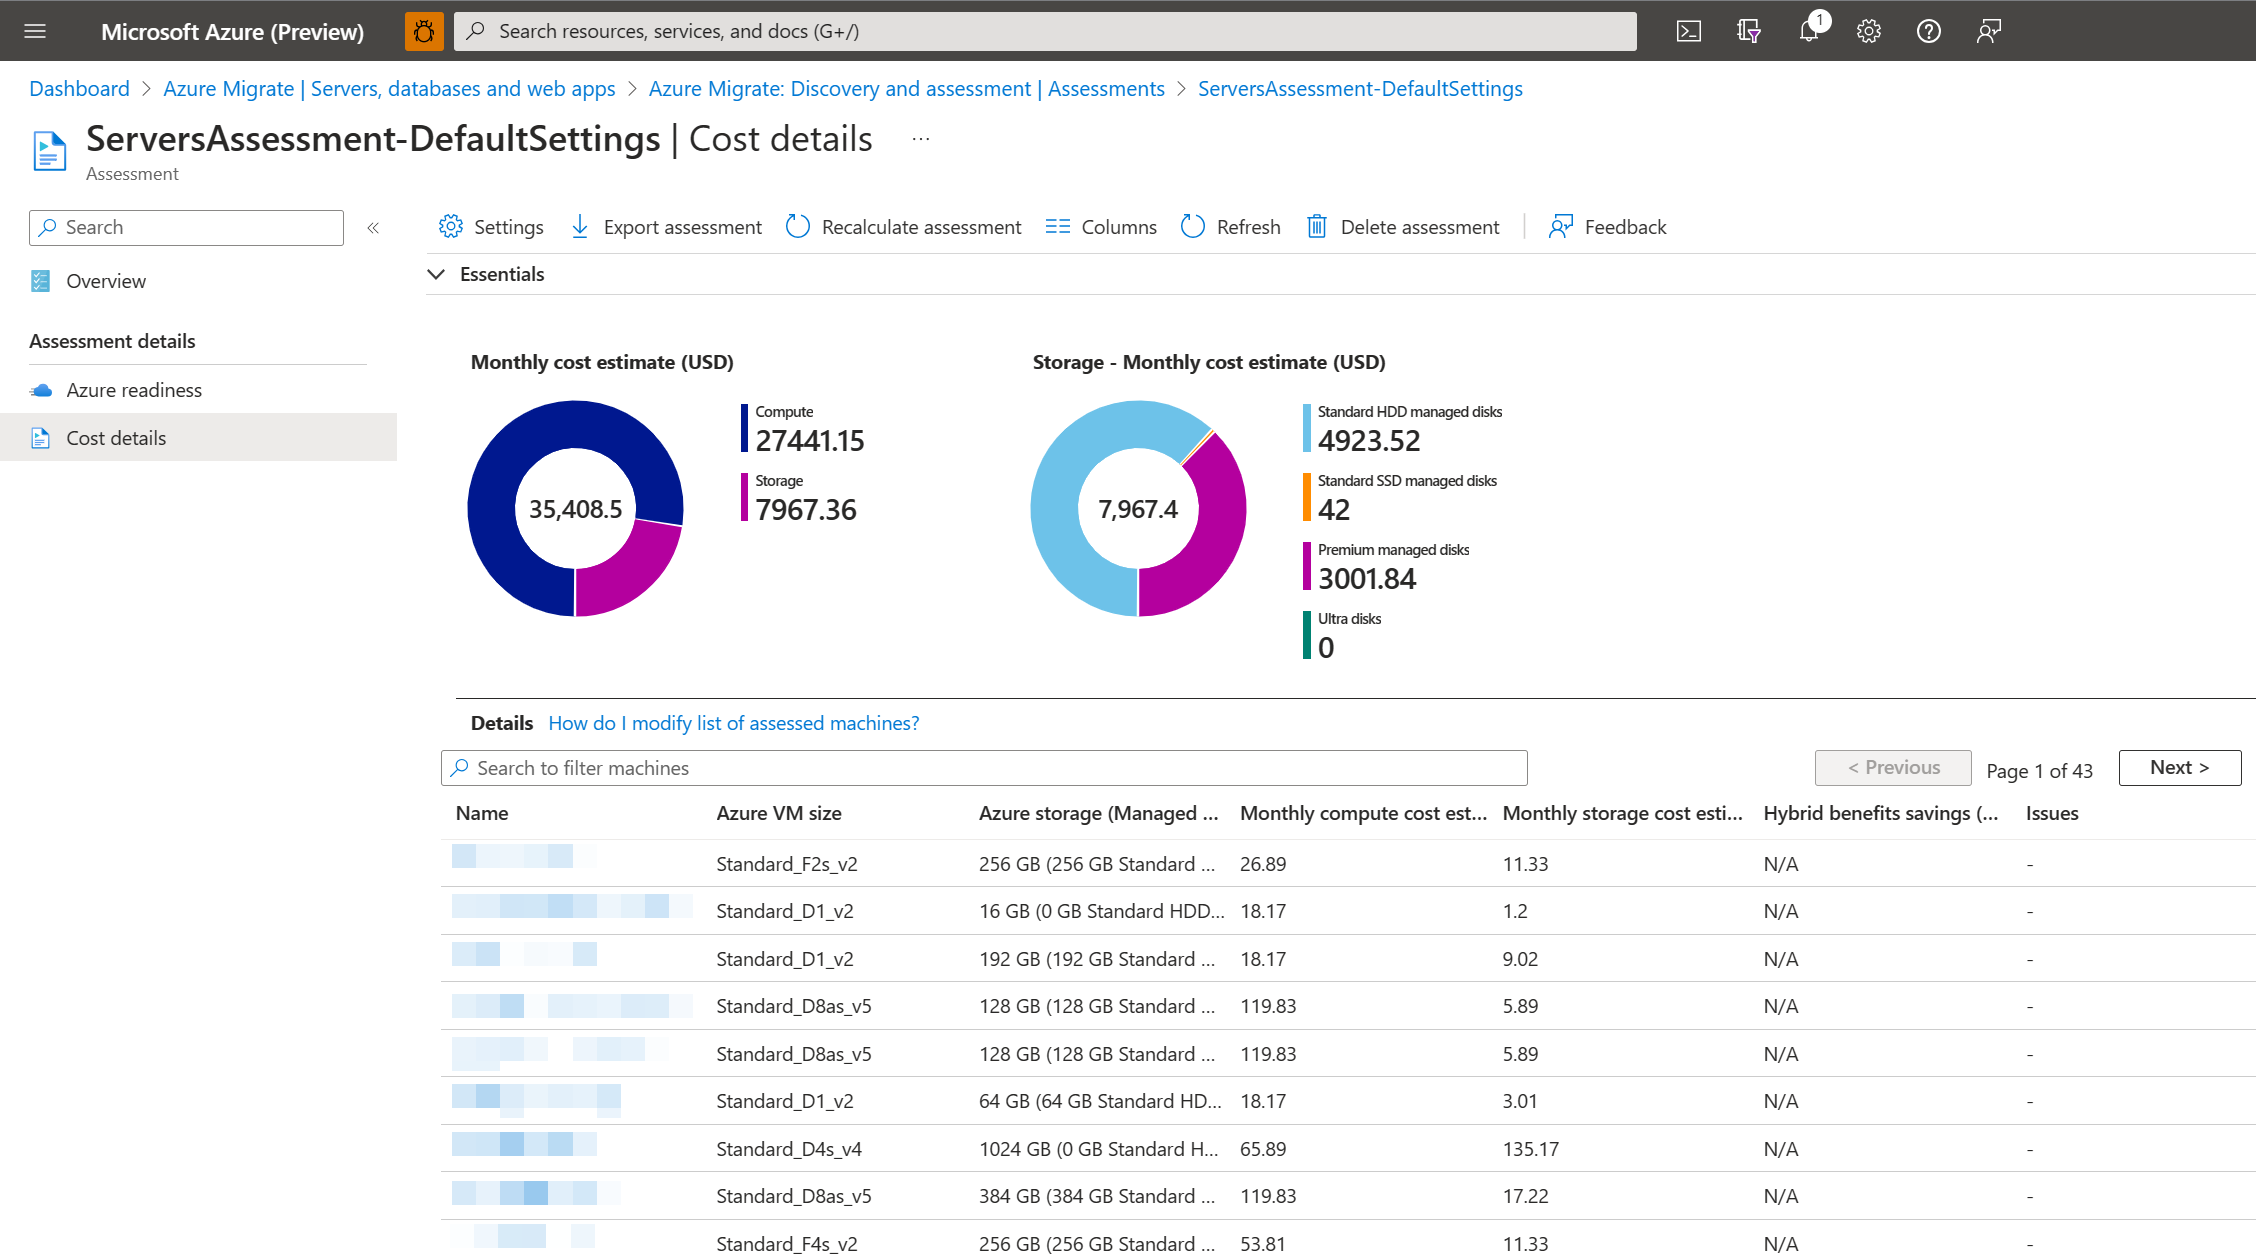
Figure 1: Diagram of the cost details view of an assessment in Azure Migrate.
Many businesses underestimate how complex data transfer can be. Reliable Data Migration Services ensure everything moves safely without downtime.
ReplyDelete