Oracle 19c RAC installation On Oracle Linux 8 Step by Step
Summary
To install and configure Oracle GI 19cRU7 on
the two database nodes:
----------------------------------------------------------------
1) Extract LINUX.X64_193000_grid_home.zip in
the first database node.
2) Set the operating system environment
variable $CV_ASSUME_DISTID=OL7
and install the Oracle GI 19c base version to
the Oracle GI home of the first node by running: $gridSetup.sh.
3) upgrade the Opatch utility from 12_2.0.1.17 to 12.2.0.1.19 using 6880880
4) Apply patch p30189609 to the Oracle GI home
for bug 30189609.8: cvu fails to detect the passwordless ssh and to set up
passwordless SSH connectivity.
5) Extract the
p30783556_190000_Linux-x86-64.zip combination patch, which includes both the
30899722 and 30805684 patches.
Apply patch 30899722 to the Oracle GI 19c home
to upgrade it from the 19c base version to 19cRU7 by following the instructions
in Doc ID 30899722.8.
6) Install and configure the upgraded Oracle
GI 19cRU7 by running the following command: $gridSetup.sh
7) Click Configure Oracle Grid Infrastructure
for a New Cluster and select both nodes.
8) If you continue to experience the error
[INS-06003} Failed to setup passwordless SSH connectivity, create the
passwordless SSH manually by running a command such as:
$ORACLH_HOME/deinstall/sshUserSetup.sh -user
grid -hosts "hostname1 hostname2" " -noPromptPassphrase -confirm
-advanced
Note : The 19.3 software was released before
OL8 was certified, so it's not on the list of valid distributions.
You can get round this by faking the
distribution with the following environment variable.
export CV_ASSUME_DISTID=OEL7.6
Install Oracle RAC Database 19cRU7
--------------------------
To install and configure Oracle RAC 19cRU7:
1) After extracting Oracle RAC 19c base
version, install the base software by setting the environment variable
$export
CV_ASSUME_DISTID=OL7 and running the runInstaller command.
2) During the SSH connectivity check phase, if
you experience an error message such as [INS-30132] Initial setup required for
the execution of Installer validation failed on nodes: node2,
manually create the passwordless SSH
connectivity by running a command such as:
$ORACLE_HOME/deinstall//sshUserSetup.sh -user
oracle -hosts "node11 node2" -noPromptPassphrase -confirm -advanced
3) Select Reuse private and public keys
existing in the user home and click Test.
4) Click OK and continue with the Oracle RAC
software installation.
5) Follow the instructions in the patch
6880880 readme file to apply the patch the Oracle RAC home on each RAC node to
upgrade the Opatch utility from 12_2.0.1.17 to 12.2.0.1.19.
6) Apply the patch to upgrade the Oracle RAC
home from 19c base version to 19cRU7 by following the instructions in Oracle
Support Document 30899722.8.
Run
the opatchauto command as the Linux root user on each RAC node.
7) Follow the instructions in the 30805684
readme file to apply the patch to Oracle RAC home on each node.
1. Hardware
Requirements
The first thing we need to verify the hardware
requirements for an Oracle 19c Release 3
— Check Physical RAM.
# grep MemTotal /proc/meminfo
We need at least 8192 MB of physical RAM.
<----
— Check Swap Space.
# grep SwapTotal /proc/meminfo/*
RAM up to 1024MB then swap = 2 times the size
of RAM
RAM between 2049MB and 8192MB then swap =
equal to the size of RAM
RAM more than 8192MB then swap size = 0.75
times the size of RAM
We need at least 8192 MB of swap <----
-– Check space available in /tmp
# df -h /tmp/*
You need to have at least 2048 MB of space in
the /tmp directory. <---
-– Check space for Oracle Software and
pre-configured database.
# df -h
Space requirement for Oracle 19c Software:
Enterprise Edition 10G <---- Minimum
[oracle@rac1 19.0.0]$ du -sh dbhome_1
9.9G
dbhome_1
[oracle@rac1 19.0.0]$
—- To determine whether the system
architecture can run the software, enter the following command:
# grep "model name" /proc/cpuinfo
This command displays the processor type.
Verify that the processor architecture matches the Oracle software release that
you want to install. If you do not see the expected output, then you cannot
install the software on this system.
2. Verify OS version
[oracle@rac1 ~]$ cat /etc/redhat-release
Red Hat Enterprise Linux Server release 7.5
[oracle@rac1 ~]$
3. Download Software
Download the Oracle software from OTN or MY
ORACLE SUPPORT (MOS).
Software image/patch name Description
---------------------------------------------------
LINUX.X64_193000_grid_home.zip Oracle GI 19c base software
19.3
p6880880_200000_Linux-x86-64.zip Patch 6880880
p30189609_195000OCWRU_Linux-x86-64.zip Patch 30189609
LINUX.X64_193000_db_home.zip Oracle RAC 19c base software
19.3
p30783556_190000_Linux-x86-64.zip Patch 307835556 combo that includes
both patch P30899722 and P30805684
To verify the network
ping -c 2 easydb1
ping -c 2 easydb2
ping -c 2 easydb1-priv
ping -c 2 easydb2-priv
[root@easydb1 ~]# nslookup easydb-scan
Server: 192.168.24.1
Address: 192.168.24.1#53
Name: easydb-scan.localdomain
Address: 192.168.24.43
Name: easydb-scan.localdomain
Address: 192.168.24.41
Name: easydb-scan.localdomain
Address: 192.168.24.42
Copy the oracle 19c grid
software using shared folder
[root@easydb1 19c]#
pwd/media/sf_oracle_software/19c
[root@easydb1 19c]# cp LINUX.X64_193000_grid_home.zip /u01/app/19c/grid/
[root@easydb1 19c]#unzip LINUX.X64_193000_grid_home.zip
Install the package cvudisk
from the grid home as the “root” user on all nodes.
1st Node
[root@easydb1 grid]#
cd /u01/app/19c/grid/cv/rpm
[root@easydb1 rpm]# rpm -Uvh cvuqdisk*
Preparing… ################################# [100%]
Using default group oinstall to install package
Updating / installing…
1:cvuqdisk-1.0.10-1 ################################# [100%]
2nd Node
scp ./cvuqdisk* root@easydb2:/tmp
ssh root@easydb2 rpm -Uvh /tmp/cvuqdisk*
Configure Oracle ASM
fdisk -l check before
formatting
[root@easydb1 ~]# fdisk /dev/sdb
Welcome to fdisk
(util-linux 2.23.2).
Changes will remain in memory only, until you decide to write them.
Be careful before using the write command.
Device does not contain a recognized partition table
Building a new DOS disklabel with disk identifier 0xd0e0d61b.
Command (m for help): n
Partition type:
p primary (0 primary, 0 extended, 4 free)
e extended
Select (default p): p
Partition number (1-4, default 1):
First sector (2048-25165823, default 2048):
Using default value 2048
Last sector, +sectors or +size{K,M,G} (2048-25165823, default 25165823):
Using default value 25165823
Partition 1 of type Linux and of size 12 GiB is set
Command (m for help): w
The partition table has been altered!
Calling ioctl() to re-read partition table.
Syncing disks.
[root@easydb1
~]# fdisk /dev/sdc
Welcome to fdisk
(util-linux 2.23.2).
Changes will remain in memory only, until you decide to write them.
Be careful before using the write command.
Device does not contain a recognized partition table
Building a new DOS disklabel with disk identifier 0x6c7dc5e4.
Command (m for help): n
Partition type:
p primary (0 primary, 0 extended, 4 free)
e extended
Select (default p): p
Partition number (1-4, default 1):
First sector (2048-73400319, default 2048):
Using default value 2048
Last sector, +sectors or +size{K,M,G} (2048-73400319, default 73400319):
Using default value 73400319
Partition 1 of type Linux and of size 35 GiB is set
Command (m for help): w
The partition table has been altered!
Calling ioctl() to re-read partition table.
Syncing disks.
Configure oracleasm utility.
[root@easydb1
grid]# /usr/sbin/oracleasm configure
-i
Configuring the Oracle
ASM library driver.
This will configure the on-boot properties of the Oracle ASM library
driver. The following questions will determine whether the driver is
loaded on boot and what permissions it will have. The current values
will be shown in brackets (‘[]’). Hitting <ENTER> without typing an
answer will keep that current value. Ctrl-C will abort.
Default user to own the driver interface []: oracle
Default group to own the driver interface []: oinstall
Start Oracle ASM library driver on boot (y/n) [n]: y
Scan for Oracle ASM disks on boot (y/n) [y]: y
Writing Oracle ASM library driver configuration: done
This can be verified using:-
[root@easydb1 grid]# /usr/sbin/oracleasm configure
ORACLEASM_ENABLED=true
ORACLEASM_UID=oracle
ORACLEASM_GID=oinstall
ORACLEASM_SCANBOOT=true
ORACLEASM_SCANORDER=””
ORACLEASM_SCANEXCLUDE=””
ORACLEASM_SCAN_DIRECTORIES=””
ORACLEASM_USE_LOGICAL_BLOCK_SIZE=”false”
Initialize the asmlib with the
oracleasm init command to load oracleasm module and mount the oracleasm
filesystem:-
[root@easydb1
grid]# /usr/sbin/oracleasm init
Creating /dev/oracleasm mount point: /dev/oracleasm
Loading module “oracleasm”: oracleasm
Configuring “oracleasm” to use device physical block size
Mounting ASMlib driver filesystem: /dev/oracleasm
When ASMLIB is configured, a
special file system is created and mounted as /dev/oracleasm, you should notice
the following line from the df command:-
[root@easydb1
grid]# df -ha | grep oracle
oracle_software 931G 315G 617G 34% /media/sf_oracle_software
oracleasmfs 0 0 0 – /dev/oracleasm
[root@easydb1
grid]# oracleasm createdisk
ASMDISK_DATA /dev/sdb1
Writing disk header: done
Instantiating disk: done
[root@easydb1 grid]# oracleasm
createdisk ASMDISK_OCR /dev/sdc1
Writing disk header: done
Instantiating disk: done
[root@easydb1 grid]# cd /dev/oracleasm/disks
[root@easydb1 disks]# ls -lrt
total 0
brw-rw—-. 1 oracle oinstall 8, 17 Dec 31 11:13 ASMDISK_DATA
brw-rw—-. 1 oracle oinstall 8, 33 Dec 31 11:13 ASMDISK_OCR
[root@easydb1
disks]# oracleasm scandisks
Reloading disk partitions: done
Cleaning any stale ASM disks…
Scanning system for ASM disks…
[root@easydb1
disks]# oracleasm listdisks
ASMDISK_DATA
ASMDISK_OCR
Node 2
[root@easydb2 grid]# /usr/sbin/oracleasm
configure -i
Configuring the Oracle
ASM library driver.
This will configure the on-boot properties of the Oracle ASM library
driver. The following questions will determine whether the driver is
loaded on boot and what permissions it will have. The current values
will be shown in brackets (‘[]’). Hitting <ENTER> without typing an
answer will keep that current value. Ctrl-C will abort.
Default user to own the driver interface []: oracle
Default group to own the driver interface []: oinstall
Start Oracle ASM library driver on boot (y/n) [n]: y
Scan for Oracle ASM disks on boot (y/n) [y]: y
Writing Oracle ASM library driver configuration: done
[root@easydb2 grid]# /usr/sbin/oracleasm
init
Creating /dev/oracleasm mount point: /dev/oracleasm
Loading module “oracleasm”: oracleasm
Configuring “oracleasm” to use device physical block size
Mounting ASMlib driver filesystem: /dev/oracleasm
[root@easydb2
grid]# oracleasm scandisks
Reloading disk partitions: done
Cleaning any stale ASM disks…
Scanning system for ASM disks…
Instantiating disk “ASMDISK_OCR”
Instantiating disk “ASMDISK_DATA”
[root@easydb2
grid]# oracleasm listdisks
ASMDISK_DATA
ASMDISK_OCR
Configure SSH Setup
[oracle@easydb1
deinstall]$ pwd
/u01/app/19c/grid/deinstall
[oracle@easydb1 deinstall]$ ./sshUserSetup.sh -user oracle -hosts “easydb1 easydb2”
-noPromptPassphrase -confirm -advanced
Pre-check for RAC Setup
Pre-check for CRS installation
using Cluvfy
We use this Cluvfy
command to check that our cluster is ready for the Grid install.
[oracle@easydb1 grid]$
./runcluvfy.sh stage -pre crsinst -n easydb1,easydb2 -verbose
Display Config and Start Grid
Installation
su –
export DISPLAY=:0.0
xhost +
su – oracle
[oracle@easydb1 ~]$ DISPLAY=easydb1.localdomain:0.0; export DISPLAY
Install and Configure Oracle 19c Grid
Infrastructure for a Cluster
[oracle@easydb1 ~]$ cd
/u01/app/19c/grid/
[oracle@easydb1 grid]$
./gridSetup.sh
Launching Oracle Grid Infrastructure Setup Wizard…
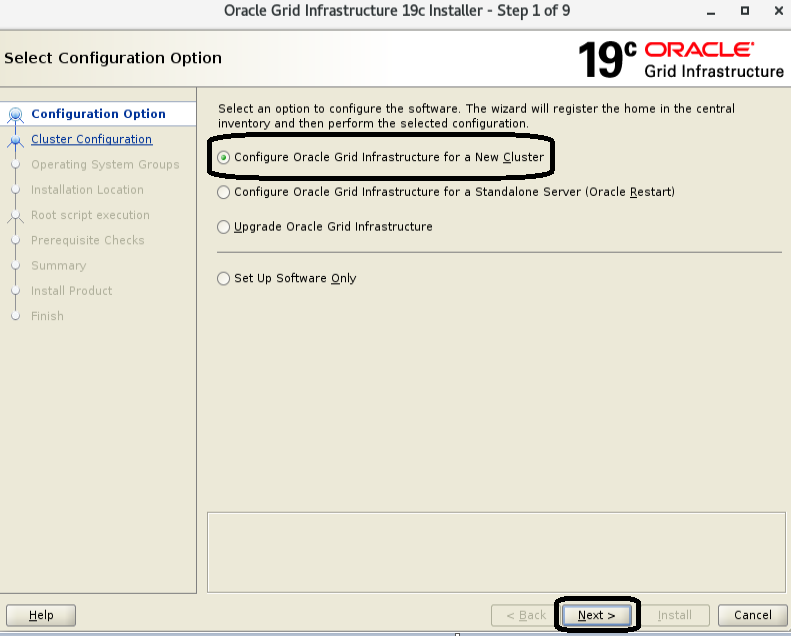
Select the Configure Oracle
Grid Infrastructure for a New Cluster option, then click the Next button.

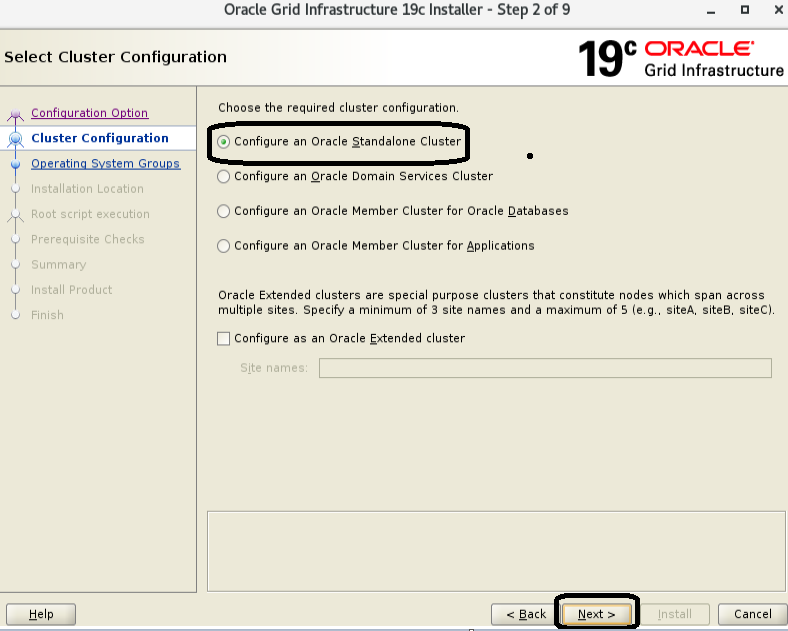
Accept the Configure an Oracle
Standalone Cluster option by clicking the Next button.

Enter the cluster name easydb-cluster,
SCAN name easydb-scan and SCAN port 1521, then click the Next button.

On the “Cluster Node
Information” screen, click the Add button.
Enter the details of the second
node in the cluster, then click the OK button.
Click the SSH connectivity
button and enter the password for the oracle user. Click the Setup button to
configure SSH connectivity, and the Test button to test it once it is complete.
Once the test is complete, click the Next button.
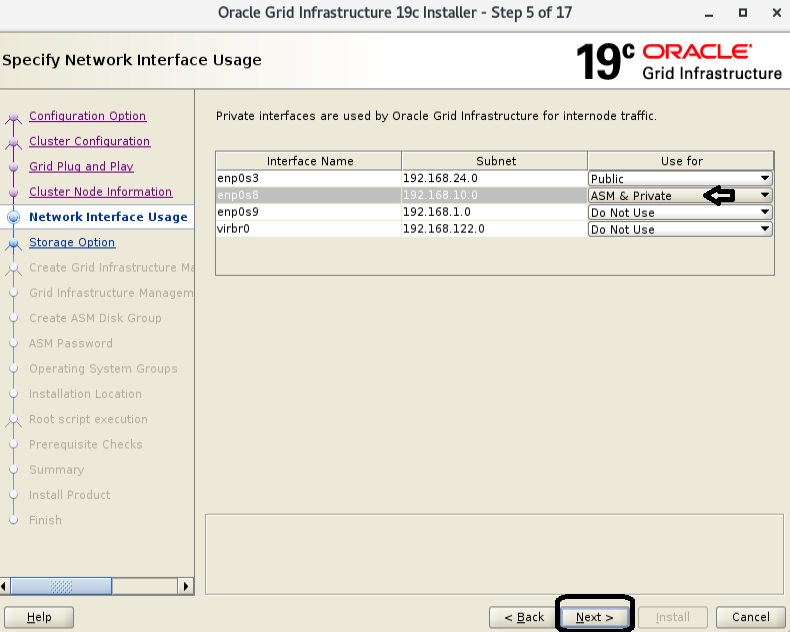
Check the public and private
networks are specified correctly as ASM & Private. Click the Next button.

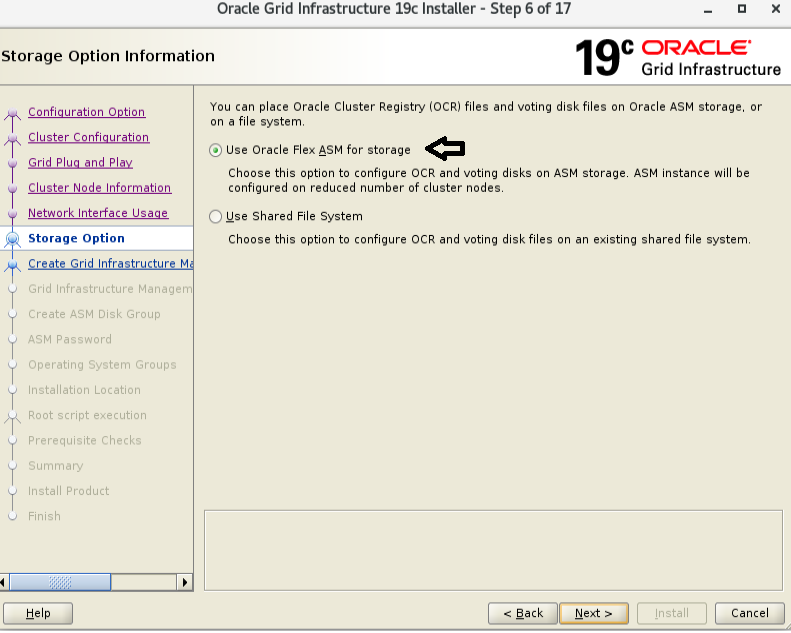
Accept the Use Oracle Flex ASM
for Storage option by clicking the Next button.

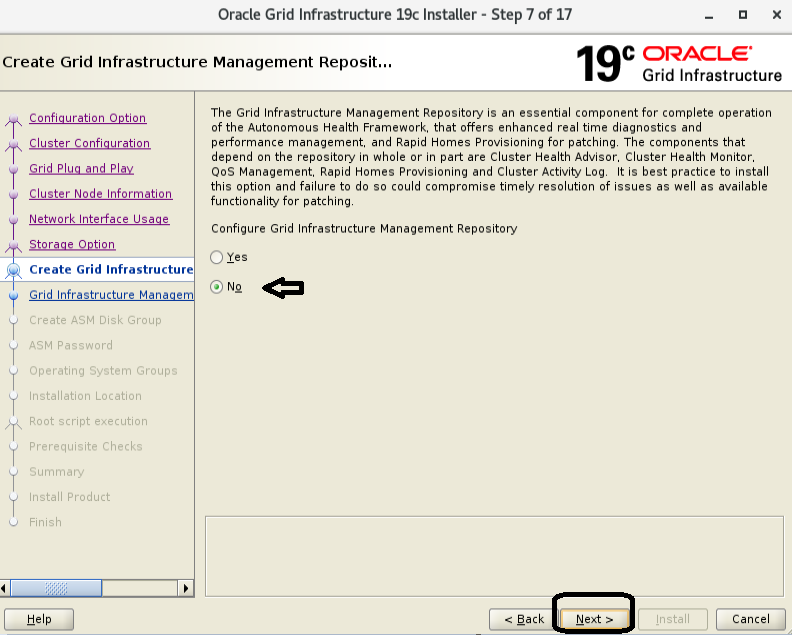
0r

Select the No option, as we
don’t want to create a separate disk group for the GIMR in this case. Click the
Next button.

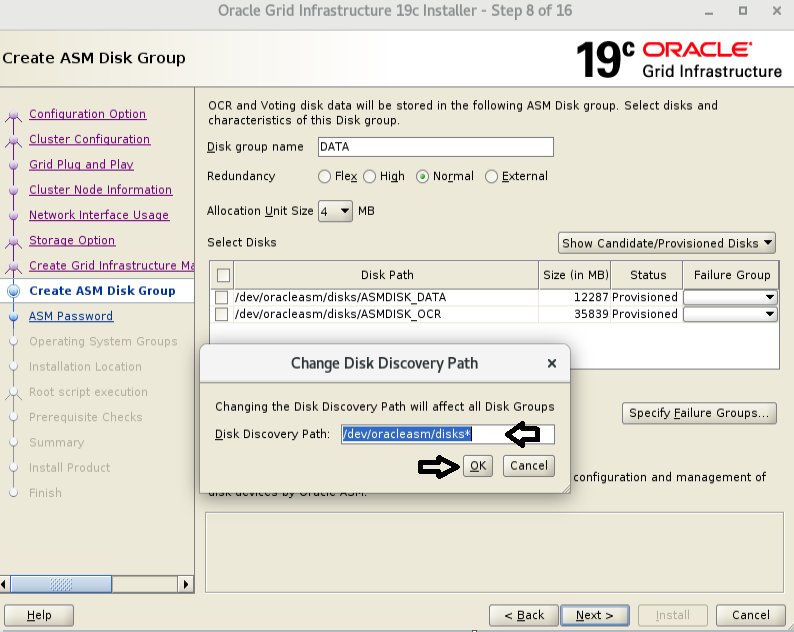
First Browse the path
/dev/oracleasm/disks* using change discovery path

Set the redundancy to External,
click the 12GB DISK for OCR configuration, then click the Next button.

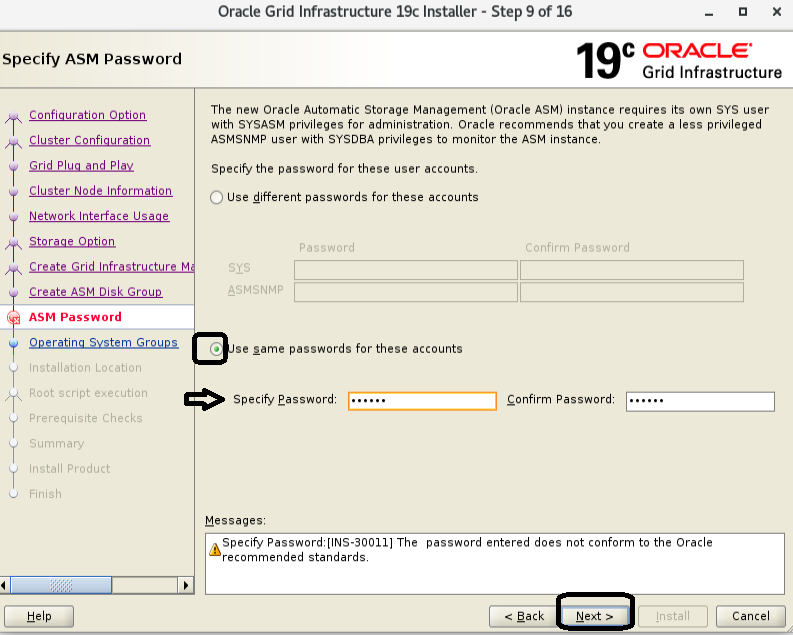
Enter the credentials and click
the Next button.

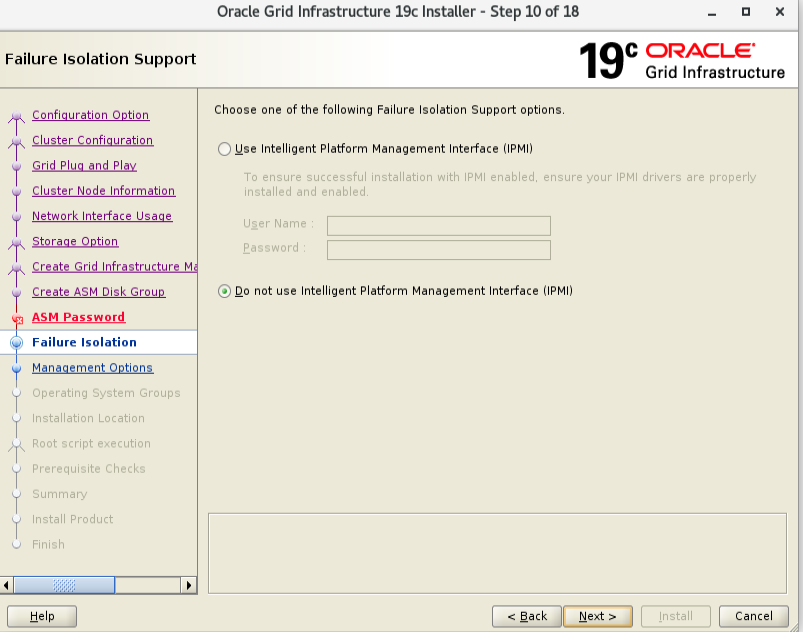
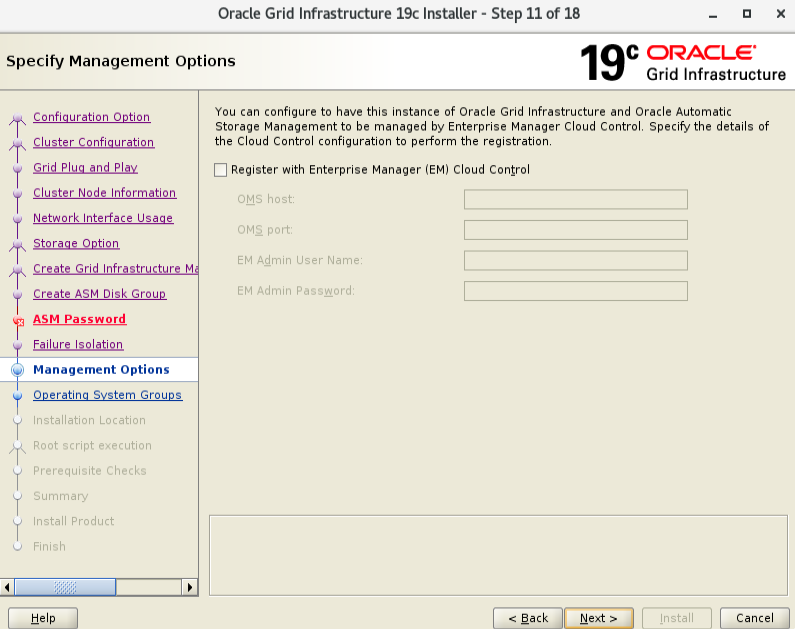
Accept the default IPMI option
by clicking the Next button.

Deselect EM. Click the Next
button.

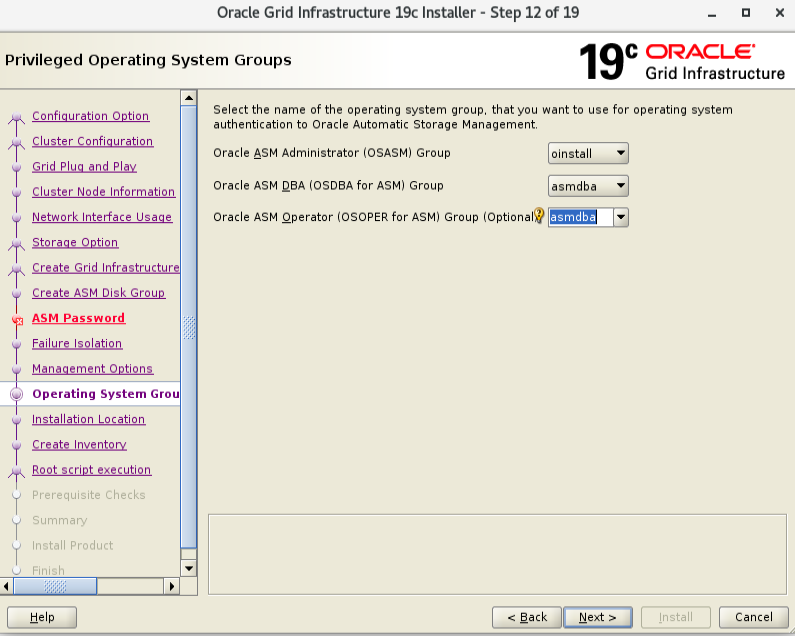
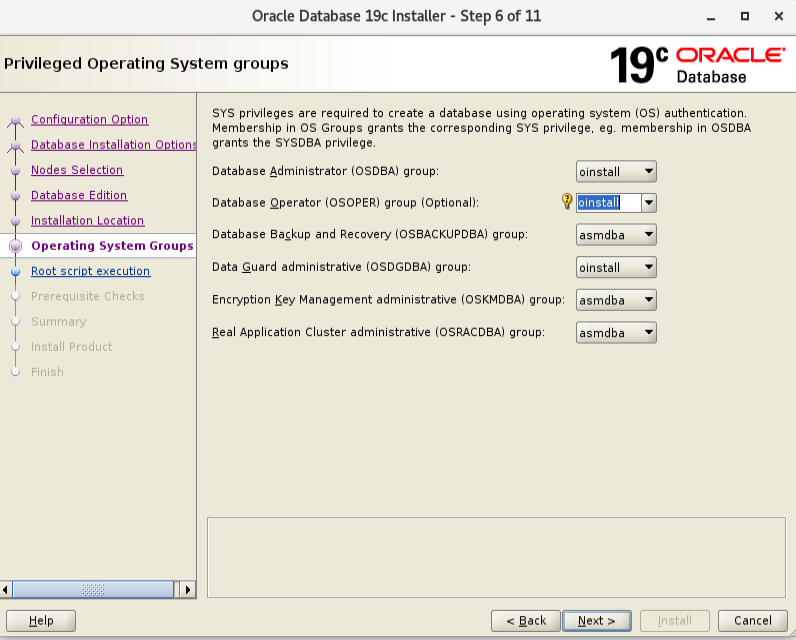
Set the groups to oinstall and
click the Next button. Accept the warnings on the subsequent dialog by clicking
the Yes button.

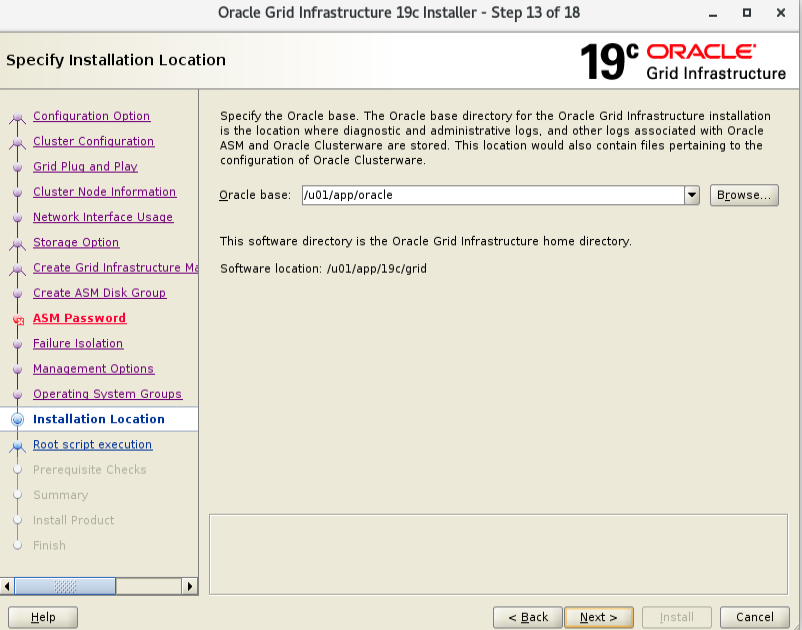
Click the Next button.

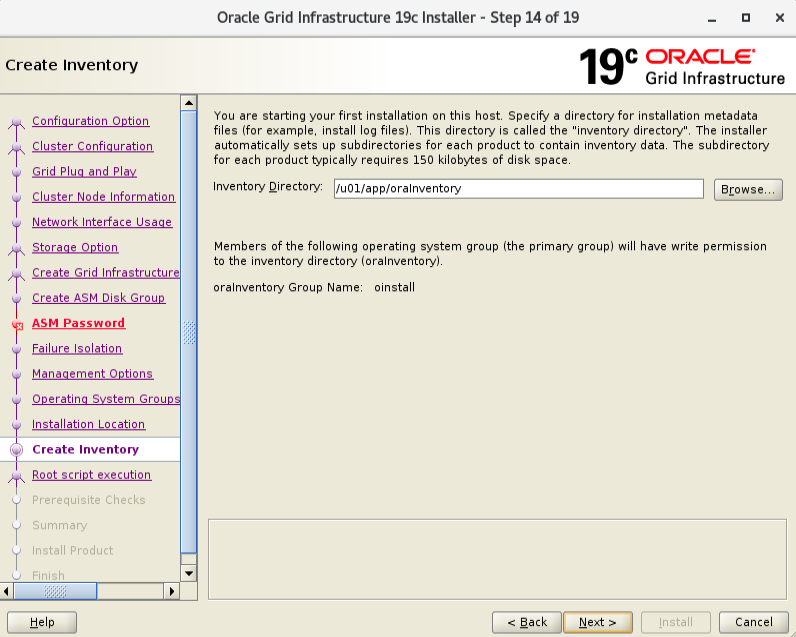
Accept the default inventory
directory by click the Next button

Click the Next button.

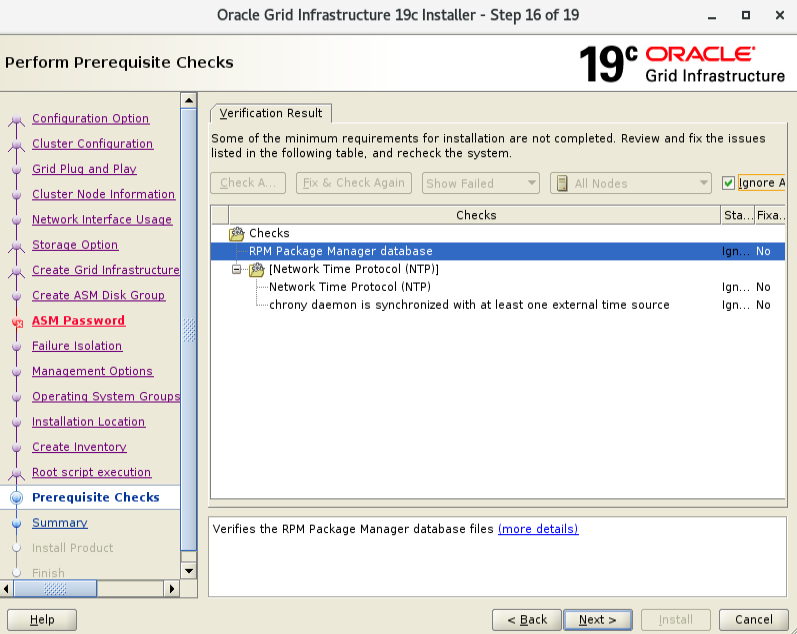
Check the Ignore All checkbox
and click the Next button.

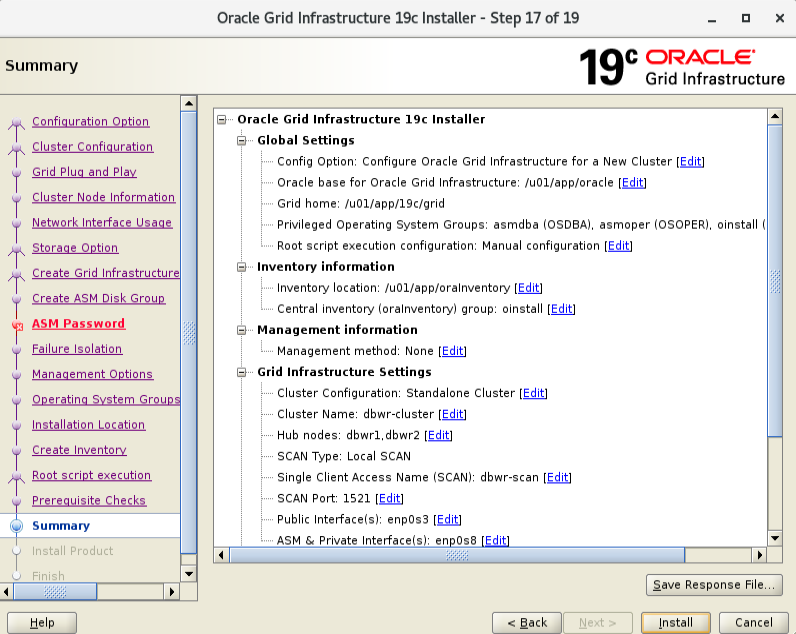
Double check and click the
Install button.
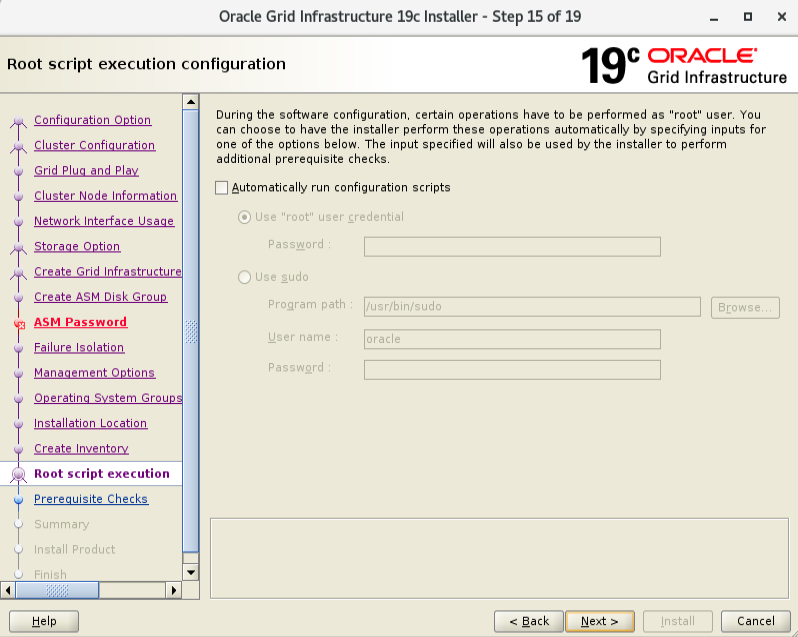
When prompted, run the
configuration scripts on each node one by one
Node 1
[root@easydb1
run]# /u01/app/oraInventory/orainstRoot.sh
Changing permissions of /u01/app/oraInventory.
Adding read,write permissions for group.
Removing read,write,execute permissions for world.
Changing groupname of /u01/app/oraInventory to oinstall.
The execution of the script is complete.
Node 2
[root@easydb2 grid]#
/u01/app/oraInventory/orainstRoot.sh
Changing permissions of /u01/app/oraInventory.
Adding read,write permissions for group.
Removing read,write,execute permissions for world.
Changing groupname of /u01/app/oraInventory to oinstall.
The execution of the script is complete.
Node 1
[root@easydb1 run]#
/u01/app/19c/grid/root.sh
Performing root user operation.
The following environment variables are set as:
ORACLE_OWNER= oracle
ORACLE_HOME= /u01/app/19c/grid
Enter the full pathname of the local bin directory: [/usr/local/bin]:
Copying dbhome to /usr/local/bin …
Copying oraenv to /usr/local/bin …
Copying coraenv to /usr/local/bin …
Creating /etc/oratab file…
Entries will be added to the /etc/oratab file as needed by
Database Configuration Assistant when a database is created
Finished running generic part of root script.
Now product-specific root actions will be performed.
Relinking oracle with rac_on option
Using configuration parameter file:
/u01/app/19c/grid/crs/install/crsconfig_params
The log of current session can be found at:
/u01/app/oracle/crsdata/easydb1/crsconfig/rootcrs_easydb1_2019-12-31_03-04-07PM.log
2019/12/31 15:05:54 CLSRSC-594: Executing installation step 1 of 19:
‘SetupTFA’.
2019/12/31 15:05:54 CLSRSC-594: Executing installation step 2 of 19:
‘ValidateEnv’.
2019/12/31 15:05:54 CLSRSC-363: User ignored prerequisites during installation
2019/12/31 15:05:55 CLSRSC-594: Executing installation step 3 of 19:
‘CheckFirstNode’.
2019/12/31 15:06:02 CLSRSC-594: Executing installation step 4 of 19:
‘GenSiteGUIDs’.
2019/12/31 15:06:06 CLSRSC-594: Executing installation step 5 of 19:
‘SetupOSD’.
2019/12/31 15:06:06 CLSRSC-594: Executing installation step 6 of 19:
‘CheckCRSConfig’.
2019/12/31 15:06:07 CLSRSC-594: Executing installation step 7 of 19:
‘SetupLocalGPNP’.
2019/12/31 15:08:34 CLSRSC-4002: Successfully installed Oracle Trace File
Analyzer (TFA) Collector.
2019/12/31 15:08:39 CLSRSC-594: Executing installation step 8 of 19:
‘CreateRootCert’.
2019/12/31 15:08:58 CLSRSC-594: Executing installation step 9 of 19:
‘ConfigOLR’.
2019/12/31 15:09:36 CLSRSC-594: Executing installation step 10 of 19:
‘ConfigCHMOS’.
2019/12/31 15:09:36 CLSRSC-594: Executing installation step 11 of 19:
‘CreateOHASD’.
2019/12/31 15:09:50 CLSRSC-594: Executing installation step 12 of 19:
‘ConfigOHASD’.
2019/12/31 15:09:51 CLSRSC-330: Adding Clusterware entries to file
‘oracle-ohasd.service’
2019/12/31 15:12:06 CLSRSC-594: Executing installation step 13 of 19:
‘InstallAFD’.
2019/12/31 15:12:21 CLSRSC-594: Executing installation step 14 of 19:
‘InstallACFS’.
2019/12/31 15:14:34 CLSRSC-594: Executing installation step 15 of 19:
‘InstallKA’.
2019/12/31 15:14:48 CLSRSC-594: Executing installation step 16 of 19:
‘InitConfig’.
ASM has been created and started successfully.
[DBT-30001] Disk groups created successfully. Check
/u01/app/oracle/cfgtoollogs/asmca/asmca-191231PM031547.log for details.
2019/12/31 15:22:26 CLSRSC-482: Running command:
‘/u01/app/19c/grid/bin/ocrconfig -upgrade oracle oinstall’
CRS-4256: Updating the profile
Successful addition of voting disk 9dbe409170c24f0abf8890b6ff79694c.
Successfully replaced voting disk group with +OCR_DISK.
CRS-4256: Updating the profile
CRS-4266: Voting file(s) successfully replaced
## STATE File Universal Id File Name Disk group
— —– —————– ——— ———
1. ONLINE 9dbe409170c24f0abf8890b6ff79694c (/dev/oracleasm/disks/ASMDISK_DATA)
[OCR_DISK]
Located 1 voting disk(s).
2019/12/31 15:26:21 CLSRSC-594: Executing installation step 17 of 19:
‘StartCluster’.
2019/12/31 15:29:07 CLSRSC-343: Successfully started Oracle Clusterware stack
2019/12/31 15:29:08 CLSRSC-594: Executing installation step 18 of 19:
‘ConfigNode’.
2019/12/31 15:36:21 CLSRSC-594: Executing installation step 19 of 19:
‘PostConfig’.
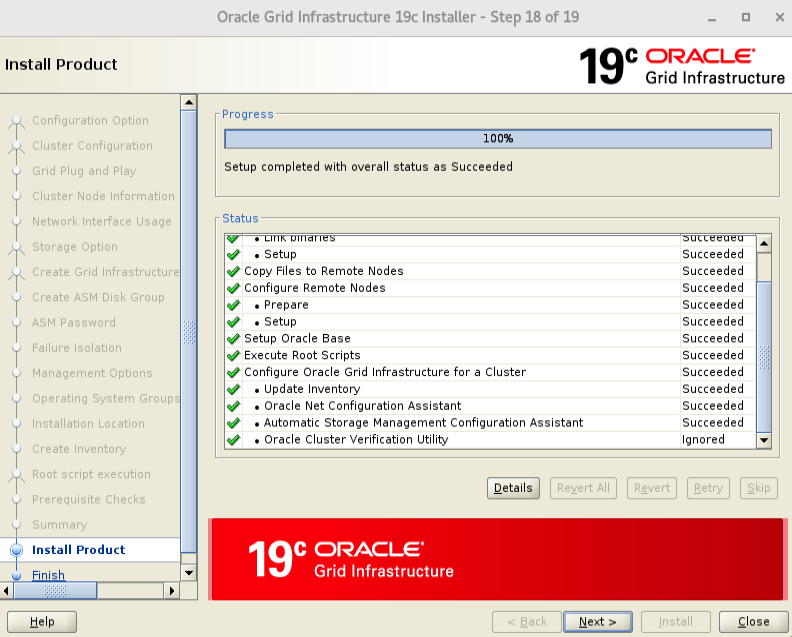
2019/12/31 15:38:35 CLSRSC-325: Configure Oracle Grid Infrastructure for a
Cluster … succeeded
Node 2
[root@easydb2 grid]#
/u01/app/19c/grid/root.sh
Performing root user operation.
The following environment variables are set as:
ORACLE_OWNER= oracle
ORACLE_HOME= /u01/app/19c/grid
Enter the full pathname of the local bin directory: [/usr/local/bin]:
Copying dbhome to /usr/local/bin …
Copying oraenv to /usr/local/bin …
Copying coraenv to /usr/local/bin …
Creating /etc/oratab file…
Entries will be added to the /etc/oratab file as needed by
Database Configuration Assistant when a database is created
Finished running generic part of root script.
Now product-specific root actions will be performed.
Relinking oracle with rac_on option
Using configuration parameter file:
/u01/app/19c/grid/crs/install/crsconfig_params
The log of current session can be found at:
/u01/app/oracle/crsdata/easydb2/crsconfig/rootcrs_easydb2_2019-12-31_03-39-53PM.log
2019/12/31 15:42:39 CLSRSC-594: Executing installation step 1 of 19:
‘SetupTFA’.
2019/12/31 15:42:39 CLSRSC-594: Executing installation step 2 of 19:
‘ValidateEnv’.
2019/12/31 15:42:39 CLSRSC-363: User ignored prerequisites during installation
2019/12/31 15:42:39 CLSRSC-594: Executing installation step 3 of 19:
‘CheckFirstNode’.
2019/12/31 15:42:44 CLSRSC-594: Executing installation step 4 of 19:
‘GenSiteGUIDs’.
2019/12/31 15:42:45 CLSRSC-594: Executing installation step 5 of 19:
‘SetupOSD’.
2019/12/31 15:42:45 CLSRSC-594: Executing installation step 6 of 19:
‘CheckCRSConfig’.
2019/12/31 15:42:48 CLSRSC-594: Executing installation step 7 of 19:
‘SetupLocalGPNP’.
2019/12/31 15:42:53 CLSRSC-594: Executing installation step 8 of 19:
‘CreateRootCert’.
2019/12/31 15:42:53 CLSRSC-594: Executing installation step 9 of 19:
‘ConfigOLR’.
2019/12/31 15:43:19 CLSRSC-594: Executing installation step 10 of 19:
‘ConfigCHMOS’.
2019/12/31 15:43:20 CLSRSC-594: Executing installation step 11 of 19:
‘CreateOHASD’.
2019/12/31 15:43:25 CLSRSC-594: Executing installation step 12 of 19:
‘ConfigOHASD’.
2019/12/31 15:43:25 CLSRSC-330: Adding Clusterware entries to file
‘oracle-ohasd.service’
2019/12/31 15:44:10 CLSRSC-4002: Successfully installed Oracle Trace File
Analyzer (TFA) Collector.
2019/12/31 15:48:30 CLSRSC-594: Executing installation step 13 of 19:
‘InstallAFD’.
2019/12/31 15:48:34 CLSRSC-594: Executing installation step 14 of 19:
‘InstallACFS’.
2019/12/31 15:50:39 CLSRSC-594: Executing installation step 15 of 19:
‘InstallKA’.
2019/12/31 15:50:43 CLSRSC-594: Executing installation step 16 of 19:
‘InitConfig’.
2019/12/31 15:51:37 CLSRSC-594: Executing installation step 17 of 19:
‘StartCluster’.
2019/12/31 15:53:16 CLSRSC-343: Successfully started Oracle Clusterware stack
2019/12/31 15:53:16 CLSRSC-594: Executing installation step 18 of 19:
‘ConfigNode’.
2019/12/31 15:54:16 CLSRSC-594: Executing installation step 19 of 19:
‘PostConfig’.
2019/12/31 15:55:00 CLSRSC-325: Configure Oracle Grid Infrastructure for a
Cluster … succeeded
Once the scripts have
completed, return to the Execute Configuration Scripts screen and click the OK
button.
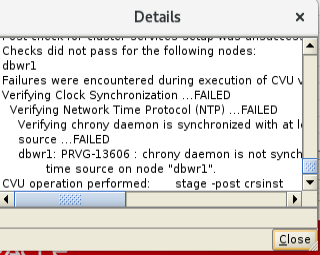
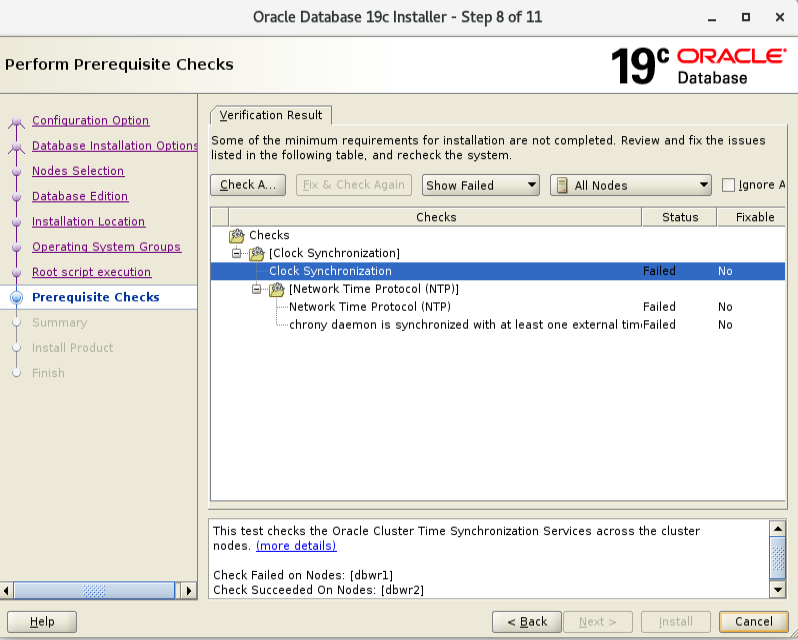
Grid Installation is
complete. Ignore the NTP error.


Install and Configure Oracle 19c Software
binary
[oracle@easydb1]$ .
db.env
[oracle@easydb1 dbhome_1]$ unzip LINUX.X64_193000_db_home.zip
[oracle@easydb1 dbhome_1]$ ./runInstaller
Launching Oracle Database Setup Wizard…
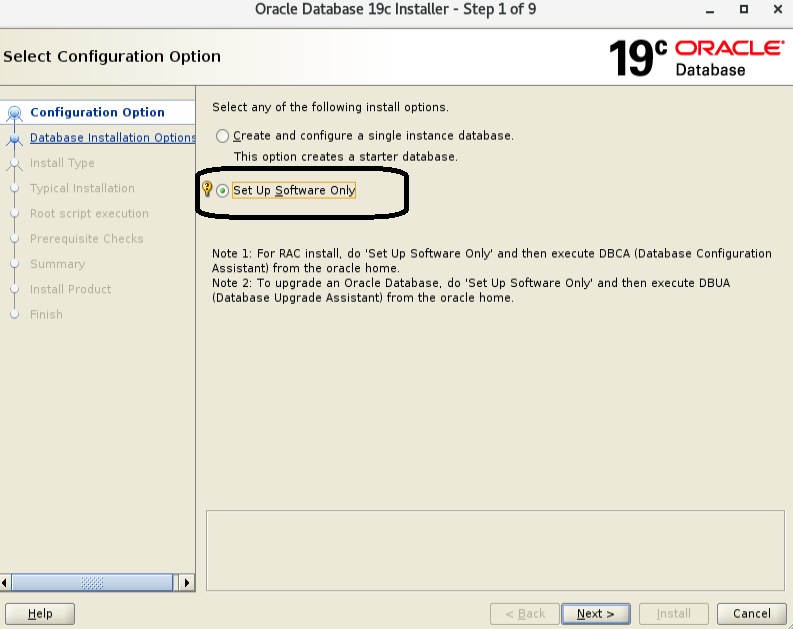
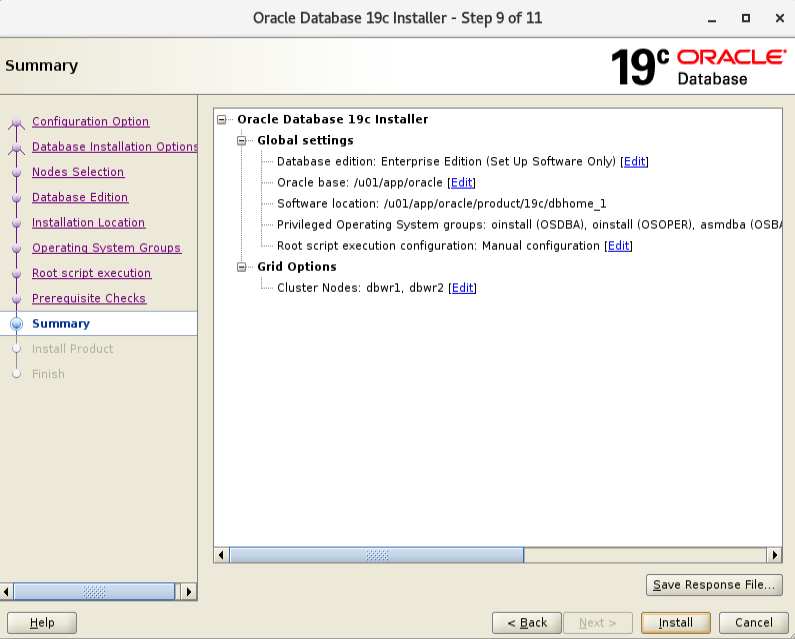
Select the setup software only
option, then click the Next button.

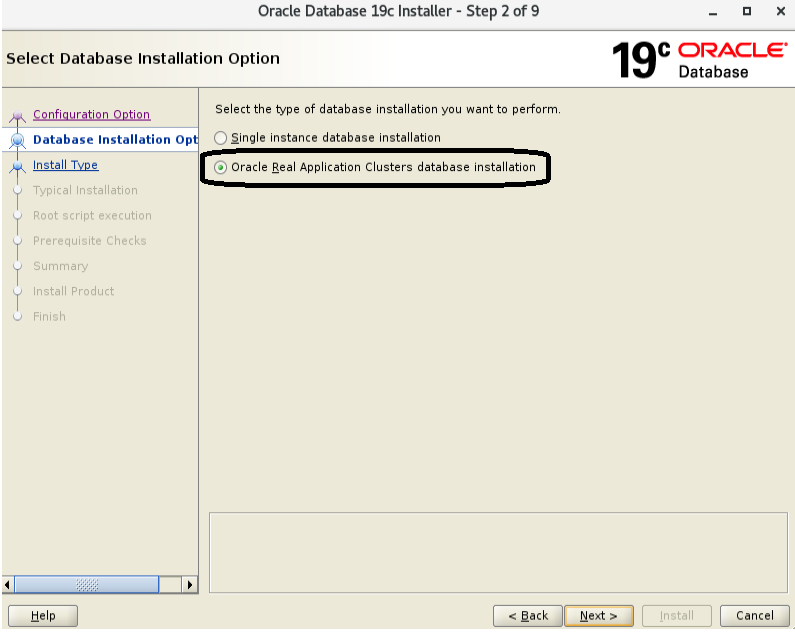
Accept the Oracle Real
Application Clusters database installation option by clicking the Next button.
Make sure both nodes are
selected, then click the Next button.
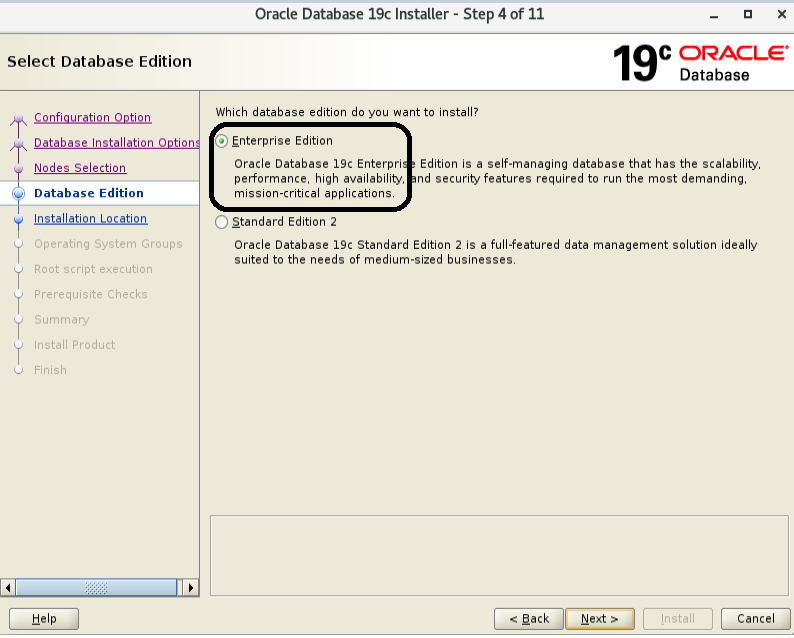
Select the Enterprise Edition
option, then click the Next button.

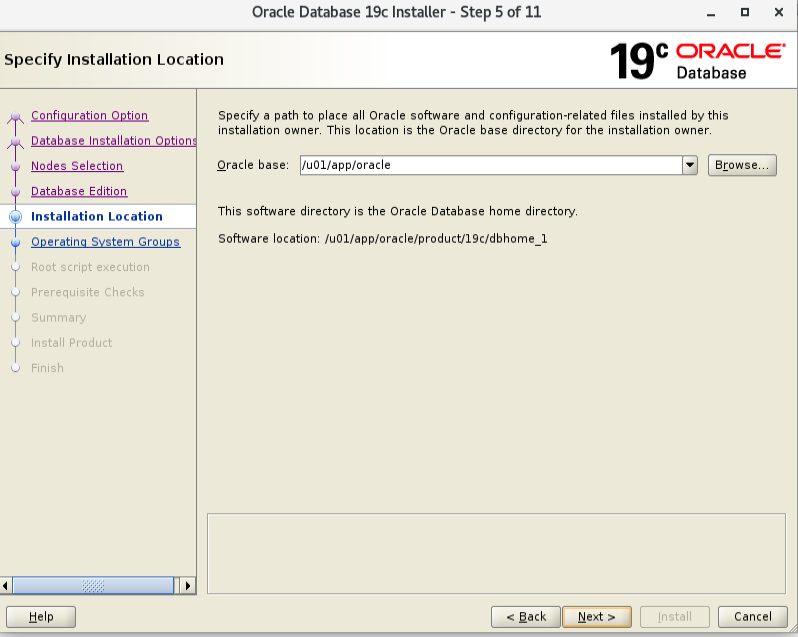
Enter /u01/app/oracle as the
Oracle base and /u01/app/oracle/product/19c/dbhome_1 as the software location,
then click the Next button.
Click the Next button.Accept
the warnings on the subsequent dialog by clicking the Yes button

Click the Next button.
Check the “Ignore All” checkbox
and click the “Next” button.
Click the Install button.

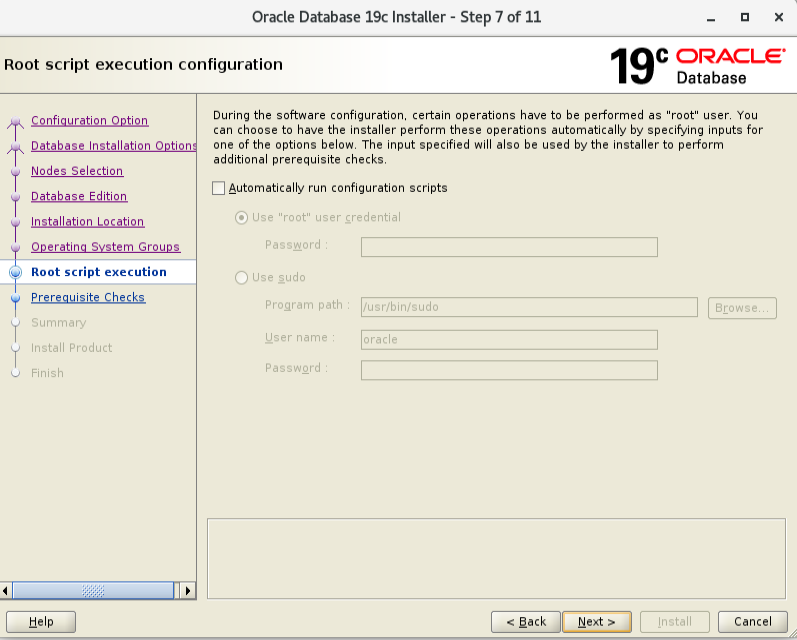
When prompted, run the
configuration script on each node. When the scripts have been run on each node,
click the OK button.
Node 1
[root@easydb1
dbhome_1]# /u01/app/oracle/product/19c/dbhome_1/root.sh
Performing root user operation.
The following environment variables are set as:
ORACLE_OWNER= oracle
ORACLE_HOME= /u01/app/oracle/product/19c/dbhome_1
Enter the full pathname of the local bin directory: [/usr/local/bin]:
The contents of “dbhome” have not changed. No need to overwrite.
The contents of “oraenv” have not changed. No need to overwrite.
The contents of “coraenv” have not changed. No need to overwrite.
Entries will be added to the /etc/oratab file as needed by
Database Configuration Assistant when a database is created
Finished running generic part of root script.
Now product-specific root actions will be performed.
Node 2
[root@easydb2
dbhome_1]# /u01/app/oracle/product/19c/dbhome_1/root.sh
Performing root user operation.
The following environment variables are set as:
ORACLE_OWNER= oracle
ORACLE_HOME= /u01/app/oracle/product/19c/dbhome_1
Enter the full pathname of the local bin directory: [/usr/local/bin]:
The contents of “dbhome” have not changed. No need to overwrite.
The contents of “oraenv” have not changed. No need to overwrite.
The contents of “coraenv” have not changed. No need to overwrite.
Entries will be added to the /etc/oratab file as needed by
Database Configuration Assistant when a database is created
Finished running generic part of root script.
Now product-specific root actions will be performed.
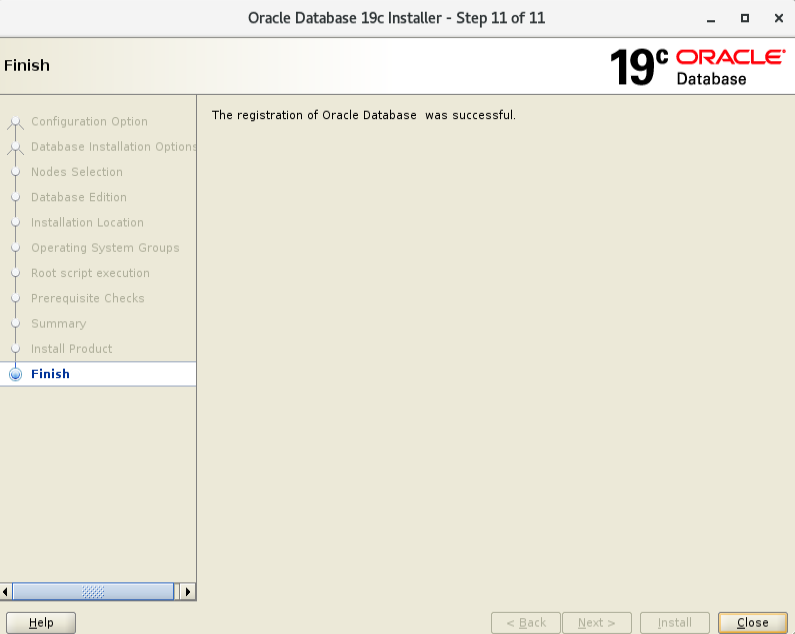
Oracle 19c Installation is
completed.

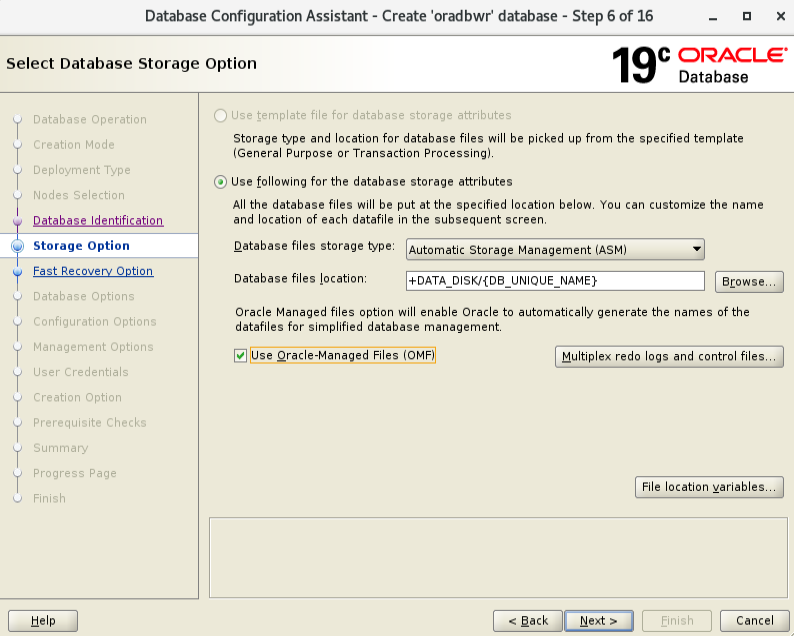
DATA and FRA Disk group Creation
Now we will create DATA
and FRA disk group, We will use DATA disk group to store the database
information and FRA for recovery of data.
Command to create the disk
group: –
|
1
2
3
|
CREATE DISKGROUP DATA EXTERNAL REDUNDANCY
DISK
'/dev/oracleasm/disks/DATA'
ATTRIBUTE
'au_size'='4M';
CREATE DISKGROUP FRA EXTERNAL REDUNDANCY DISK
'/dev/oracleasm/disks/FRA’
ATTRIBUTE 'au_size'='4M';
|
Output: –

Note: – After
creating the disk groups they are visible only on rac node 1,
but to visible on rac node 2 as well you need to mount it manually through
below command.
RAC Node 2 beforemount output: –

RAC node 2 after mount output: –

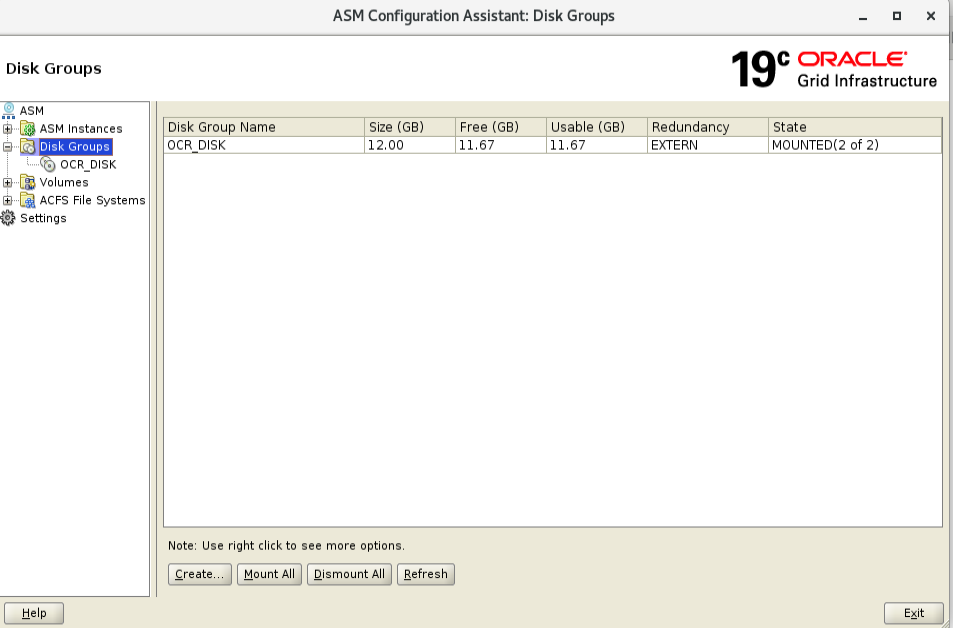
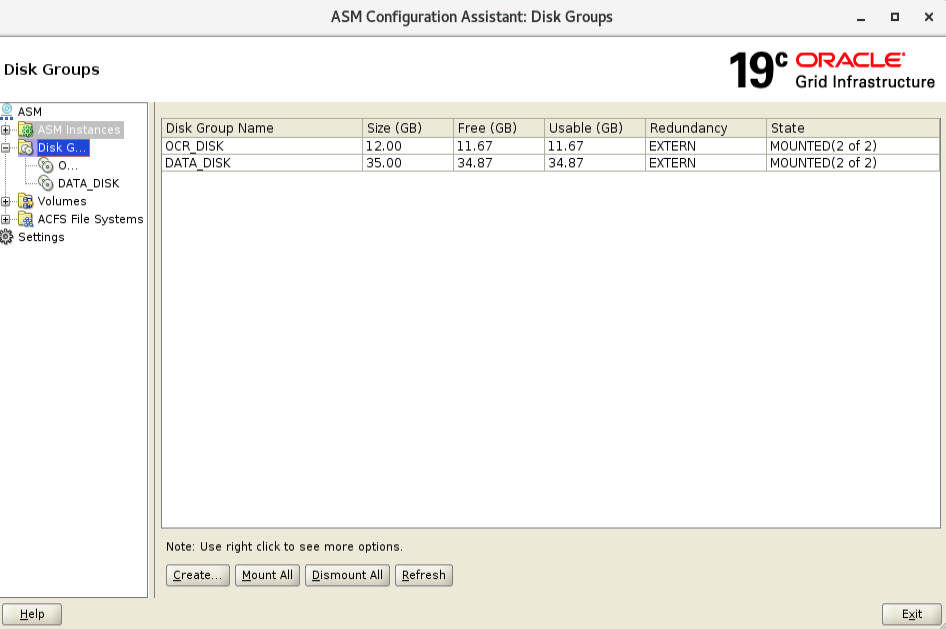
Creating ASM Diskgroup
using ASMCA Tool for database creation
[oracle@easydb1 ~]$ .
grid.env
[oracle@easydb1 ~]$ asmca
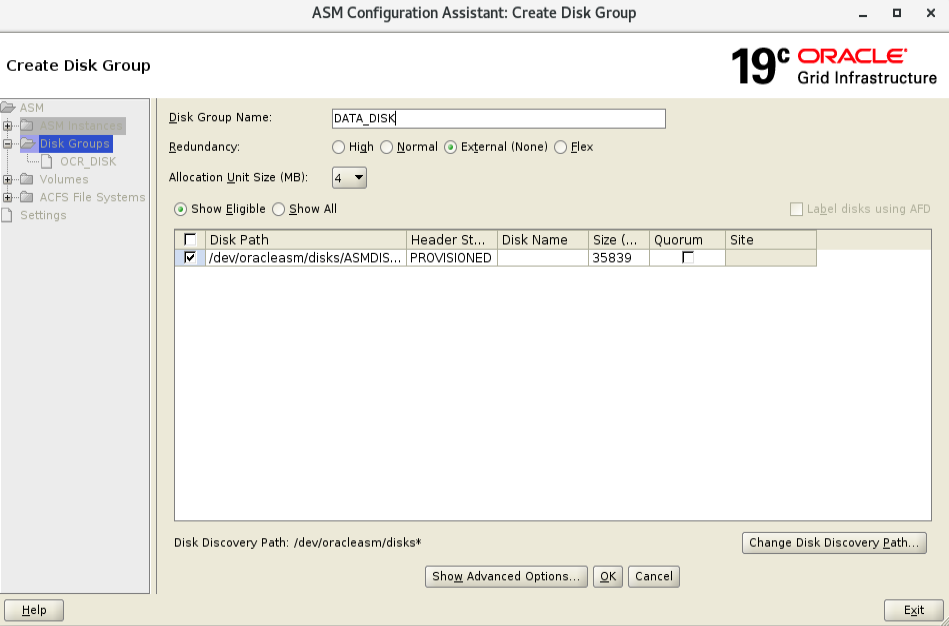
Select Disk Groups and create

Set the redundancy to External,
click the 35GB DISK for Database configuration, then click the ok button.

DiskGroup is ready for creating
Database

Database Creation
[oracle@easydb1 ~]$ .
db.env
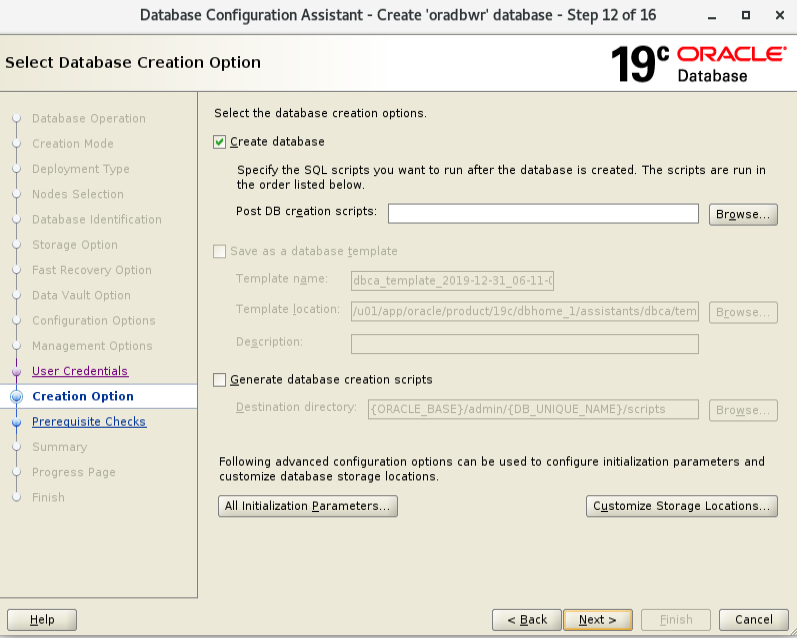
[oracle@easydb1 ~]$ dbca
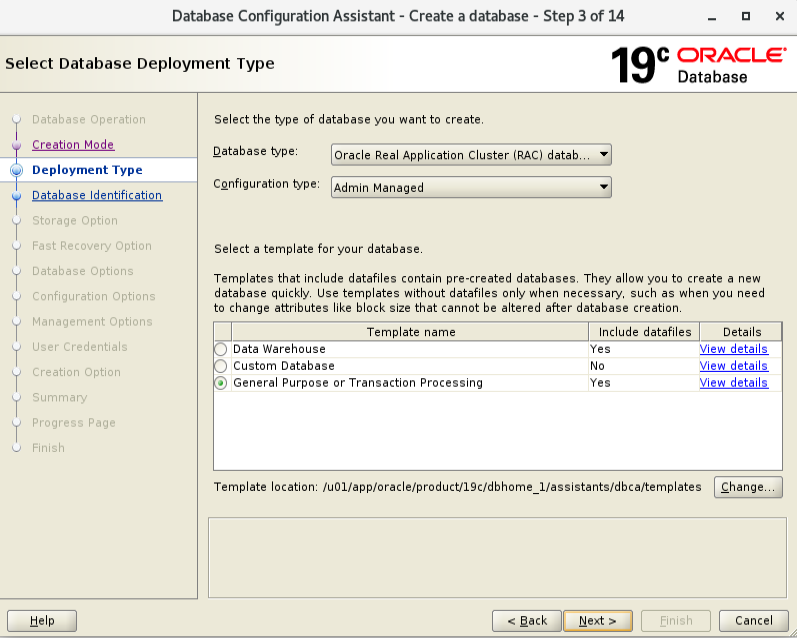
Select the Create Database
option and click the Next button.

Select the Advanced
configuration option.and click the Next button.

Select the General purpose and
click the Next button.

Make sure both nodes are
selected, then click the Next button.
Enter the Database Name and
deselect CDB Database
Default select as it is and
Click next

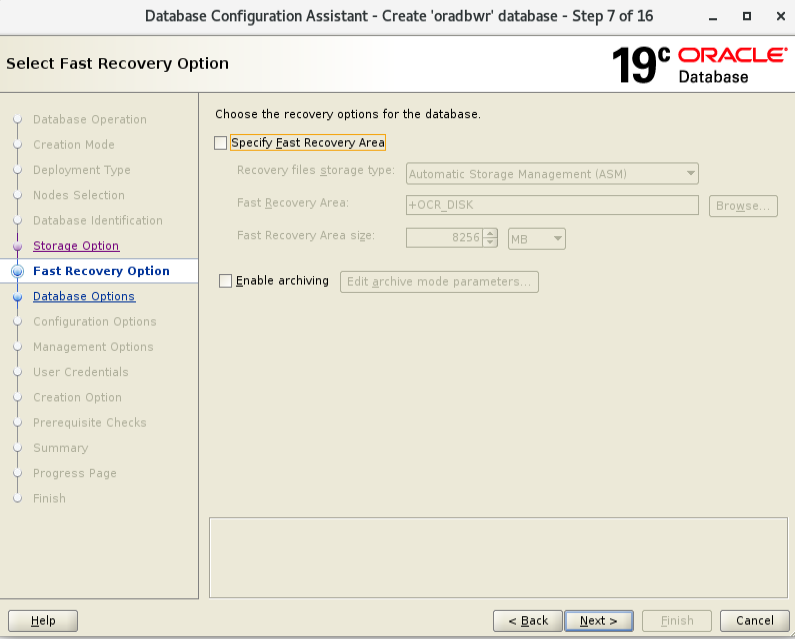
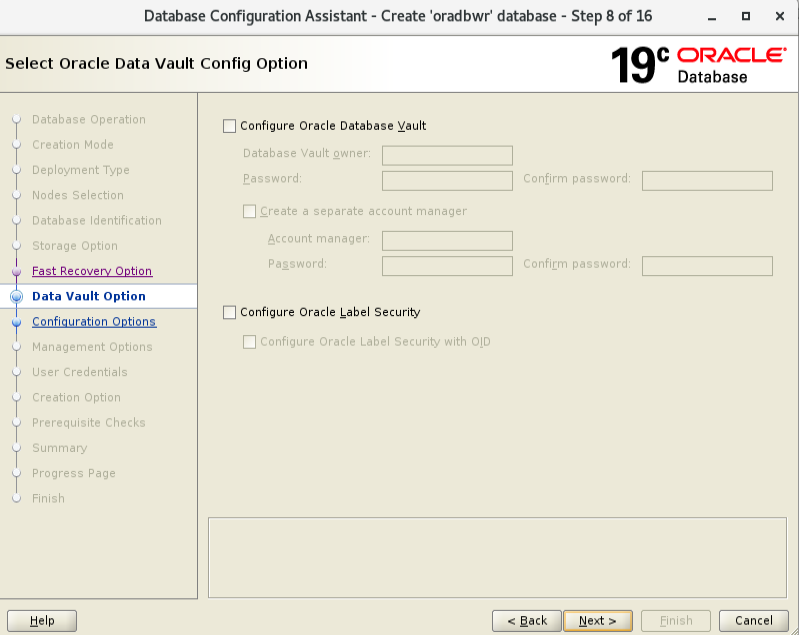
Deselect FRA and Archivelog
mode

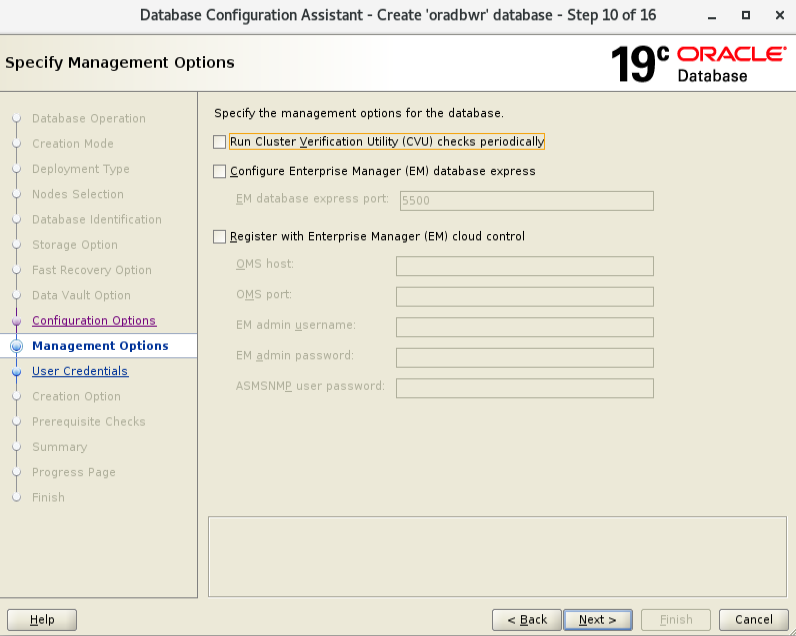
Default as it is and Click next

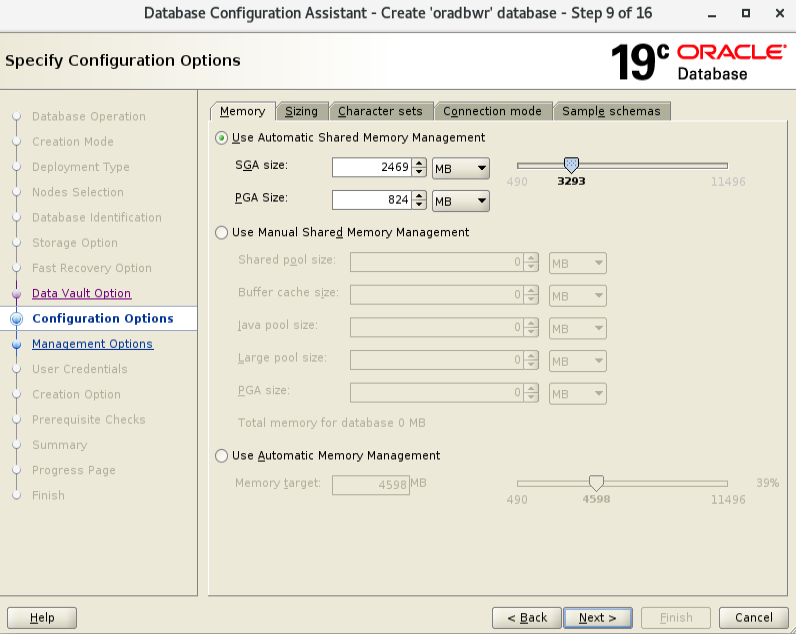
Check ASMM Memory

Default as it is and Click next

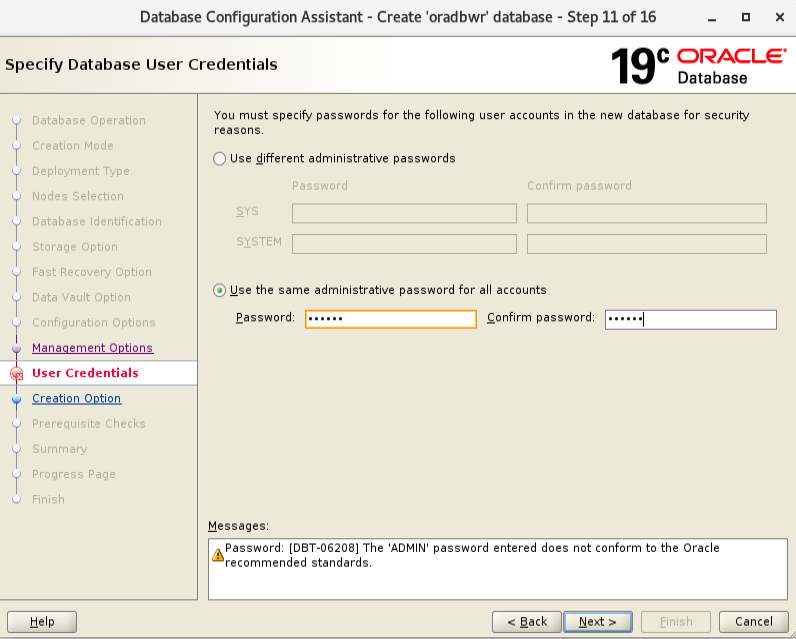
Enter oracle user Credential
and click next

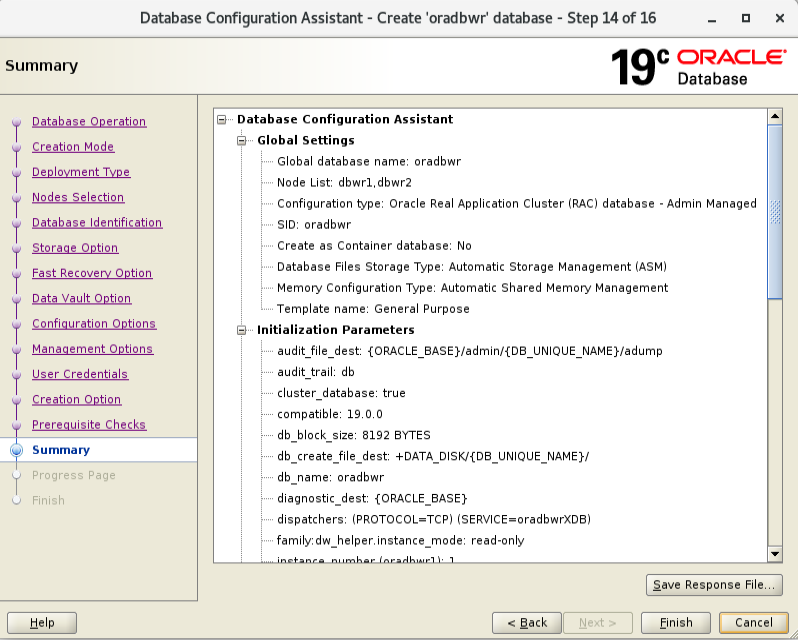
Select Create Database and
click finish


Oracle 19c Rac Database
Creation is completed.
Post-Check For Rac Setup
Check the Status of the RAC
[oracle@easydb1
~]$ srvctl config database -d oraeasydb
Database unique name: oraeasydb
Database name: oraeasydb
Oracle home: /u01/app/oracle/product/19c/dbhome_1
Oracle user: oracle
Spfile: +DATA_DISK/ORAEASYDB/PARAMETERFILE/spfile.268.1028487843
Password file: +DATA_DISK/ORAEASYDB/PASSWORD/pwdoraeasydb.256.1028485849
Domain:
Start options: open
Stop options: immediate
Database role: PRIMARY
Management policy: AUTOMATIC
Server pools:
Disk Groups: DATA_DISK
Mount point paths:
Services:
Type: RAC
Start concurrency:
Stop concurrency:
OSDBA group: oinstall
OSOPER group: oinstall
Database instances: oraeasydb1,oraeasydb2
Configured nodes: easydb1,easydb2
CSS critical: no
CPU count: 0
Memory target: 0
Maximum memory: 0
Default network number for database services:
Database is administrator managed
Database Level
[oracle@easydb1 ~]$
sqlplus / as sysdba
SQL*Plus: Release 19.0.0.0.0 – Production on Tue Dec 31 19:20:07 2019
Version 19.3.0.0.0
Copyright (c) 1982, 2019, Oracle. All rights reserved.
Connected to:
Oracle Database 19c Enterprise Edition Release 19.0.0.0.0 – Production
Version 19.3.0.0.0
SQL> select
INST_NUMBER,INST_NAME FROM v$active_instances;
INST_NUMBER INST_NAME
———– ———————————-
1 easydb1.localdomain:oraeasydb1
2 easydb2.localdomain:oraeasydb2
SQL> SELECT
instance_name, host_name FROM gv$instance;
INSTANCE_NAME
HOST_NAME
—————- —————————————————————-
oraeasydb1 easydb1.localdomain
oraeasydb2 easydb2.localdomain