Training. Please visit
Oracle 12 And 19c Multitenant Architecture – EasyReliable
For oracle database and cloud dumps
Training. Please visit
Oracle 12 And 19c Multitenant Architecture – EasyReliable
For oracle database and cloud dumps
BZIP2, which has a very good compression ratio. ZLIB compression, which requires a COMPATIBLE setting of 11.0.0 or higher, is very fast but has a lower compression ratio than other algorithms.In Oracle 19c a number of new features have been added to DBCA in silent mode.
In Oracle 18c, we could clone a PDB both via the GUI DBCA as well as using the dbca -silent -createPluggableDatabase command.
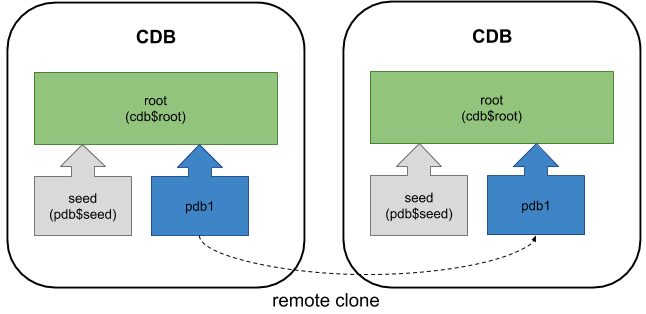
New in Oracle 19c is the ability to create a remote clone of a PDB as well as perform the relocate of a PDB using the DBCA silent mode.
We can use the createFromRemotePDB parameter of the DBCA command createPluggableDatabase to create a PDB by cloning a remote PDB as well as use the relocatePDB option to relocate a PDB from one container database to another.
Let us have a look at a worked example.
Here is the 19c environment:
a) host01: CDB1 (PDB1,PDB2)
b) host02: CDB2 (PDB2)
We will remote clone PDB1 from CDB1 and create the pluggable database in the container database CDB2.
We will then create another pluggable database PDB3 in CDB1 by cloning PDB1 using the dbca silent method.
Then we will relocate PDB3 from CDB1 to CDB2.
For this we need to create a common user in CDB1 and use this use to create a database link from CDB2 to CDB1.
***Create common user in CDB1***

SQL> create user c##link_user identified by oracle container=all;

User created.

SQL> grant sysoper,sysdba to c##link_user container=all;

Grant succeeded.

SQL> grant create pluggable database to c##link_user container=all;

Grant succeeded.

SQL> grant create session to c##link_user container=all;

Grant succeeded.


***Add TNS entry to connect to CDB1 from CDB2***

CDB1 =
  (DESCRIPTION =
    (ADDRESS = (PROTOCOL = TCP)(HOST = host02.localdomain)(PORT = 1521))
    (CONNECT_DATA =
      (SERVER = DEDICATED)
      (SERVICE_NAME = cdb1.localdomain)
    )
  )

***Create database link from CDB2 to CDB1***

SQL> create database link cdb1_link connect to c##link_user identified by oracle
    using 'cdb1';

Database link created.


SQL>  select * from dual@cdb1_link;

D
-
X


***Note the PDB's currently in CDB2***

SQL> show pdbs

    CON_ID CON_NAME			  OPEN MODE  RESTRICTED
---------- ------------------------------ ---------- ----------
	 2 PDB$SEED			  READ ONLY  NO
	 3 PDB2 			  READ WRITE NO
Create the Pluggable Database using the dbca -silent -createPluggableDatabase command with the -createFromRemotePDB clause.
[oracle@host02 ~]$ dbca -silent -createPluggableDatabase -pdbname pdb1 -sourceDB cdb2 -createFromRemotePDB -remotePDBName pdb1 -dbLinkUsername c##link_user -remoteDBConnString "host01:1521/cdb1.localdomain" -remoteDBSYSDBAUserName SYS -dbLinkUserPassword oracle -remoteDBSYSDBAUserPassword welcome1 -sysDBAUserName SYS -sysDBAPassword welcome1 -pdbDatafileDestination '/u01/app/oracle/oradata/CDB2/pdb1/'

Prepare for db operation
50% complete
Create pluggable database using remote clone operation
100% complete
Pluggable database "pdb1" plugged successfully.
Look at the log file "/u01/app/oracle/cfgtoollogs/dbca/cdb2/pdb1/cdb2.log" for further details.


SQL> show pdbs

    CON_ID CON_NAME			  OPEN MODE  RESTRICTED
---------- ------------------------------ ---------- ----------
	 2 PDB$SEED			  READ ONLY  NO
	 3 PDB2 			  READ WRITE NO
	 4 PDB1 			  READ WRITE NO
First we create PDB3 in CDB1 by cloning from PDB1 using the dbca -silent -createPluggableDatabase command.
[oracle@host01 ~]$ dbca -silent -createPluggableDatabase -sourceDB cdb1 -pdbName pdb3 -createAsClone FALSE -createPDBFrom PDB -sourcePDB pdb1 -fileNameConvert '/u01/app/oracle/oradata/CDB1/pdb1/','/u01/app/oracle/oradata/CDB1/pdb3/'
Prepare for db operation
13% complete
Creating Pluggable Database
15% complete
19% complete
23% complete
31% complete
53% complete
Completing Pluggable Database Creation
60% complete
Executing Post Configuration Actions
100% complete
Pluggable database "pdb3" plugged successfully.
Look at the log file "/u01/app/oracle/cfgtoollogs/dbca/cdb1/pdb3/cdb1.log" for further details.

SQL> show pdbs

    CON_ID CON_NAME			  OPEN MODE  RESTRICTED
---------- ------------------------------ ---------- ----------
	 2 PDB$SEED			  READ ONLY  NO
	 3 PDB1 			  READ WRITE NO
	 4 PDB2 			  READ WRITE NO
 	 5 PDB3				  READ WRITE NO
Relocate PDB3 from CDB1 to CDB2 using the dbca -silent -relocatePDB command.
[oracle@host02 ~]$ dbca -silent  -relocatePDB -pdbname pdb3 -sourceDB cdb2 -remotePDBName pdb3 -dbLinkUsername c##link_user -remoteDBConnString "host02:1521/cdb1.localdomain" -remoteDBSYSDBAUserName SYS -dbLinkUserPassword oracle -remoteDBSYSDBAUserPassword G#vin2407 -sysDBAUserName SYS -sysDBAPassword G#vin2407 -pdbDatafileDestination '/u01/app/oracle/oradata/CDB2/pdb3/'
Prepare for db operation
50% complete
Create pluggable database using relocate PDB operation
100% complete
Pluggable database "pdb3" plugged successfully.
Look at the log file "/u01/app/oracle/cfgtoollogs/dbca/cdb2/pdb3/cdb2.log" for further details.


****Note the PDB's now in CDB2****

SQL> show pdbs

    CON_ID CON_NAME			  OPEN MODE  RESTRICTED
---------- ------------------------------ ---------- ----------
	 2 PDB$SEED			  READ ONLY  NO
	 3 PDB2 			  READ WRITE NO
	 4 PDB1 			  READ WRITE NO
	 5 PDB3 			  READ WRITE NO

****Note the PDB's now in CDB1****

SQL> show pdbs

    CON_ID CON_NAME			  OPEN MODE  RESTRICTED
---------- ------------------------------ ---------- ----------
	 2 PDB$SEED			  READ ONLY  NO
	 3 PDB1 			  READ WRITE NO
	 4 PDB2 			  READ WRITE NO
Oracle Database 12c Release 2 (12.2) introduced the ability to perform a hot clone of a remote pluggable database (PDB) using the CREATE PLUGGABLE DATABASE command. In Oracle 19c it's possible to perform a remote clone of a pluggable database (PDB) using the Database Configuration Assistant (DBCA).
Connect to the remote CDB and prepare it for cloning.
export ORAENV_ASK=NO
export ORACLE_SID=cdb3
. oraenv
export ORAENV_ASK=YES

sqlplus / as sysdba
Create a user in the remote database for use with the database link. In this case, we will use a common user in the remote PDB.
CREATE USER c##remote_clone_user IDENTIFIED BY remote_clone_user CONTAINER=ALL;
GRANT CREATE SESSION, CREATE PLUGGABLE DATABASE TO c##remote_clone_user CONTAINER=ALL;
Unlike a regular remote clone, we don't need to create a database link. We just need to supply the credentials we would use to create the link. The DBCA does the rest.
Check the remote CDB is in local undo mode and archivelog mode.
CONN / AS SYSDBA

COLUMN property_name FORMAT A30
COLUMN property_value FORMAT A30

SELECT property_name, property_value
FROM   database_properties
WHERE  property_name = 'LOCAL_UNDO_ENABLED';

PROPERTY_NAME                  PROPERTY_VALUE
------------------------------ ------------------------------
LOCAL_UNDO_ENABLED             TRUE

SQL>


SELECT log_mode
FROM   v$database;

LOG_MODE
------------
ARCHIVELOG

SQL>
Because the remote CDB is in local undo mode and archivelog mode, we don't need to turn the remote database into read-only mode.
Connect to the local CDB and prepare it for cloning.
export ORAENV_ASK=NO
export ORACLE_SID=cdb1
. oraenv
export ORAENV_ASK=YES

sqlplus / as sysdba
Check the local CDB is in local undo mode and archivelog mode.
CONN / AS SYSDBA

COLUMN property_name FORMAT A30
COLUMN property_value FORMAT A30

SELECT property_name, property_value
FROM   database_properties
WHERE  property_name = 'LOCAL_UNDO_ENABLED';

PROPERTY_NAME                  PROPERTY_VALUE
------------------------------ ------------------------------
LOCAL_UNDO_ENABLED             TRUE

SQL>


SELECT log_mode
FROM   v$database;

LOG_MODE
------------
ARCHIVELOG

SQL>
In 19c the DBCA -createPluggableDatabase command has a new parameter called -createFromRemotePDB, allowing us to create a new PDB by remote cloning an existing PDB.
   [-createFromRemotePDB <Create a pluggable database from Remote PDB clone operation.>]
      -remotePDBName <Name of the pluggable database to clone/relocate>
      -dbLinkUsername <Common user of a remote CDB, used by database link to connect to remote CDB.>
      -remoteDBConnString <EZCONNECT string to connect to Source database for example "host:port/servicename">
      [-remoteDBSYSDBAUserName <User name with SYSDBA privileges of remote database>]
      [-dbLinkUserPassword <Common user password of a remote CDB, used by database link to connect to remote CDB.>]
      [-remoteDBSYSDBAUserPassword <Password for remoteDBSYSDBAUserName user of remote database.>]
      [-sysDBAUserName <User name  with SYSDBA privileges>]
      [-sysDBAPassword <Password for sysDBAUserName user name>]
You can see the full syntax for the -createPluggableDatabase command here, although at the time of writing the documentation doesn't match the utility usage presented by the dbca -createPluggableDatabase -help command.
Make sure the environment is set up to point to the local instance "cdb1" and create a new PDB called "pdb5new" as a clone of the remote PDB called "pdb5" in the "cdb3" instance.
export ORACLE_SID=cdb1
export ORAENV_ASK=NO
. oraenv
export ORAENV_ASK=YES


dbca -silent \
  -createPluggableDatabase \
    -pdbName pdb5new \
    -sourceDB cdb1 \
  -createFromRemotePDB \
    -remotePDBName pdb5 \
    -remoteDBConnString localhost:1521/pdb5 \
    -remoteDBSYSDBAUserName sys \
    -remoteDBSYSDBAUserPassword SysPassword1 \
    -dbLinkUsername c##remote_clone_user \
    -dbLinkUserPassword remote_clone_user
Prepare for db operation
50% complete
Create pluggable database using remote clone operation
100% complete
Pluggable database "pdb5new" plugged successfully.
Look at the log file "/u01/app/oracle/cfgtoollogs/dbca/cdb1/pdb5new/cdb1.log" for further details.
$
Connect to the local root container and check the status of the new PDB.
COLUMN name FORMAT A30

SELECT con_id, name, open_mode
FROM   v$pdbs
ORDER BY 1;

    CON_ID NAME                           OPEN_MODE
---------- ------------------------------ ----------
         2 PDB$SEED                       READ ONLY
         3 PDB1                           READ WRITE
         4 PDB5NEW                        READ WRITE

SQL>
We can clean up by deleting the new pluggable database using the command below.
dbca -silent \
     -deletePluggableDatabase \
     -sourceDB cdb1 \
     -pdbName pdb5new
Prepare for db operation
25% complete
Deleting Pluggable Database
40% complete
85% complete
92% complete
100% complete
Pluggable database "pdb5new" deleted successfully.
Look at the log file "/u01/app/oracle/cfgtoollogs/dbca/cdb1/pdb5new/cdb14.log" for further details.
$The instances and pluggable databases used in these examples are created using the following commands.
# Local container (cdb1).
dbca -silent -createDatabase \
 -templateName General_Purpose.dbc \
 -gdbname cdb1 -sid cdb1 -responseFile NO_VALUE \
 -characterSet AL32UTF8 \
 -sysPassword SysPassword1 \
 -systemPassword SysPassword1 \
 -createAsContainerDatabase true \
 -numberOfPDBs 1 \
 -pdbName pdb1 \
 -pdbAdminPassword PdbPassword1 \
 -databaseType MULTIPURPOSE \
 -memoryMgmtType auto_sga \
 -totalMemory 2048 \
 -storageType FS \
 -datafileDestination "/u02/oradata/" \
 -redoLogFileSize 50 \
 -emConfiguration NONE \
 -ignorePreReqs

# Remote container (cdb3) with PDB (pdb5).
dbca -silent -createDatabase \
 -templateName General_Purpose.dbc \
 -gdbname cdb3 -sid cdb3 -responseFile NO_VALUE \
 -characterSet AL32UTF8 \
 -sysPassword SysPassword1 \
 -systemPassword SysPassword1 \
 -createAsContainerDatabase true \
 -numberOfPDBs 1 \
 -pdbName pdb5 \
 -pdbAdminPassword PdbPassword1 \
 -databaseType MULTIPURPOSE \
 -memoryMgmtType auto_sga \
 -totalMemory 2048 \
 -storageType FS \
 -datafileDestination "/u02/oradata/" \
 -redoLogFileSize 50 \
 -emConfiguration NONE \
 -ignorePreReqs


# Delete the instances.
#dbca -silent -deleteDatabase -sourceDB cdb1 -sysDBAUserName sys -sysDBAPassword SysPassword1
#dbca -silent -deleteDatabase -sourceDB cdb3 -sysDBAUserName sys -sysDBAPassword SysPassword1
The databases have Oracle Managed Files (OMF) enabled and are switched to archivelog mode.
export ORAENV_ASK=NO
export ORACLE_SID=cdb3
. oraenv
export ORAENV_ASK=YES

sqlplus / as sysdba <<EOF

ALTER SYSTEM SET db_create_file_dest = '/u02/oradata';

SHUTDOWN IMMEDIATE;
STARTUP MOUNT;
ALTER DATABASE ARCHIVELOG;
ALTER DATABASE OPEN;

ALTER PLUGGABLE DATABASE pdb5 OPEN;
ALTER PLUGGABLE DATABASE pdb5 SAVE STATE;

EXIT;
EOF


export ORAENV_ASK=NO
export ORACLE_SID=cdb1
. oraenv
export ORAENV_ASK=YES

sqlplus / as sysdba <<EOF

ALTER SYSTEM SET db_create_file_dest = '/u02/oradata';

SHUTDOWN IMMEDIATE;
STARTUP MOUNT;
ALTER DATABASE ARCHIVELOG;
ALTER DATABASE OPEN;

ALTER PLUGGABLE DATABASE pdb1 OPEN;
ALTER PLUGGABLE DATABASE pdb1 SAVE STATE;

EXIT;
EOF
This chapter describes how to use the DUPLICATE command to create an independently functioning database copy.
This chapter contains the following topics:
Database duplication is the use of the DUPLICATE command to copy all or a subset of the data in a source database. The duplicate database (the copied database) functions entirely independently from the source database (the database being copied).
This section contains the following topics:
A duplicate database is useful for a variety of purposes, most of which involve testing. You can perform the following tasks in a duplicate database:
Test backup and recovery procedures
Test an upgrade to a new release of Oracle Database
Test the effect of applications on database performance
Create a standby database
Generate reports
For example, you can duplicate the production database on host1 to host2, and then use the duplicate database on host2 to practice restoring and recovering this database while the production database on host1 operates as usual.
If you copy a database with operating system utilities rather than the DUPLICATE command, then the DBID of the copied database remains the same as the original database. To register the copied database in the same recovery catalog with the original, you must change the DBID with the DBNEWID utility (see Oracle Database Utilities). In contrast, the DUPLICATE command automatically assigns the duplicate database a different DBID so that it can be registered in the same recovery catalog as the source database.
The DUPLICATE command can create a fully functional copy of your database or create a physical standby database, which serves a very different purpose. A standby database is a copy of the primary database that you update continually with archived redo log files from the primary database. If the primary database is inaccessible, then you can fail over to the standby database, which becomes the new primary database. A database copy, however, cannot be used in this way: it is not intended for failover scenarios and does not support the various standby recovery and failover options.
See Also:
Oracle Data Guard Concepts and Administration to learn how to create a standby database with the DUPLICATE command
The source host is the computer that hosts the source database. The source database instance is the instance associated with the source database.
The destination host is the computer that hosts the duplicate database. The source host and destination host can be the same or different computers. For the duplication process, the database instance associated with the duplicate database is called the auxiliary instance.
Note:
Performing simultaneous database duplication operations using the same source database is not supported.
RMAN supports two basic types of duplication: active database duplication and backup-based duplication. RMAN can perform backup-based duplication with or without either of the following connections:
Target
Recovery catalog
A connection to both is required for active database duplication.
Figure 25-1 shows the decision tree for the two duplication techniques.
In active database duplication, RMAN connects as TARGET to the source database instance and as AUXILIARY to the auxiliary instance. RMAN then manages the copying of the database to the auxiliary instance over the network. No backups of the source database are required.
RMAN can transfer the files required for active database duplication as image copies or backup sets.
Note:
Performing active database duplication using backup sets is available starting with Oracle Database 12c Release 1 (12.1).
Figure 25-2 illustrates active database duplication.
When active database duplication is performed using image copies, after RMAN establishes a connection with the source database, the source database transfers the required database files to the auxiliary database. Using image copies may require additional resources on the source database. This method is referred to as the push-based method of active database duplication.
When RMAN performs active database duplication using backup sets, a connection is established with the source database and the auxiliary database. The auxiliary database then connects to the source database through Oracle Net Services and retrieves the required database files from the source database. This method of active database duplication is also to as the pull-based method.
Using backup sets for active database duplication provides certain advantages. RMAN can employ unused block compression while creating backups, thus reducing the size of backups that are transported over the network. Backup sets can be created in parallel on the source database by using multisection backups. You can also encrypt backup sets created on the source database.
See Also:
Factors That Determine Whether Backup Sets or Image Copies Are Used for Active Database Duplication
RMAN only uses image copies to perform active database duplication when no auxiliary channels are allocated or when the number of auxiliary channels allocated is less than the number of target channels.
RMAN uses backup sets to perform active database duplication when the connection to the target database is established using a net service name and any one of the following conditions is satisfied:
The DUPLICATE ... FROM ACTIVE DATABASE command contains either the USING BACKUPSET, USING COMPRESSED BACKUPSET, or SECTION SIZE clause.
The number of auxiliary channels allocated is equal to or greater than the number of target channels allocated.
Note:
Oracle recommends that you use backup sets to perform active database duplication.
In backup-based duplication, RMAN creates the duplicate database by using preexisting RMAN backups and copies. This technique of duplication uses one of the following mutually exclusive methods:
Duplication without a target database connection. RMAN obtains metadata about backups from a recovery catalog.
Duplication without a target database connection and without a recovery catalog. RMAN obtains metadata about where backups and copies reside from the BACKUP LOCATION clause specification of the DUPLICATE command.
Duplication with a target database connection. RMAN obtains metadata about backups from the target database control file or from the recovery catalog.
Figure 25-3 illustrates backup-based duplication without a target connection. RMAN connects to a recovery catalog database instance and the auxiliary instance. The destination host must have access to the RMAN backups required to create the duplicate database.
Figure 25-3 Backup-Based Duplication Without a Target Connection

Figure 25-4 illustrates backup-based duplication without connections to the target or to the recovery catalog database instance. RMAN connects to the auxiliary instance of the duplicate database on the destination host. A disk backup location containing all the backups or copies for duplication must be available to the destination host.
Figure 25-4 Backup-Based Duplication Without a Target Connection or Recovery Catalog Connection

Figure 25-5 illustrates backup-based duplication with a target connection. RMAN connects to the source database instance and the auxiliary instance. Optionally, RMAN can connect to a recovery catalog database (not shown in the figure). The destination host must have access to the RMAN backups required to create the duplicate database.
Figure 25-5 Backup-Based Duplication with a Target Connection

A duplicate database can include the same contents as the source database or only a subset of the tablespaces in the source database. For example, you can use the TABLESPACE option of the DUPLICATE command to duplicate only specified tablespaces, or the SKIP READONLY option to exclude read-only tablespaces from the duplicate database.
For backup-based duplication, the principal work of the duplication is performed by the auxiliary channels. These channels correspond to a server session on the auxiliary instance on the destination host. For active database duplication, the type of duplication technique used determines which channel performs the principal work. When active database duplication is performed using backup sets, the principal work of duplication is performed by the auxiliary channels. When image copies are used, the primary work is performed by the target channels.
RMAN must perform database point-in-time recovery, even when no explicit point in time is provided for duplication. Point-in-time recovery is required because the online redo log files in the source database are not backed up and cannot be applied to the duplicate database. The farthest point of recovery of the duplicate database is the most recent redo log file archived by the source database.
As part of the duplicating operation, RMAN automates the following steps:
Creates a default server parameter file for the auxiliary instance if the following conditions are true:
Duplication does not involve a standby database.
Server parameter files are not being duplicated.
The auxiliary instance was not started with a server parameter file.
Restores from backup or copies from the active database the latest control file that satisfies the UNTIL clause requirements.
Mounts the restored or copied backup control file from the active database.
Note:
If the control file in the source database contains disabled threads, then these threads will also be disabled in the duplicate database.
Uses the RMAN repository to select the backups for restoring the data files to the auxiliary instance. This step applies to backup-based duplication.
Copies the duplicate data files and restores them with incremental backups and archived redo log files to a noncurrent point in time.
Shuts down and restarts the auxiliary database instance on the destination host in NOMOUNT mode.
Creates a new control file, which then creates and stores the new DBID in the data files.
Opens the duplicate database with the RESETLOGS option and creates the online redo log for the new database.
If you do not want to open the duplicate database, use the NOOPEN clause in the DUPLICATE statement as described in "Specifying the State of the Duplicate Database".
See Also:
The DUPLICATE entry in Oracle Database Backup and Recovery Reference for a complete list of which files are copied to the duplicate database
To duplicate a database:
This section describes the basic steps of database duplication. Follow the link in each step for further instructions.
See Also:
Duplicating a whole multitenant container database (CDB) or one or more pluggable databases (PDBs) requires only minimal adjustments to the procedure for duplicating a non-CDB as described in "Basic Steps of Database Duplication".
When duplicating a whole CDB or one more PDBs:
You must create the auxiliary instance as a CDB. To do so, start the instance with the following declaration in the initialization parameter file:
enable_pluggable_database=TRUE
When instructed to connect to the necessary instances, connect to the root as a user with SYSDBA or SYSBACKUP privilege. On both instances, the password for the user performing the duplication must be the same.
When instructed to create an initialization parameter file for the auxiliary instance, you must copy the file from the source database. This ensures that the auxiliary instance is also a CDB. After copying, you modify DB_NAME and the various destination/location parameters.
When transferring backup files from the source to the destination host:
In "Making Disk Backups Accessible to the Auxiliary Instance" and "Making Disk Backups Accessible Without Shared Disk", note the following adjustment:
Use the PLUGGABLE DATABASE syntax of the BACKUP command to copy only the backups of a specific PDB.
This example transfers the backup files for the entire CDB:
BACKUP COPY OF DATABASE;
The next example transfers only the backup files for the PDB pdb3:
BACKUP COPY OF PLUGGABLE DATABASE pdb3;
RMAN enables you to duplicate PDBs with the DUPLICATE command. You can duplicate a single PDB, a set of PDBs, or a set of tablespaces within a PDB.
You must log in to the root of the CDB as a user who is granted the SYSDBA or SYSBACKUP privilege. To perform backup-based duplication of PDBs, you must back up the root and the seed database (PDB$SEED) of the CDB that contains the listed PDBs.
To duplicate PDBs, you must create the auxiliary instance as a CDB. To do so, start the instance with the declaration enable_pluggable_database=TRUE in the initialization parameter file. When you duplicate one or more PDBs, RMAN also duplicates the root (CDB$ROOT) and the seed database (PDB$SEED). The resulting duplicate database is a fully functional CDB that contains the root, the seed database, and the duplicated PDBs.Table 25-1 describes the options that you can use to duplicate PDBs or tablespaces within PDBs.
Table 25-1 Options to Duplicate PDBs
| DUPLICATE Option | Explanation |
|---|---|
| Duplicates the specified PDBs in the CDB. Use a comma-delimited list to duplicate multiple PDBs. |
| Duplicates all the PDBs in the CDB, except the PDBs specified by |
| Duplicates specified tablespaces within a PDB. The tablespace name must be prefixed with the name of the PDB that contains the tablespace. If you omit the name of the PDB, |
| Duplicates all tablespaces in the CDB except the specified tablespaces in the specified PDB. |
To duplicate PDBs:
Ensure that you have completed Steps 1 to 4 in "Basic Steps of Database Duplication".
Run the DUPLICATE command with either the PLUGGABLE DATABASE or SKIP PLUGGABLE DATABASE option described in Table 25-1.
The following are some examples of duplicating PDBs:
To duplicate the PDB pdb1 to the CDB cdb1, use the following command:
DUPLICATE DATABASE TO cdb1 PLUGGABLE DATABASE pdb1;
To duplicate the PDBs pdb1, pdb3, and pdb4 to the database cdb1, use the following command:
DUPLICATE DATABASE TO cdb1 PLUGGABLE DATABASE pdb1,pdb3,pdb4;
To duplicate all the databases in the CDB, except the PDB pdb3, use the following command:
DUPLICATE DATABASE TO cdb1 SKIP PLUGGABLE DATABASE pdb3;
To duplicate tablespaces within a PDB:
Before duplicating the database, you must decide how to perform the duplication and then prepare the database environment, including the auxiliary database instance. Follow the links in each step for further instructions.
Preparing for duplication:
Your business requirements and the database environment determine which duplication technique is best for your situation. Consider the following questions:
Are you familiar with the prerequisites for each duplication technique?
Review the Prerequisites section of the DUPLICATE command description in Oracle Database Backup and Recovery Reference for a complete list.
Some prerequisites are specific and depend on the duplication technique. For example, active duplication requires that the source and auxiliary instances use the same password as the source database, whereas backup-based duplication without connections to the target database and recovery catalog requires only that all backups and database copies reside in a single location.
Do backups of the source database exist?
The principal advantage of active database duplication is that it does not require source database backups. Active duplication copies mounted or online database files over a network to the auxiliary instance. One disadvantage of this technique is the negative performance effect on the network. Another disadvantage is that the source database is running processes required to transfer the files to the auxiliary host, thereby affecting the source database and production workload.
If the source database backups exist, and if the effect on the network is unacceptable, then backup-based duplication may be a better option. You can copy backups to temporary storage and transfer them manually to the destination host. If duplication is made with a connection to the target or the recovery catalog, then the backup files on the destination host must have the same file specification as they had on the source host. Otherwise, this is not a requirement.
Is a recovery catalog available?
If a recovery catalog exists, then you can perform backup-based duplication without connecting RMAN as TARGET to the source database. This technique is advantageous where network connections from the auxiliary host to the source database are restricted or prone to intermittent disruptions. In duplication without a TARGET connection, the source database is unaffected by the duplication.
How much disk space is available on the destination host?
The disk space on the destination host can be an issue when you perform duplication using disk backups. For example, if the source database is 1 terabyte (TB), and if you duplicate the database from disk backups without using shared disk or network file system (NFS), then you must have at least 2 terabytes (TB) of space available on the destination host. In some environments, manual transfer of backups is necessary because NFS performance is a bottleneck.
Are the source and destination hosts connected by a LAN or a WAN?
Performance of active database duplication is probably slower on a wide area network (WAN) than on a local area network (LAN). If the performance degradation on a WAN is unacceptable, then backup-based duplication may be the only viable option.
When do you plan to duplicate the database?
If you must duplicate the database during a period of high user activity, then the loss of network throughput caused by active duplication may be a problem, making backup-based duplication a better choice. Also, in active database duplication, the RMAN channels required for copying files to the auxiliary host can affect performance.
Starting with Oracle Database 12c Release 1 (12.1), RMAN can use backup sets to transfer the source database files that need to be duplicated. The backup sets are transferred over the network to the auxiliary database. Backup sets can be encrypted for additional security. Specify the encryption algorithm by using the SET ENCRYPTION ALGORITHM command before the DUPLICATE command.
Before you perform active database duplication, use one of the following techniques to ensure that the encryption is successful:
If the source database uses transparent encryption, then you must share the Oracle keystore that contains the encryption key between the source database and the auxiliary database as described in "Step 6: Copying the Oracle Keystore to the Destination Host".
If the source database uses password encryption, then you must specify the password used to encrypt backups.
The following command sets the encryption password to encr_pwd:
SET ENCRYPTION ON IDENTIFIED BY encr_pwd;
The following example connects to the target database and an auxiliary database using net service names and performs active database duplication. The keystore that contains the encryption key is shared between the target and the auxiliary database. sbu is a user who is granted the SYSBACKUP privilege.
CONNECT TARGET "sbu@prod AS SYSBACKUP";
CONNECT AUXILIARY "sbu@dup_db AS SYSBACKUP";
SET ENCRYPTION ALGORITHM 'AES128';
DUPLICATE TARGET DATABASE TO dup_db
     FROM ACTIVE DATABASE
     PASSWORD FILE;
When you use backup sets to perform active database duplication, you can compress the backup sets created to transfer files from the source database to the destination database. Using compressed backup sets minimizes the size of the backup sets and thus provides better performance for the database duplication. Compressing backup sets used for active database duplication is supported starting with Oracle Database 12c Release 1 (12.1).
Use the USING COMPRESSED BACKUPSET clause of the DUPLICATE command to compress the backup sets containing data required to perform active database duplication. The following command performs active database duplication using compressed backup sets. Assume that the connection to the target database and auxiliary instance has been made using net service names.
DUPLICATE TARGET DATABASE TO dup_db
     FROM ACTIVE DATABASE
     PASSWORD FILE
     USING COMPRESSED BACKUPSET;
RMAN multisection backups provide faster backup performance by backing up very large data files in parallel. Multiple backup pieces are created, with a separate channel writing to each backup piece. Starting with Oracle Database 12c Release 1 (12.1), you can use multisection backup sets to transfer the source files required to perform active database duplication.
Use the SECTION SIZE clause in the DUPLICATE command to create multisection backup sets that can be used for active database duplication. The following command creates multisection backup sets, with the size of each backup piece being 400MB. Assume that the connection to the target database and auxiliary instance has been made using net service names.
DUPLICATE TARGET DATABASE TO dup_db
     FROM ACTIVE DATABASE
     PASSWORD FILE
     SECTION SIZE 400M;
When you use the RMAN DUPLICATE command, the duplicate database is created and then opened in RESETLOGS mode. You can specify that the duplicate database must not be opened by using the NOOPEN clause in the DUPLICATE command.
You may not want to open the duplicate database immediately after creation in the following situations:
Opening the duplicate database may cause errors.
You need to modify the initialization parameters of the duplicate database.
For example, you need to modify flashback database settings, configure fast incremental backups, or modify block change tracking.
You are creating a new database as part of an upgrade procedure.
During an upgrade you cannot open the database with RESETLOGS option. The NOOPEN clause enables you to duplicate the database and then leave it in a state ready for opening in upgrade mode and subsequent execution of upgrade scripts.
The following command creates a duplicate database called dupdb. Because the NOOPEN clause is used, RMAN creates the duplicate database but does not open it.
DUPLICATE TARGET DATABASE
TO dupdb
FROM ACTIVE DATABASE
NOOPEN;
When duplicating a database, RMAN generates names for the duplicate control files, data files, temp files, and online redo log files. Therefore, you must decide on a naming strategy for these files.
The simplest duplication strategy is to configure the duplicate database to use the same names as the source database. Using the same names means that your environment meets the following requirements:
If the source database uses ASM disk groups, then the duplicate database must use ASM disk groups with the same names.
If the source database files are Oracle Managed Files, then the auxiliary instance must set DB_CREATE_FILE_DEST to the same directory location as the source database. Although the directories are the same on the source and destination hosts, Oracle Database chooses the relative names for the duplicate files.
If the names of the database files in the source database contain a path, then this path name must be the same in the duplicate database.
Note:
If the destination and source hosts are the same, then use one of several methods available to modify the database file paths in the duplicate database. See "Specifying Alternative Names for Duplicate Database Files".
When you configure your environment as suggested, no additional configuration is required to name the duplicate files.
It is recommended that you use different names for the ASM disk groups in the source and duplicate database. Use one of the following techniques to specify different names for database files in the duplicate database:
Set the DB_CREATE_FILE_DEST and LOG_FILE_CREATE_DEST initialization parameters in the auxiliary instance. This is recommended when you use ASM and OMF.
Use the SET NEWNAME command.
Set the DB_FILE_NAME_CONVERT and LOG_FILE_NAME_CONVERT initialization parameters in the auxiliary instance.
If DB_FILE_NAME_CONVERT is applied for ASM names, only disk group name changes must be performed.
See Also:
Specifying Alternative Names for Duplicate Database Files for information about specifying different file names for files in the duplicate database
If the source and destination hosts are different, then you must install the Oracle Database software on the destination host so that you can create the auxiliary instance. You can install the software in one of two ways:
Perform a normal installation with Oracle Universal Installer (OUI).
Install an Oracle Database that is the same release as the source database. Do not create a database; install the software only. Apply any required patches.
Clone the source Oracle home.
Use OUI to clone the source Oracle home. This ensures that all patches applied to the source database are present in the duplicate database.
See Also:
Oracle Universal Installer and OPatch User's Guide for information about cloning an Oracle home
Note:
If you are performing active database duplication, then skip this section and proceed to "Step 5: Preparing Remote Access to Databases".
When duplicating with a target and recovery catalog or just a target connection, RMAN uses metadata in the RMAN repository to locate backups and archived redo log files needed for duplication. If RMAN is connected to a recovery catalog, then RMAN obtains the backup metadata from the catalog. If RMAN is not connected to a catalog, as may be the case when performing backup-based duplication with a target connection, then RMAN obtains metadata from the control file.
Unless you are duplicating without a connection to the target and to the recovery catalog, the names of the backups must be available with the same names recorded in the RMAN repository. Ensure that auxiliary channels on the destination host can access all data file backups and archived redo log files (required to restore and recover the duplicate database to the desired point in time). If not, duplication fails. The archived redo log files can be available either as image copies or backup sets.
Note:
The database backup need not have been generated with BACKUP DATABASE. You can mix full and incremental backups of individual data files, but a full backup of every data file is required.
This section contains the following topics:
The steps in this task are specific to your media manager configuration.
To make SBT backups accessible to the auxiliary instance:
When you make disk backups accessible to the auxiliary instance, your strategy depends on whether or not you duplicate the database while connected to the target or recovery catalog. If you do not connect to the target or recovery catalog, then you must designate a backup location for the duplication by using the BACKUP LOCATION clause.
When you use a backup location, the backups and copies can reside in a shared location or can be moved to the location on the destination host. In the latter case, you do not need to preserve the name or the original path of the backup or copy. The location specified in the BACKUP LOCATION option must contain sufficient backup sets, image copies, and archived logs to restore all of the files being duplicated, and recover them to the desired point in time.
It is not required that all of the backups be from the same point in time, or that they all be backup sets, or all image copies. Data file backups can be supplied as either image copies or backup sets. Archived logs can be supplied either in their normal format or as backup sets of archived logs.
When you use backups from different points in time, the backup location must contain archived logs covering the time from the start of the oldest backup until the desired recovery point.
If the backup location contains backup files from multiple databases, then the DATABASE clause must specify the name of the database that is to be duplicated. If the backup location contains backup files from multiple databases having the same name, then the DATABASE clause must specify both the name and DBID of the database that is to be duplicated.
The source database's Fast Recovery Area is particularly well suited for use as a backup location because it almost always contains all of the files needed for the duplication. To use a Fast Recovery Area as a backup location, you can either remotely access it from the destination system, or copy its contents to the destination system.
When you are not using a backup location, your strategy depends on the following mutually exclusive scenarios:
Identical file systems for source and destination hosts
This scenario is the simplest and Oracle recommends it. For example, assume that the backups of the source database are stored in /dsk1/bkp. In this case, you can make disk backups accessible to the destination host in either of these ways:
Manually transfer backups from the source host to an identical path in the destination host. For example, if the backups are in /dsk1/bkp on the source host, then use FTP to transfer them to /dsk1/bkp on the destination host.
Use NFS or shared disks and ensure that the same path is accessible in the destination host. For example, assuming that the source host can access /dsk1/bkp, use NFS to mount /dsk1/bkp on the destination host and use /dsk1/bkp as the mount point name.
Different file systems for source and destination hosts
In this case you cannot use the same directory name on the destination host as you use on the source host. You have the following options:
You can use shared disk to make backups available. This section explains the shared disk technique.
You cannot use shared disk to make backups available. "Making Disk Backups Accessible Without Shared Disk" explains this technique.
Assume that you have two hosts, srchost and dsthost, and access to NFS or shared disk. The database on srchost is called srcdb. The backups of srcdb reside in /dsk1/bkp on host srchost. The directory /dsk1/bkp is in use on the destination host, but the directory /dsk2/dup is not in use on either host.
To transfer the backups from the source host to the destination host:
When a database must be accessed from another host, you must set up a password file and Oracle Net connectivity. Be aware of the potential security consequences of this type of setup.
This section contains the following topics:
You can establish database connectivity by manually creating a password file or using Oracle Net.
To create a password file manually:
Follow the instructions in Oracle Database Administrator's Guide to create a password file.
The types of file names allowed for password files and the location of the password files are both platform-specific and operating system-specific.
See Also:
Oracle Data Guard Concepts and Administration to create a password file manually
To establish Oracle Net connectivity and set up a static listener:
Follow the instructions in Oracle Database Net Services Administrator's Guide to configure a client for connection to a database and add static service information for the listener.
You have the following options for creating a password file for the auxiliary instance on the destination host:
Copy the source database password file to the destination host and rename it to match the auxiliary instance name. This is applicable only if the source and destination hosts are on the same platform.
Create the password file manually.
Create the password file with the ORAPWD command. The SYSBACKUP option creates a SYSBACKUP entry in the new password file.
Specify the PASSWORD FILE option on the DUPLICATE... FROM ACTIVE DATABASE command.
In this case, RMAN copies the source database password file to the destination host and overwrites any existing password file for the auxiliary instance. This technique is useful if the source database password file has multiple passwords to make available on the duplicate database.
There are additional requirements for the case of DUPLICATE ... FROM ACTIVE DATABASE. The password file must contain at least two passwords, for the SYS user and the user with SYSBACKUP privilege, and the passwords must match the passwords of the source database. You can start the auxiliary instance and enable the source database to connect to it.
See Also:
Oracle Database Administrator's Guide for information about creating a password file
Note:
If you create a standby database with the FROM ACTIVE DATABASE option, then RMAN always copies the password file to the standby host.
If transparent encryption is configured on the source database, then you must ensure that the Oracle software keystore from the source database is available to the auxiliary instance. Manually copy the source database keystore to the destination host.
The following are requirements for the keystore at the duplicate database:
The keystore must be in the default location, or in the location indicated by the sqlnet.ora file.
Permissions on the Oracle keystore file must be set so that the database can access the file.
The keystore must be an auto login keystore.
During duplication, the auxiliary instance is restarted thereby causing the Oracle software keystore to become unavailable. To ensure that the auxiliary instance has access to the keystore, set the ENCRYPTION_WALLET_LOCATION parameter in the sqlnet.ora file such that it points to the keystore location.
With Oracle Real Application Clusters (Oracle RAC), register the auxiliary instance statically with an Oracle Grid Infrastructure listener and use the ENVS parameter in the sqlnet.ora file of the Oracle Grid home to specify environment variables that set the keystore location and the unique name of the database.
The following example sets the ENVS parameter in sqlnet.ora to specify the keystore location and unique database name:
(ENVS="ORACLE_UNQNAME=cdbrptl, ENCRYPTION_WALLET_LOCATION=(SOURCE=(METHOD=FILE)(METHOD_DATA=(DIRECTORY=/etc/ORACLE/WALLETS/cdbrpt1)))")
If the source database uses a password-based software keystore (not an auto-login software keystore), then you must provide the keystore password before you begin the database duplication.
Use the SET command with the DECRYPTION WALLET OPEN IDENTIFIED BY clause to specify the password that must be used to open the keystore.
The following command sets specifies that the password used to open the keystore is my_pswd:
SET DECRYPTION WALLET OPEN IDENTIFIED BY my_pswd;
See Also:
Oracle Database Net Services Reference for information about specifying the Oracle keystore location in sqlnet.ora
Oracle Database Advanced Security Guide for information about the default Oracle keystore location
Oracle Database Advanced Security Guide for information about converting a standard Oracle keystore to an auto login keystore
The location and content of the initialization parameter file depend on your choice in "Step 2: Choosing a Strategy for Naming Duplicate Files". This section makes the following assumptions:
You choose the recommended technique of using the same naming strategy for the source and destination hosts. For Oracle Real Application Clusters environments, you therefore use the same ORACLE_SID for source and destination hosts.
You create a text-based initialization parameter file (PFILE) for the auxiliary instance. See Table 26-5.
The initialization parameter file is located in the operating system-specific default location of the host on which SQL*Plus runs.
For example, on Linux and UNIX the default initialization parameter file name is ORACLE_HOME/dbs/initORACLE_SID.ora and on Windows the file name is ORACLE_HOME\database\initORACLE_SID.ora.
You plan to specify the SPFILE clause on the DUPLICATE command.
The DUPLICATE ... SPFILE technique is easiest because during duplication RMAN automatically copies the server parameter file from the source database to the auxiliary instance or restores it from backup.
If you cannot meet the preceding requirements, then see "Duplicating a Database When No Server Parameter File Exists".
To create an initialization parameter file and start the auxiliary instance:
Do one of the following:
Copy the initialization parameter file from the source host to the destination host, placing it in the operating system-specific default location, and then modify DB_NAME, DB_DOMAIN, and the various destination/location parameters such as CONTROL_FILES and DB_RECOVERY_FILE_DEST.
If you are duplicating a CDB, ensure that the ENABLE_PLUGGABLE_DATABASE parameter is present and set to TRUE.
Complete these steps:
Using a text editor, create an empty file for use as a text-based initialization parameter file, and save it in the operating system-specific default location.
In the parameter file, set DB_NAME and DB_DOMAIN. These are the only required parameters.
Setting DB_DOMAIN enables you to connect to the default database service when connecting with a net service name.
If the auxiliary instance is to be a CDB, then set the following parameter:
ENABLE_PLUGGABLE_DATABASE=TRUE
If necessary, set other initialization parameters like those needed for Oracle Real Application Clusters.
Set the required environment variables, such as ORACLE_HOME and ORACLE_SID.
Start SQL*Plus and connect to the auxiliary instance as a user with SYSDBA or SYSBACKUP privileges. Start the auxiliary instance in NOMOUNT mode. No PFILE parameter on the STARTUP command is necessary if the file is in the default location.
SQL> STARTUP NOMOUNT;
Note:
For this scenario, ensure that the auxiliary instance is started with a text-based initialization parameter file and not a server parameter file. Do not create a control file or try to mount or open the auxiliary instance.
Note:
If you are performing backup-based duplication without a target connection, then skip to "Configuring RMAN Channels for Use in Duplication".
If RMAN is connected to the source database as TARGET, then the source database must be in the proper state for the duplication.
To ensure that the source database is in the proper state:
In this task, you must start the RMAN client and connect to the database instances required by the duplication technique chosen in "Step 1: Choosing a Duplication Technique". The RMAN client can be located on any host so long as it can connect to the necessary databases over the network.
To start RMAN and connect to the target and auxiliary instances:
This section contains the following topics:
The channel on the auxiliary instance, not the source database instance, restores RMAN backups in backup-based duplication. The channel configuration depends on your duplication technique.
RMAN can use the same channel configurations on the source database for duplication on the destination host. RMAN can use these configurations even if the source database channels do not specify the AUXILIARY option.
Note the following additional considerations:
The channel type (DISK or sbt) of the auxiliary channel must match the backup media. In general, the more channels you allocate for disk backups, the faster the duplication. You cannot increase the speed of duplication after the disks reach their maximum read/write rate. For tape backups, limit the number of channels to the number of devices available.
If the auxiliary channels need special parameters (for example, to point to a different media manager), then you can configure an automatic channel with the AUXILIARY option of the CONFIGURE command.
When you perform duplication without a target connection and without a recovery catalog, only disk channels can be used. If no user-allocated channels are used, then only one channel initially restores the control file. After the control file is mounted, the number of allocated channels depends on the configuration in the restored control file.
If you omit the USING BACKUPSET clause from the DUPLICATE command and the number of allocated auxiliary channels is greater than or equal to the number of target channels, then RMAN still uses active database duplication with backup sets.
In active database duplication, you do not have to change your source database channel configuration or configure AUXILIARY channels.
To perform active database duplication using backup sets, you must allocate additional auxiliary channels. The number of auxiliary channels must be greater than or equal to the number of target channels. Using backup sets for active duplication also enables parallelism which can improve the speed of the duplication process.
See Also:
Oracle Database Backup and Recovery Reference for information about the CONFIGURE command
This section describes the most basic procedure to duplicate a database. This section makes the following assumptions:
You are duplicating the database to a remote host. The duplicate database files use the same names as the source database files.
Note:
When running the DUPLICATE command in this configuration, you must specify the NOFILENAMECHECK option on the DUPLICATE command. If you duplicate a database on the same host as the source database, then verify that NOFILENAMECHECK is not specified.
You are duplicating the entire database or one or more PDBs. For other scenarios, see "Duplicating a Subset of the Source Database Tablespaces".
Note:
For more information about duplicating an Oracle RAC database, refer to My Oracle Support Note 1617946.1 at https://support.oracle.com/rs?type=doc&id=1617946.1.
To duplicate a database to a remote host with the same directory structure:
DUPLICATE command.Example 25-1 Duplicating to a Different Host with the Same Directory Structure (Active)
This example illustrates how to perform active duplication. RMAN uses the pull method (using backup sets) by default.DUPLICATE requires theNOFILENAMECHECK option because the source database files have the same names as the duplicate database files.
The PASSWORD FILE option specifies that RMAN copies the password file to the destination host.
RMAN automatically copies the server parameter file to the destination host, restarts the auxiliary instance with the server parameter file, copies all necessary database files and archived redo logs over the network to the destination host, and recovers the database. Finally, RMAN opens the database with theRESETLOGS option to create the online redo log.dupdb is theDB_NAME of the duplicate database
DUPLICATE TARGET DATABASE TO dupdb
  FROM ACTIVE DATABASE
  PASSWORD FILE
  SPFILE
  NOFILENAMECHECK;
Example 25-2 Duplicating a PDB
This example adds the PLUGGABLE DATABASE clause to the previous example to duplicate a single PDB. The root and seed database are automatically included in the duplication. The auxiliary instance must have been started with an initialization parameter file that includes the declaration enable_pluggable_database=TRUE.
DUPLICATE TARGET DATABASE TO cdbdupe
  PLUGGABLE DATABASE sales
  FROM ACTIVE DATABASE
  PASSWORD FILE
  SPFILE
  NOFILENAMECHECK;
In this variation of Example 25-1, RMAN does not use a TARGET connection to the source database. Example 25-3 creates a duplicate of the source database prod as it appeared in 2013 in a previous database incarnation. RMAN is not connected to the source database but must be connected to a recovery catalog because no BACKUP LOCATION clause is provided.
Example 25-3 Duplicating a Database to a Past Point in Time (Backup-Based)
DUPLICATE DATABASE prod DBID 8675309 TO dupdb
  UNTIL TIME "TO_DATE('11/01/2013', 'MM/DD/YYYY')"
  SPFILE
  NOFILENAMECHECK;
Note the following characteristics of Example 25-3:
The FROM ACTIVE DATABASE clause is not specified. By not specifying this clause, you instruct RMAN to perform backup-based duplication.
The DBID of the source database is specified because the source database name prod is not unique in the recovery catalog.
The NOFILENAMECHECK check is specified because it is necessary when the duplicate database files use the same names as the source database files.
Assume a variation in which you want to restore an archival backup, which is all-inclusive in the sense that every file needed to restore and recover the database is included. The recommended technique for restoring an archival backup for testing is to create a temporary instance and use the DUPLICATE command. In this way, you avoid interfering with the source database.
In the DUPLICATE command you must specify the restore point that was created with the archival backup. You can only specify TO RESTORE POINT if RMAN is connected to a catalog, or to the source database when the restore point exists in the control file.Example 25-4 specifies restore point TESTDB103107.
Example 25-4 Using an Archival Backup for Backup-Based Duplication
DUPLICATE DATABASE prod DBID 8675309 TO dupdb
  TO RESTORE POINT TESTDB103107
  SPFILE
  NOFILENAMECHECK;
Assume a backup-based variation of Example 25-1 in which RMAN is connected as TARGET to the source database. Example 25-5 recovers the duplicate database to 1 week ago to view the data in the source database as it appeared then.
Example 25-5 Duplicating a Database to a Past Point in Time (Backup-Based)
DUPLICATE TARGET DATABASE TO dupdb
  SPFILE
  NOFILENAMECHECK
  UNTIL TIME 'SYSDATE-7';
Note the following characteristics of Example 25-5:
The FROM ACTIVE DATABASE clause is not specified. By not specifying this clause, you instruct RMAN to perform backup-based duplication.
The NOFILENAMECHECK option is specified because it is necessary when the duplicate database files use the same names as the source database files.
In the variation of Example 25-1 shown in Example 25-6, RMAN does not use a TARGET connection to the source database or a CATALOG connection to a recovery catalog. All backup and copies necessary for duplication until November 1 of 2013 at 2:00 PM, including a control file backup or copy, have been placed under /prod_backups.
Example 25-6 Duplicating a Database Without a Target and Recovery Catalog Connection (Backup-Based)
DUPLICATE DATABASE TO dupdb
  UNTIL TIME "TO_DATE('11/01/2013 14:00:00', 'MM/DD/YYYY HH24:MI:SS')"
  SPFILE
  BACKUP LOCATION '/prod_backups'
  NOFILENAMECHECK;
Note the following characteristics of Example 25-6 :
The database name is not specified. By not specifying a database name with the DATABASE keyword, DUPLICATE obtains the database name and DBID from the backups. An error is displayed if backups for multiple databases were found in the BACKUP LOCATION.
Use of the BACKUP LOCATION clause identifies the type of duplication as backup-based with neither a target connection nor recovery catalog.
The UNTIL TIME option is specified. It is the only UNTIL subclause permitted with the BACKUP LOCATION clause.
The NOFILENAMECHECK option is specified because it is necessary when the duplicate database files use the same names as the source database files.
Example 25-7 Duplicating a Database to a Past Point in Time (Backup-Based)
This example performs backup-based duplication to a point-in-time in the past.
DUPLICATE TARGET DATABASE TO dupdb
  SPFILE
  NOFILENAMECHECK
  UNTIL TIME 'SYSDATE-7';
Note the following characteristics of Example 25-7:
The FROM ACTIVE DATABASE clause is not specified. Omitting this clause instructs RMAN to perform backup-based duplication.
The NOFILENAMECHECK option check is specified because it is necessary when the duplicate database files use the same names as the source database files.
This example shows how to use a script to automate the process of duplicating a target database.
backups of the target database are available to the auxiliary instance
connection to the RMAN recovery catalog that contains metadata for the target database is available (connection to the target database is not required)
both source and duplicate database use Oracle Managed Files (OMF)
operating system used is Linux or UNIX
audit directory is created on the auxiliary database host
prerequisites for backup-based duplication are met
drops the auxiliary database
backs up the target database
creates a dummy auxiliary instance and opens it in NOMOUNT mode
duplicates the target database using the target database backups and metadata in the RMAN recovery catalog
The duplicate database control file is stored as +REDO/ORACLE_SID/CONTROLFILE/cf3.ctl and the data files are stored in the +DATA directory.
verifies that the required objects are created in the duplicate database
To duplicate a target database using backup-based duplication without a target connection:
RMAN automatically optimizes a DUPLICATE command that is a repeat of a previously failed DUPLICATE command. The repeat DUPLICATE command notices which data files were successfully copied earlier and does not copy them again. This applies to all forms of duplication, whether they are backup-based (with or without a target connection) or active database duplication. The automatic optimization of the DUPLICATE command can be especially useful when a failure occurs during the duplication of very large databases.
To restart a DUPLICATE operation:
The second DUPLICATE operation:
Locates the data files that were successfully duplicated by the initial DUPLICATE command.
Displays a message similar to the following for each data file that it does not need to duplicate again:
RMAN-05560: Using previous duplicated file /oradata/new/data01.f for datafile 1 with checkpoint SCN of 1654665
Restores only the missing or incomplete data files, thereby avoiding recopying and restoring all the data files.
If you do not want RMAN to automatically recover from a failed DUPLICATE operation, specify the keyword NORESUME to disable the functionality. Using the keyword NORESUME in the first invocation of DUPLICATE prevents a subsequent DUPLICATE command for the new database from using this automatic optimization.

