How to restore Azure VM data in Azure portal
This article describes how to restore Azure VM data from the recovery points stored in Azure Backup Recovery Services vaults.
Restore options
Azure Backup provides several ways to restore a VM.
| Restore option | Details |
|---|---|
| Create a new VM | Quickly creates and gets a basic VM up and running from a restore point. You can specify a name for the VM, select the resource group and virtual network (VNet) in which it will be placed, and specify a storage account for the restored VM. The new VM must be created in the same region as the source VM. If a VM restore fails because an Azure VM SKU wasn't available in the specified region of Azure, or because of any other issues, Azure Backup still restores the disks in the specified resource group. |
| Restore disk | Restores a VM disk, which can then be used to create a new VM. Azure Backup provides a template to help you customize and create a VM. The restore job generates a template that you can download and use to specify custom VM settings, and create a VM. The disks are copied to the Resource Group you specify. Alternatively, you can attach the disk to an existing VM, or create a new VM using PowerShell. This option is useful if you want to customize the VM, add configuration settings that weren't there at the time of backup, or add settings that must be configured using the template or PowerShell. |
| Replace existing | You can restore a disk, and use it to replace a disk on the existing VM. The current VM must exist. If it's been deleted, this option can't be used. Azure Backup takes a snapshot of the existing VM before replacing the disk, and stores it in the staging location you specify. Existing disks connected to the VM are replaced with the selected restore point. The snapshot is copied to the vault, and retained in accordance with the retention policy. After the replace disk operation, the original disk is retained in the resource group. You can choose to manually delete the original disks if they aren't needed. Replace existing is supported for unencrypted managed VMs, including VMs created using custom images. It's unsupported for classic VMs, unmanaged VMs, and generalized VMs. If the restore point has more or less disks than the current VM, then the number of disks in the restore point will only reflect the VM configuration. Replace existing is also supported for VMs with linked resources, like user-assigned managed-identity or Key Vault. |
| Cross Region (secondary region) | Cross Region restore can be used to restore Azure VMs in the secondary region, which is an Azure paired region. You can restore all the Azure VMs for the selected recovery point if the backup is done in the secondary region. During the backup, snapshots aren't replicated to the secondary region. Only the data stored in the vault is replicated. So secondary region restores are only vault tier restores. The restore time for the secondary region will be almost the same as the vault tier restore time for the primary region. This feature is available for the options below: - Create a VM - Restore Disks We don't currently support the Replace existing disks option. Permissions The restore operation on secondary region can be performed by Backup Admins and App admins. |
| Cross Subscription Restore (preview) | Allows you to restore Azure Virtual Machines or disks to any subscription (as per the Azure RBAC capabilities) from restore points. You can trigger Cross Subscription Restore for managed virtual machines only. Cross Subscription Restore is supported for Restore with Managed System Identities (MSI). It's unsupported for snapshots and secondary region restores. It's unsupported for unmanaged VMs, Encrypted Azure VMs and Trusted Launch VMs. |
| Cross Zonal Restore | Allows you to restore Azure Virtual Machines or disks pinned to any zone to different available zones (as per the Azure RBAC capabilities) from restore points. You can trigger Cross Zonal Restore for managed virtual machines only. Cross Zonal Restore is supported for Restore with Managed System Identities (MSI). Cross Zonal Restore supports restore of an Azure zone pinned/non-zone pinned VM from a vault with Zonal-redundant storage (ZRS) enabled. Learn how to set Storage Redundancy. It's supported to restore an Azure zone pinned VM only from a vault with Cross Region Restore (CRR) (if the secondary region supports zones) or Zone Redundant Storage (ZRS) enabled. Cross Zonal Restore is supported from secondary regions. It's unsupported from snapshots restore point. It's unsupported for Encrypted Azure VMs and Trusted Launch VMs. |
Tip
To receive alerts/notifications when a restore operation fails, use Azure Monitor alerts for Azure Backup. This helps you to monitor such failures and take necessary actions to remediate the issues.
Note
You can also recover specific files and folders on an Azure VM. Learn more.
Storage accounts
Some details about storage accounts:
- Create VM: When you create a new VM, the VM will be placed in the storage account you specify.
- Restore disk: When you restore a disk, the disk is copied to the storage account you specify. The restore job generates a template that you can download and use to specify custom VM settings. This template is placed in the specified storage account.
- Replace disk: When you replace a disk in an existing VM, Azure Backup takes a snapshot of the existing VM before replacing the disk. The snapshot is also copied to the Recovery Services vault through data transfer, as a background process. However, once the snapshot phase is completed, the replace disks operation is triggered. After the replace disk operation, the disks of the source Azure VM are left in the specified Resource group for your operation and the VHDs are stored in the specified storage account. You can choose to delete or retain these VHDs and disks.
- Storage account location: The storage account must be in the same region as the vault. Only these accounts are displayed. If there are no storage accounts in the location, you need to create one.
- Storage type: Blob storage isn't supported.
- Storage redundancy: Zone redundant storage (ZRS) isn't supported. The replication and redundancy information for the account is shown in parentheses after the account name.
- Premium storage:
- When you restore non-premium VMs, premium storage accounts aren't supported.
- When you restore managed VMs, premium storage accounts configured with network rules aren't supported.
Before you start
To restore a VM (create a new VM), make sure you have the correct Azure role-based access control (Azure RBAC) permissions for the Restore VM operation.
If you don't have permissions, you can restore a disk, and then after the disk is restored, you can use the template that was generated as part of the restore operation to create a new VM.
Note
The functionality described in the following sections can also be accessed via Backup center. Backup center is a single unified management experience in Azure. It enables enterprises to govern, monitor, operate, and analyze backups at scale. With this solution, you can perform most of the key backup management operations without being limited to the scope of an individual vault.
Select a restore point
Navigate to Backup center in the Azure portal and click Restore from the Overview tab.
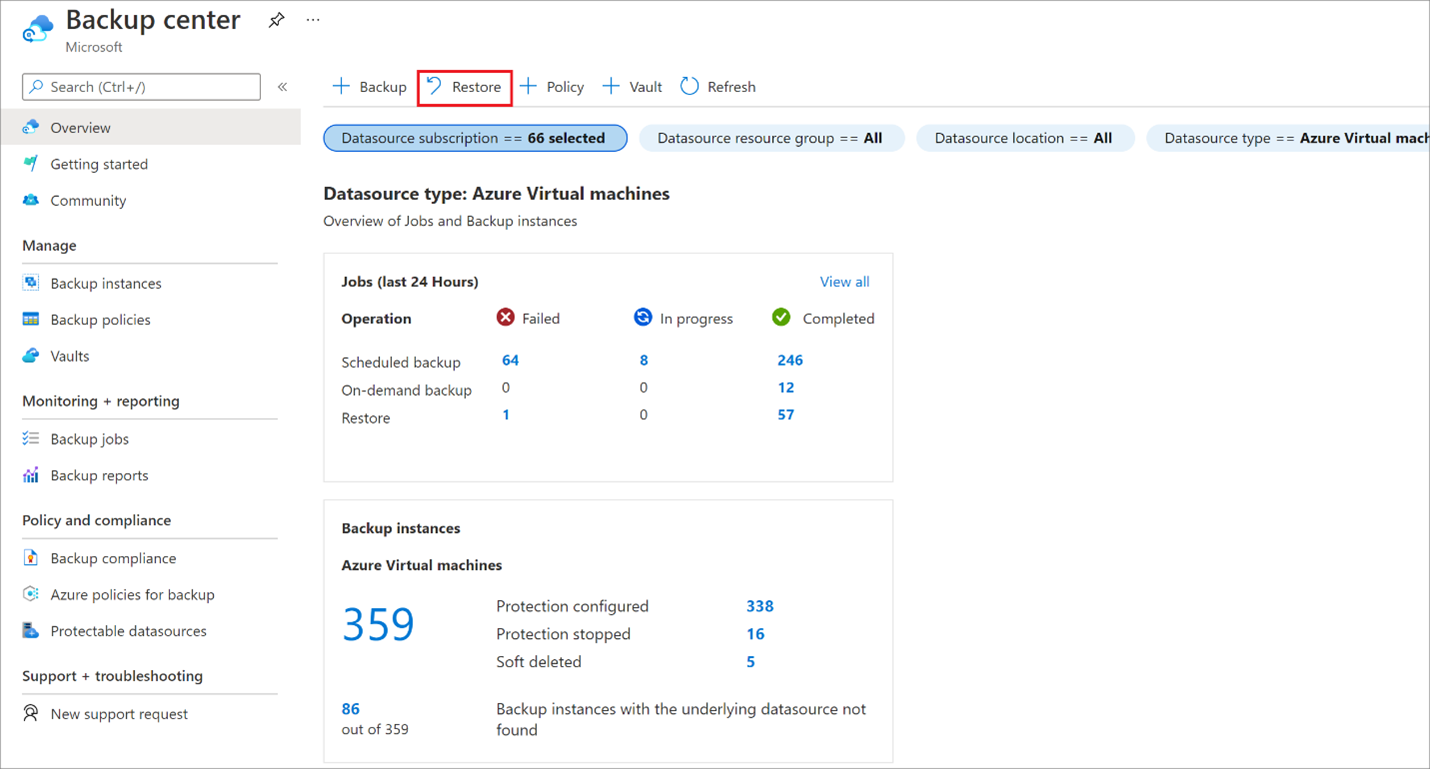
Select Azure Virtual machines as the Datasource type, and then select a Backup instance.

Select a VM and click Continue.
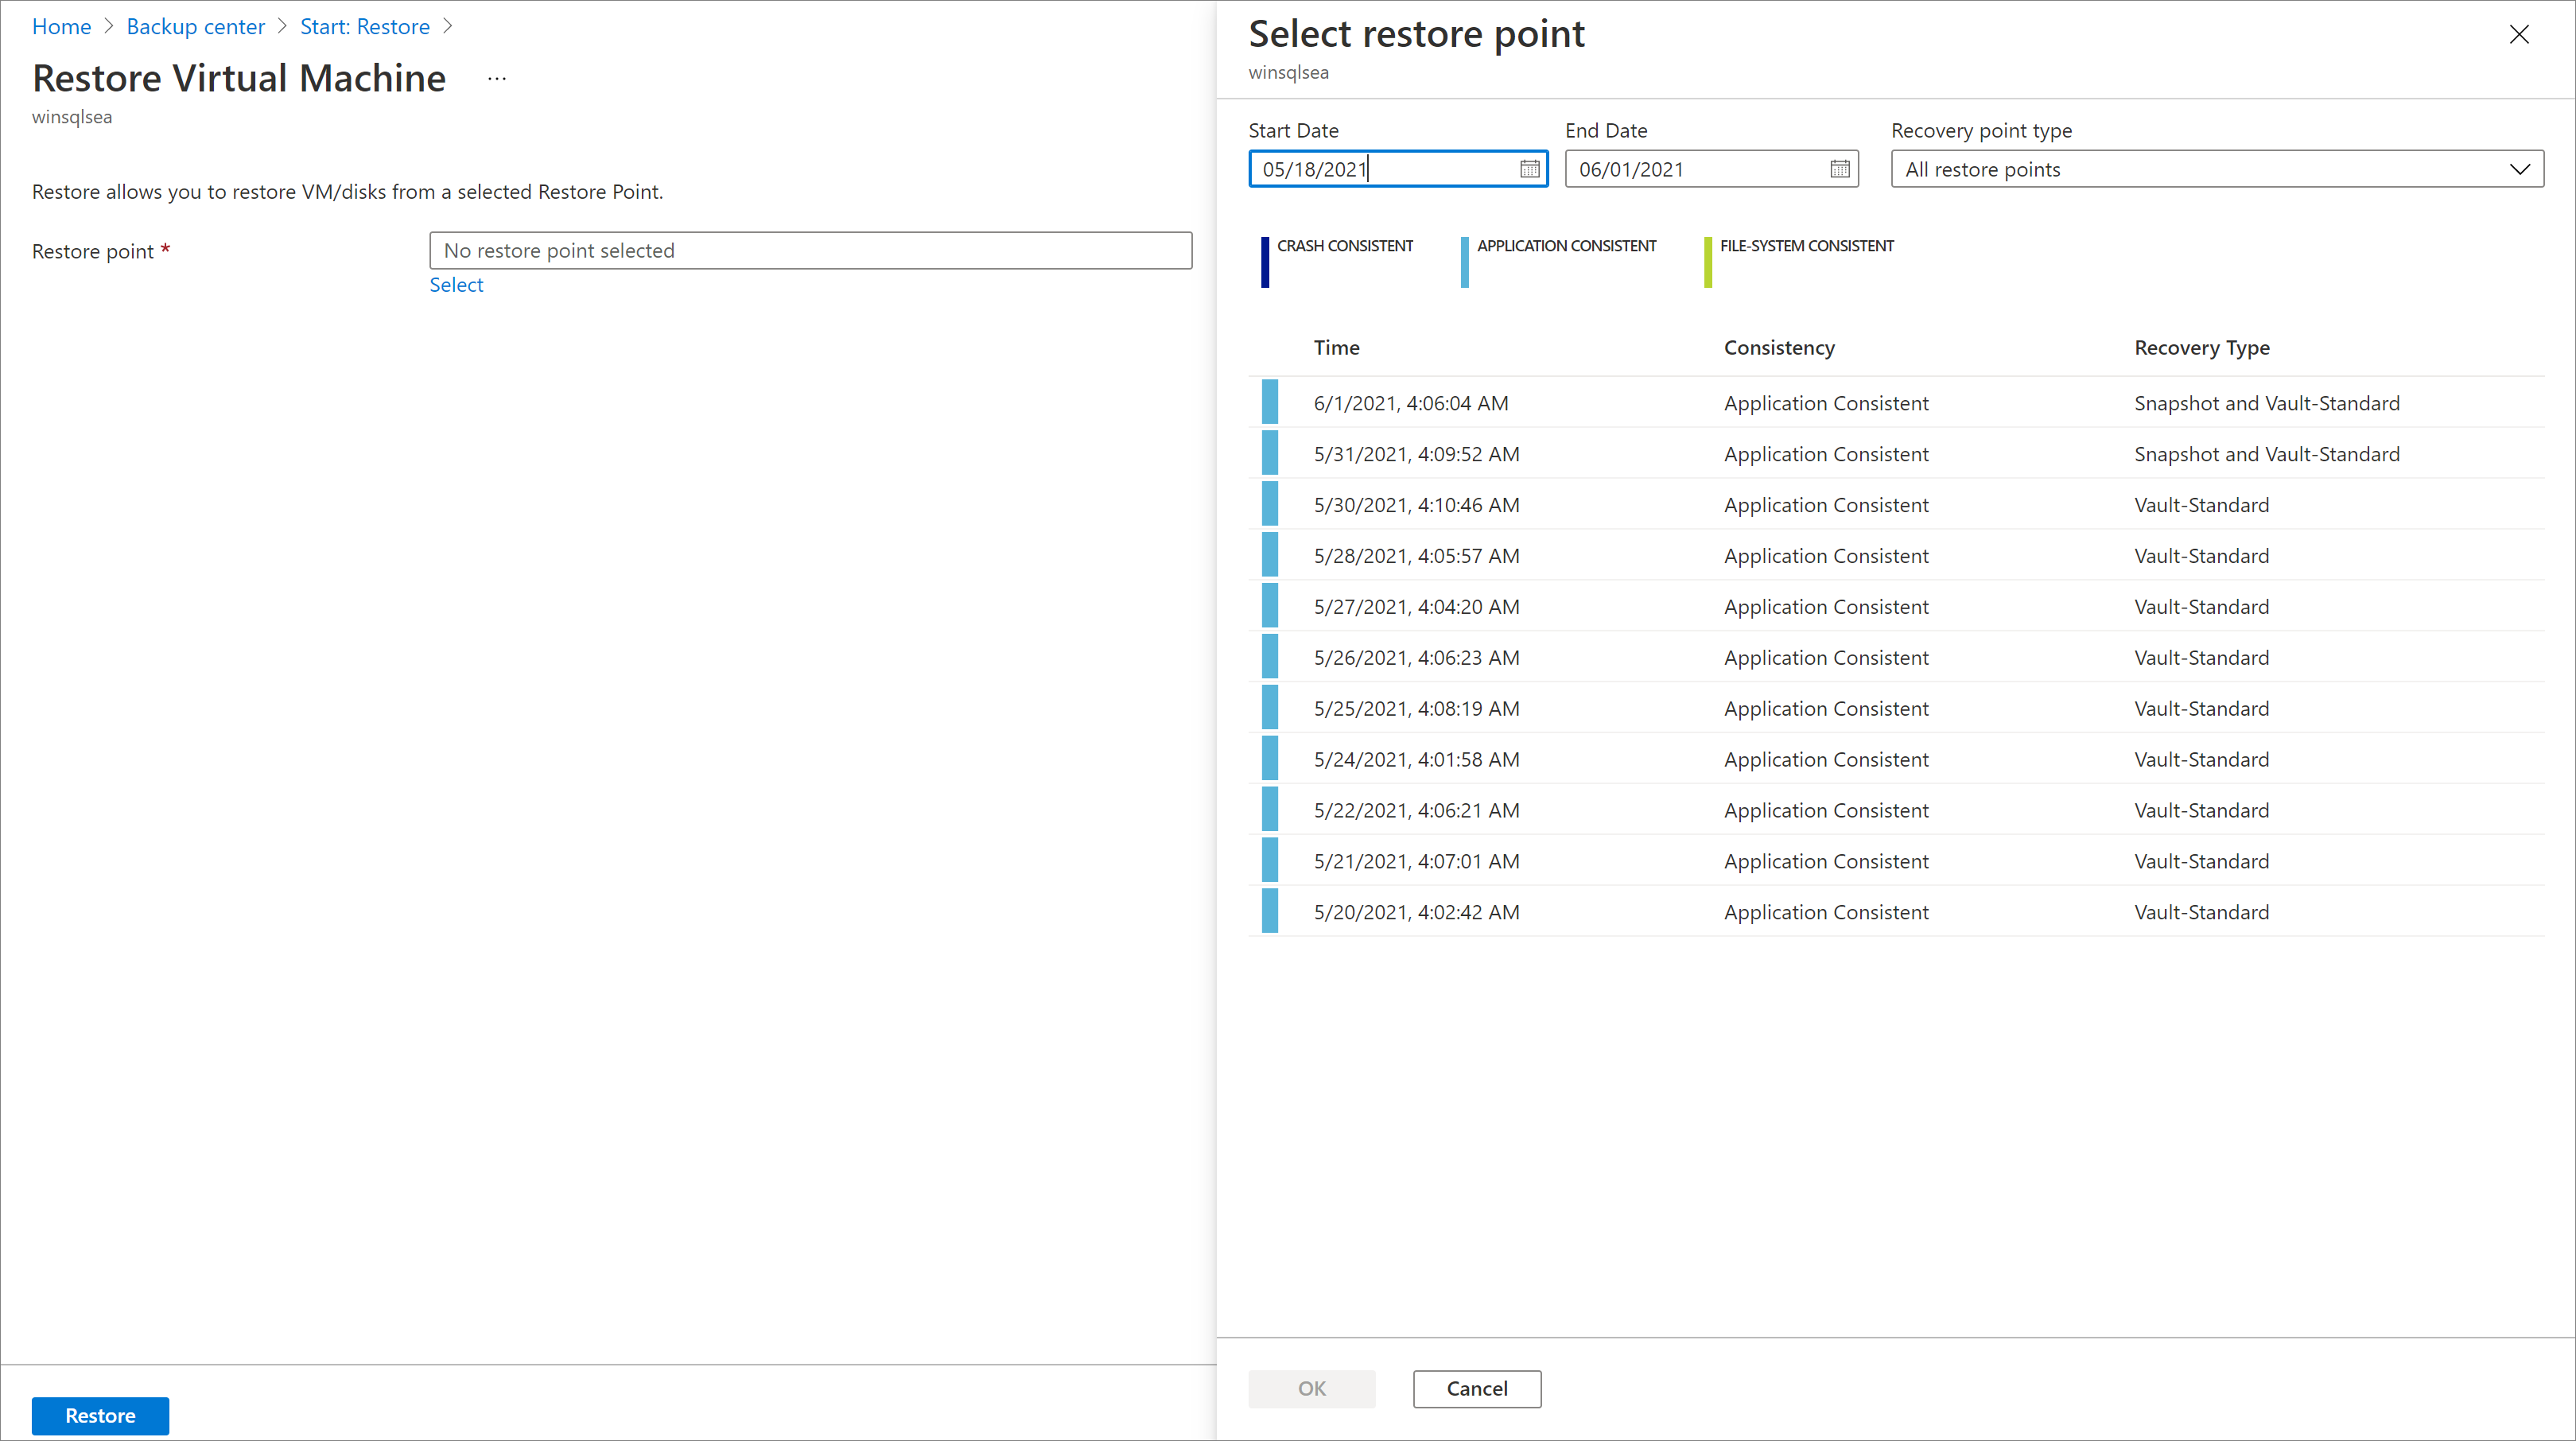
In the next screen that appears, select a restore point to use for the recovery.
Choose a VM restore configuration
In Restore Virtual Machine, select a restore option:
Create new: Use this option if you want to create a new VM. You can create a VM with simple settings, or restore a disk and create a customized VM.
Replace existing: Use this option if you want to replace disks on an existing VM.

Specify settings for your selected restore option.
Create a VM
As one of the restore options, you can create a VM quickly with basic settings from a restore point.
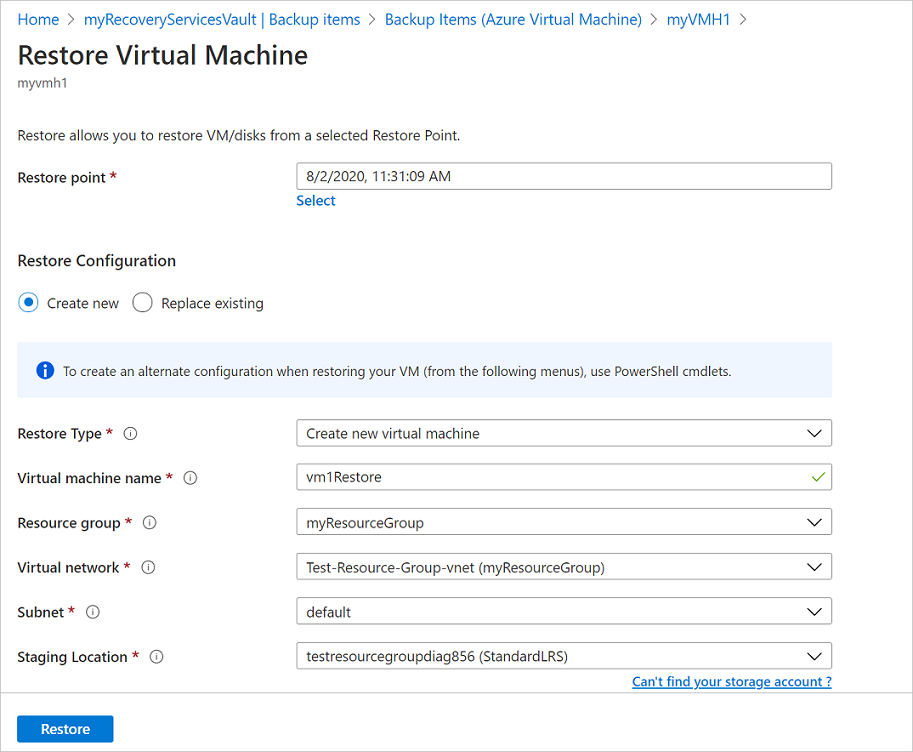
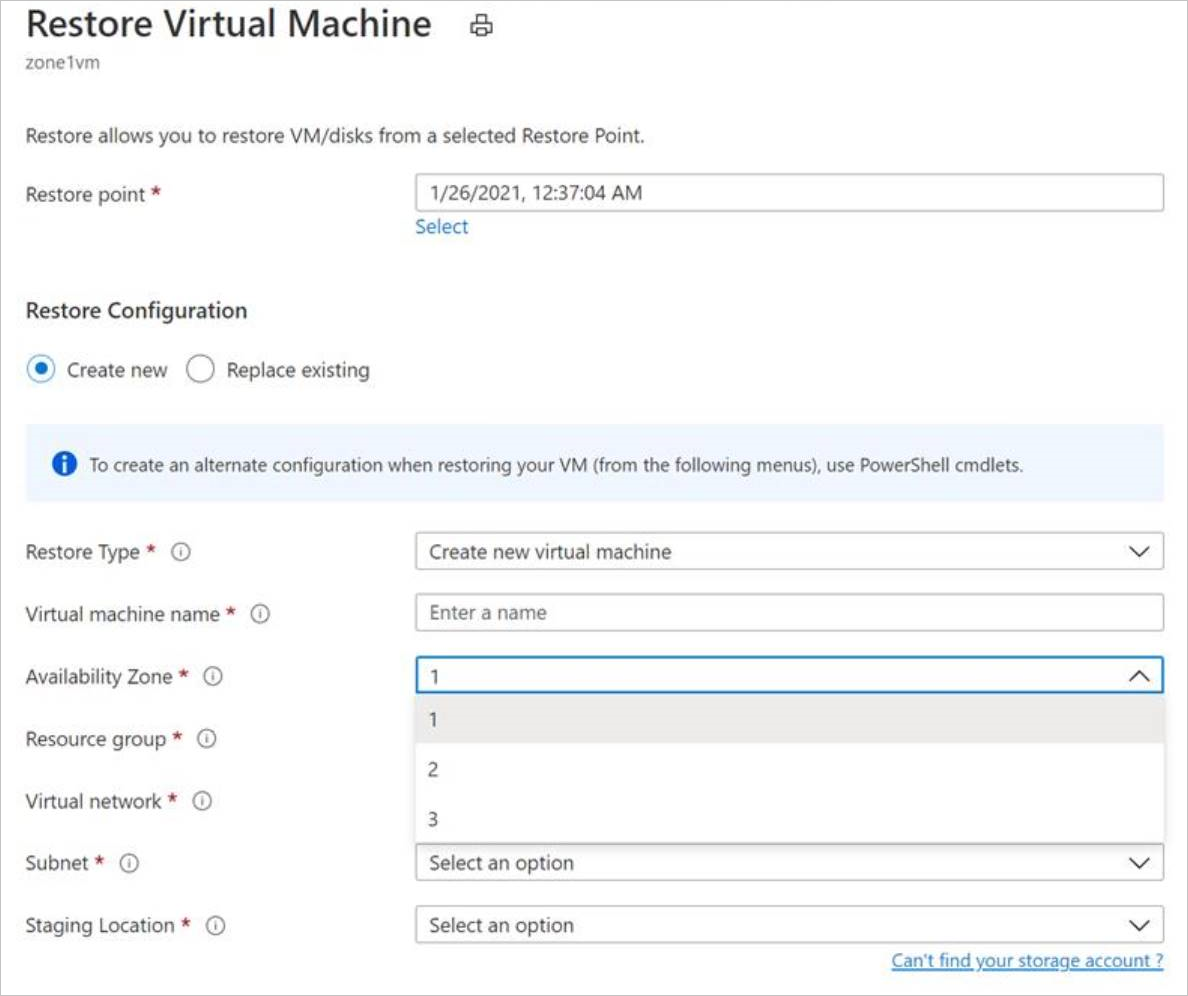
In Restore Virtual Machine > Create new > Restore Type, select Create new virtual machine.
In Virtual machine name, specify a VM that doesn't exist in the subscription.
In Resource group, select an existing resource group for the new VM, or create a new one with a globally unique name. If you assign a name that already exists, Azure assigns the group the same name as the VM.
In Virtual network, select the VNet in which the VM will be placed. All VNets associated with the subscription in the same location as the vault, which is active and not attached with any affinity group, are displayed. Select the subnet.
The first subnet is selected by default.
In Staging Location, specify the storage account for the VM. Learn more.
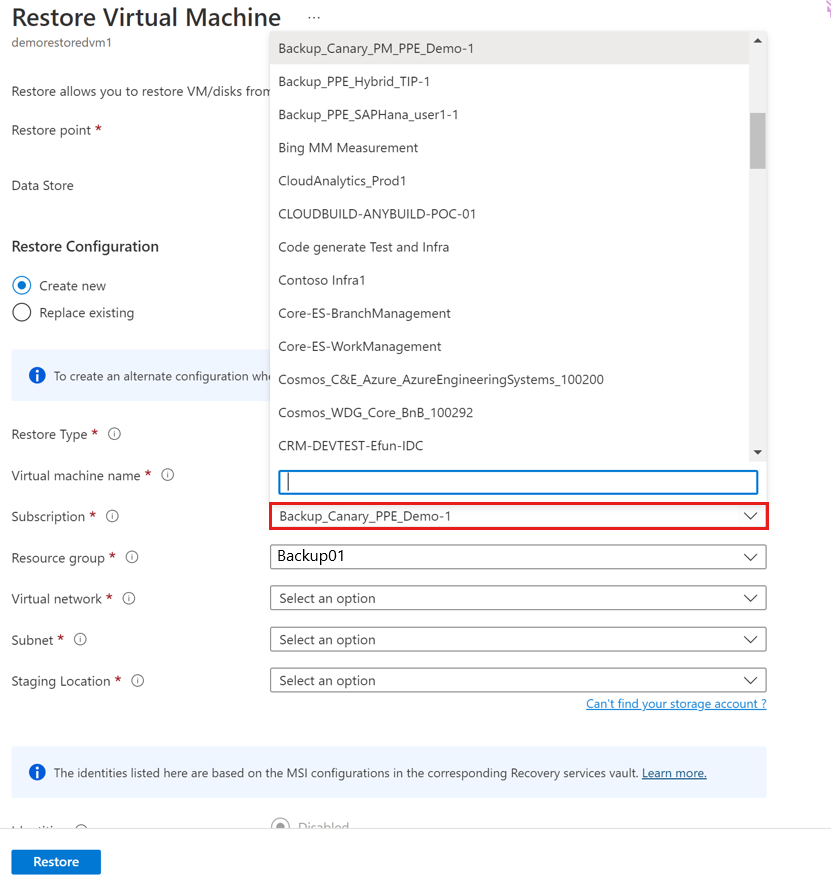
Choose the required subscription from the Subscription drop-down list to restore an Azure VM to a different subscription.
Azure Backup now supports Cross Subscription Restore (CSR), you can now restore an Azure VM using a recovery point from default subscription to another. Default subscription is the subscription where recovery point is available.
The following screenshot lists all subscriptions under the tenant where you've permissions, which enable you to restore the Azure VM to another subscription.
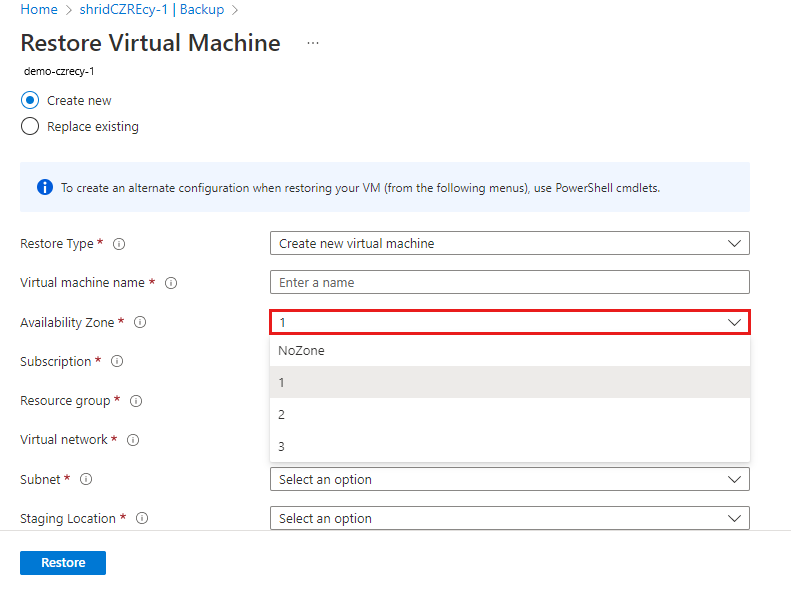
Choose the required zone from the Availability Zone drop-down list to restore an Azure VM pinned to any zone to a different zone.
Azure Backup now supports Cross Zonal Restore (CZR), you can now restore an Azure VM from the default zone to any available zones. Default zone is the zone in which Azure VM is running.
The following screenshot lists all zones that enable you to restore Azure VM to another zone.
Note
Azure Backup supports CZR only for vaults with ZRS or CRR redundancy.
Select Restore to trigger the restore operation.
Note
Before you modify any NSG settings, ensure the VM restore operation is complete. Learn about tracking the restore operation.
Restore disks
As one of the restore options, you can create a disk from a restore point. Then with the disk, you can do one of the following actions:
- Use the template that's generated during the restore operation to customize settings, and trigger VM deployment. You edit the default template settings, and submit the template for VM deployment.
- Attach restored disks to an existing VM.
- Create a new VM from the restored disks using PowerShell.
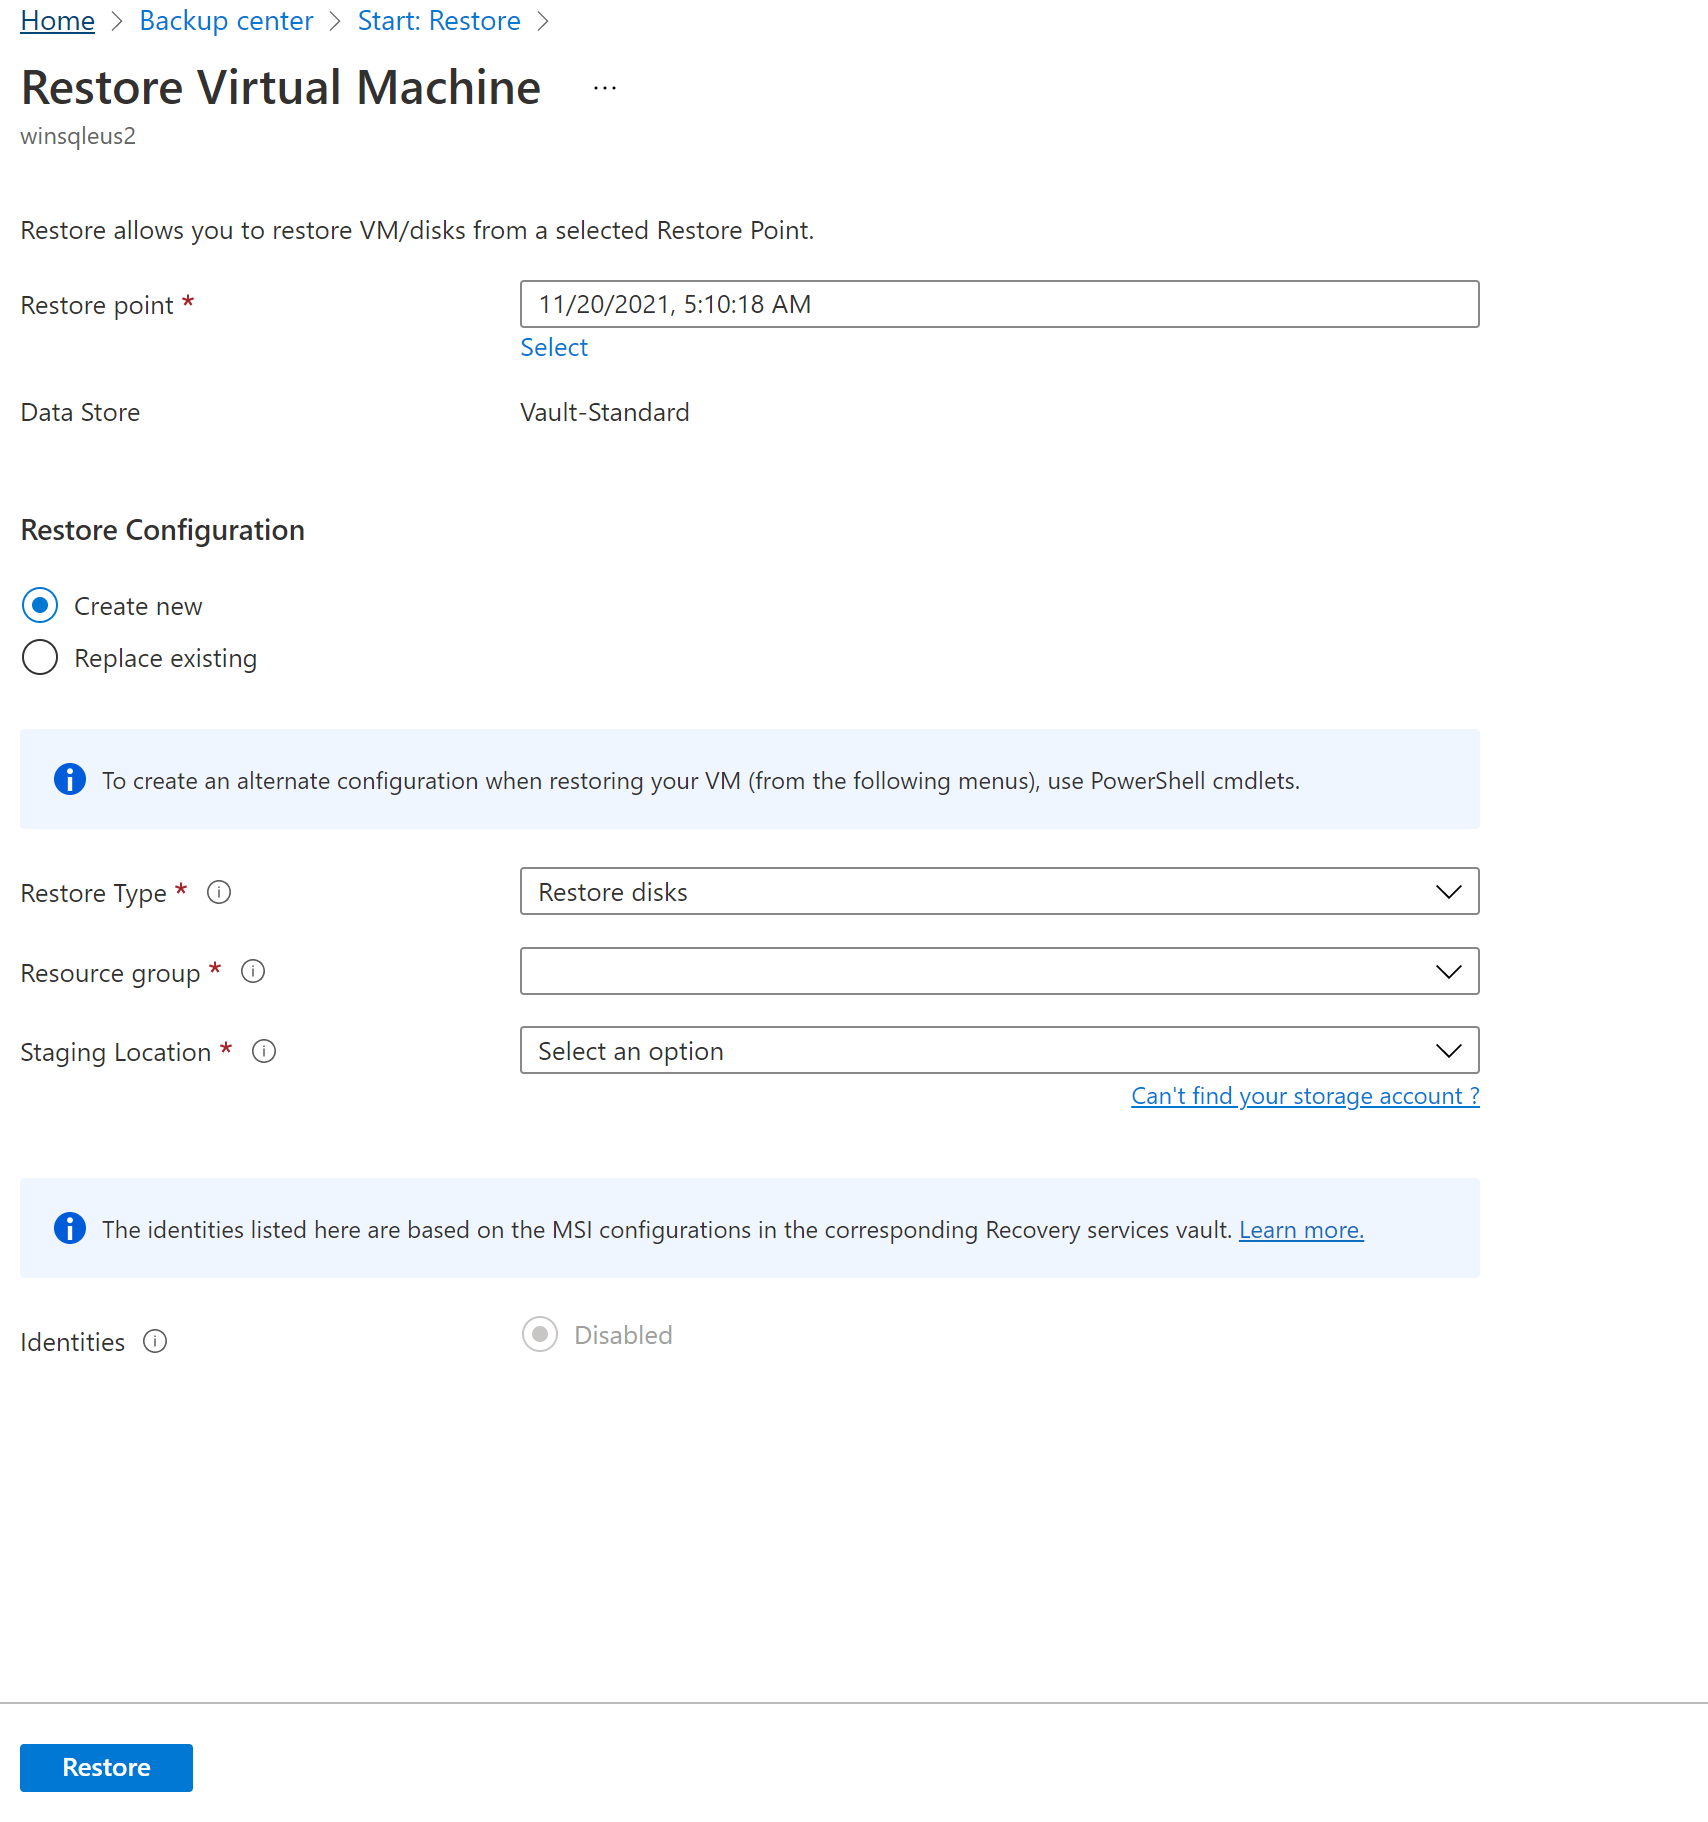
In Restore configuration > Create new > Restore Type, select Restore disks.
In Resource group, select an existing resource group for the restored disks, or create a new one with a globally unique name.
In Staging location, specify the storage account to which to copy the VHDs. Learn more.
Choose the required subscription from the Subscription drop-down list to restore the VM disks to a different subscription.
Azure Backup now supports Cross Subscription Restore (CSR). Like Azure VM, you can now restore Azure VM disks using a recovery point from default subscription to another. Default subscription is the subscription where recovery point is available.
Choose the required zone from the Availability Zone drop-down list to restore the VM disks to a different zone.
Azure Backup now supports Cross Zonal Restore (CZR). Like Azure VM, you can now restore Azure VM disks from the default zone to any available zones. Default zone is the zone in which the VM disks reside.
Note
Azure Backup supports CZR only for vaults with ZRS or CRR redundancy.
Select Restore to trigger the restore operation.
When your virtual machine uses managed disks and you select the Create virtual machine option, Azure Backup doesn't use the specified storage account. In the case of Restore disks and Instant Restore, the storage account is used only for storing the template. Managed disks are created in the specified resource group. When your virtual machine uses unmanaged disks, they're restored as blobs to the storage account.
While you restore disks for a Managed VM from a Vault-Standard recovery point, it restores the Managed disk and Azure Resource Manager (ARM) templates, along with the VHD files of the disks in staging location. If you restore disks from an Instant recovery point, it restores the Managed disks and ARM templates only.
Note
- For restoring disk from a Vault-Standard recovery point that is/was greater than 4 TB, Azure Backup doesn't restore the VHD files.
- For information on managed/premium disk performance after restored via Azure Backup, see the Latency section.
Use templates to customize a restored VM
After the disk is restored, use the template that was generated as part of the restore operation to customize and create a new VM:
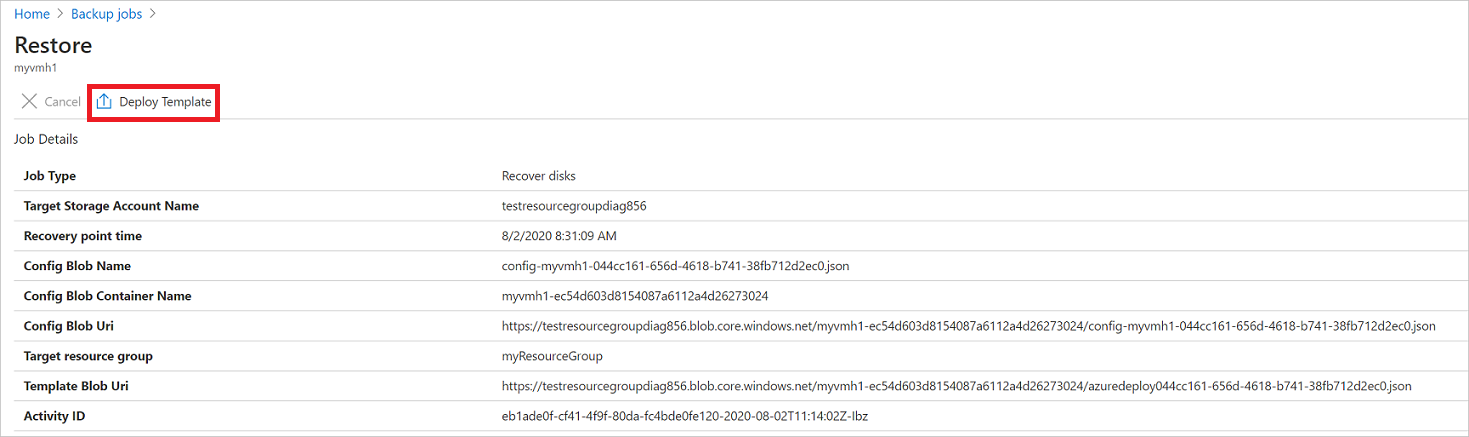
In Backup Jobs, select the relevant restore job.
In Restore, select Deploy Template to initiate template deployment.
Note
For a shared access signature (SAS) that has Allow storage account key access set to disabled, the template won't deploy when you select Deploy Template.
To customize the VM setting provided in the template, select Edit template. If you want to add more customizations, select Edit parameters.
- Learn more about deploying resources from a custom template.
- Learn more about authoring templates.

Enter the custom values for the VM, accept the Terms and Conditions and select Purchase.

Replace existing disks
As one of the restore options, you can replace an existing VM disk with the selected restore point. Review all restore options.
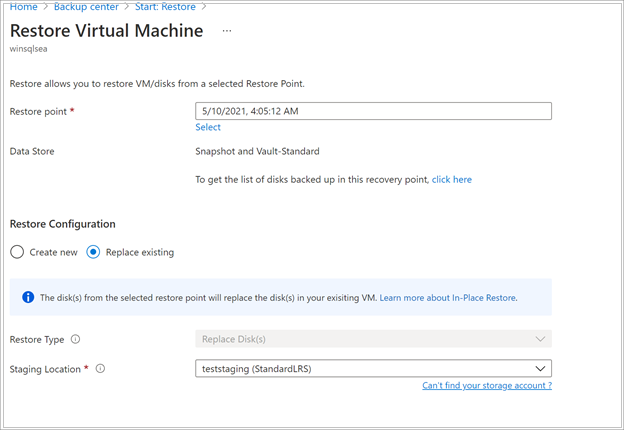
In Restore configuration, select Replace existing.
In Restore Type, select Replace disk/s. This is the restore point that will be used replace existing VM disks.
In Staging Location, specify where snapshots of the current managed disks should be saved during the restore process. Learn more.
Cross Region Restore
As one of the restore options, Cross Region Restore (CRR) allows you to restore Azure VMs in a secondary region, which is an Azure paired region.
To begin using the feature, read the Before You Begin section.
To see if CRR is enabled, follow the instructions in Configure Cross Region Restore.
View backup items in secondary region
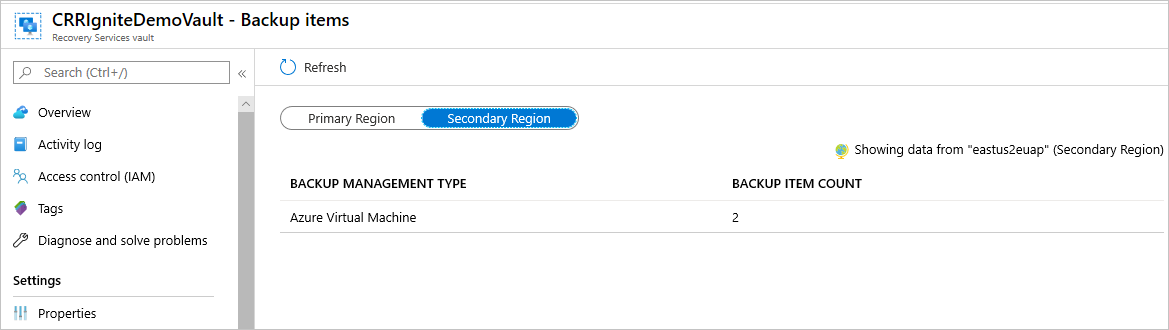
If CRR is enabled, you can view the backup items in the secondary region.
- From the portal, go to Recovery Services vault > Backup items.
- Select Secondary Region to view the items in the secondary region.
Note
Only Backup Management Types supporting the CRR feature will be shown in the list. Currently, only support for restoring secondary region data to a secondary region is allowed.
CRR for Azure VMs is supported for Azure Managed VMs (including encrypted Azure VMs). See the management types that support Cross Region Restore.

Restore in secondary region
The secondary region restore user experience will be similar to the primary region restore user experience. When configuring details in the Restore Configuration pane to configure your restore, you'll be prompted to provide only secondary region parameters.
Currently, secondary region RPO is 36 hours. This is because the RPO in the primary region is 24 hours and can take up to 12 hours to replicate the backup data from the primary to the secondary region.


- To restore and create a VM, refer to Create a VM.
- To restore as a disk, refer to Restore disks.
Note
- You can cancel the restore job till the data transfer phase. Once it enters VM creation phase, you can't cancel the restore job.
- The Cross Region Restore feature restores CMK (customer-managed keys) enabled Azure VMs, which aren't backed-up in a CMK enabled Recovery Services vault, as non-CMK enabled VMs in the secondary region.
- The Azure roles needed to restore in the secondary region are the same as those in the primary region.
- While restoring an Azure VM, Azure Backup configures the virtual network settings in the secondary region automatically. If you are restoring disks while deploying the template, ensure to provide the virtual network settings, corresponding to the secondary region.
- If VNet/Subnet is not available in the primary region or is not configured in the secondary region, Azure portal doesn't auto-populate any default values during restore operation.
- For Cross Region Restores, the Staging Location (that is the storage account location) must be in the region that the Recovery Services vault treats as the secondary region. For example, a Recovery Services vault is located in East US 2 region (with Geo-Redundancy and Cross Region Restore enabled). This means that the secondary region would be Central US. Therefore, you need to create a storage account in Central US to perform a Cross Region Restore of the VM.
Learn more about Azure cross-region replication pairings for all geographies.
Azure zone pinned VMs can be restored in any availability zones of the same region.
In the restore process, you'll see the option Availability Zone. You'll see your default zone first. To choose a different zone, choose the number of the zone of your choice. If the pinned zone is unavailable, you won't be able to restore the data to another zone because the backed-up data isn't zonally replicated. The restore in availability zones is possible from recovery points in vault tier only.
In summary, the Availability Zone will only appear when
- The source VM is zone pinned and is NOT encrypted
- The recovery point is present in vault tier only (Snapshots only or snapshot and vault tier are not supported)
- The recovery option is to either create a new VM or to restore disks (replace disks option replaces source data and hence the availability zone option is not applicable)
- Creating VM/disks in the same region when vault's storage redundancy is ZRS (Doesn't work when vault's storage redundancy is GRS even though the source VM is zone pinned)
- Creating VM/disks in the paired region when vault's storage redundancy is enabled for Cross-Region-Restore AND if the paired region supports zones
Note
Cross-region restore jobs can't be canceled.
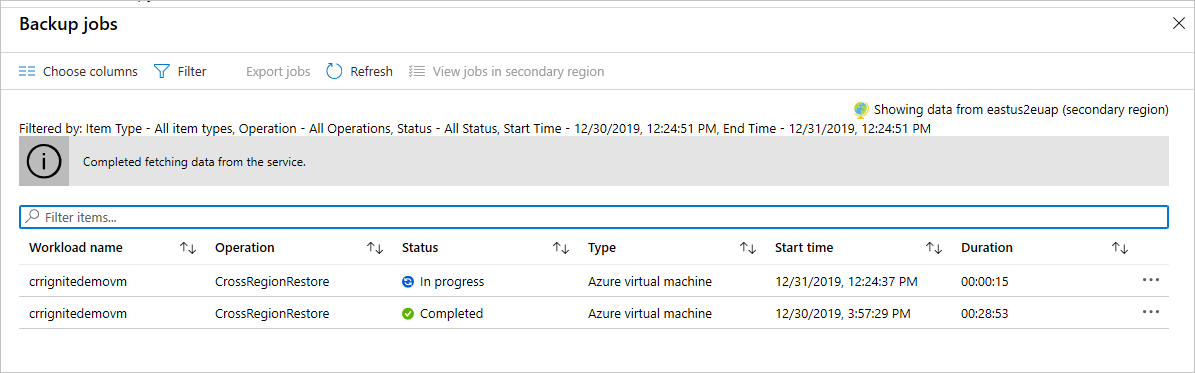
Monitoring secondary region restore jobs
From the portal, go to Recovery Services vault > Backup Jobs
Select Secondary Region to view the items in the secondary region.
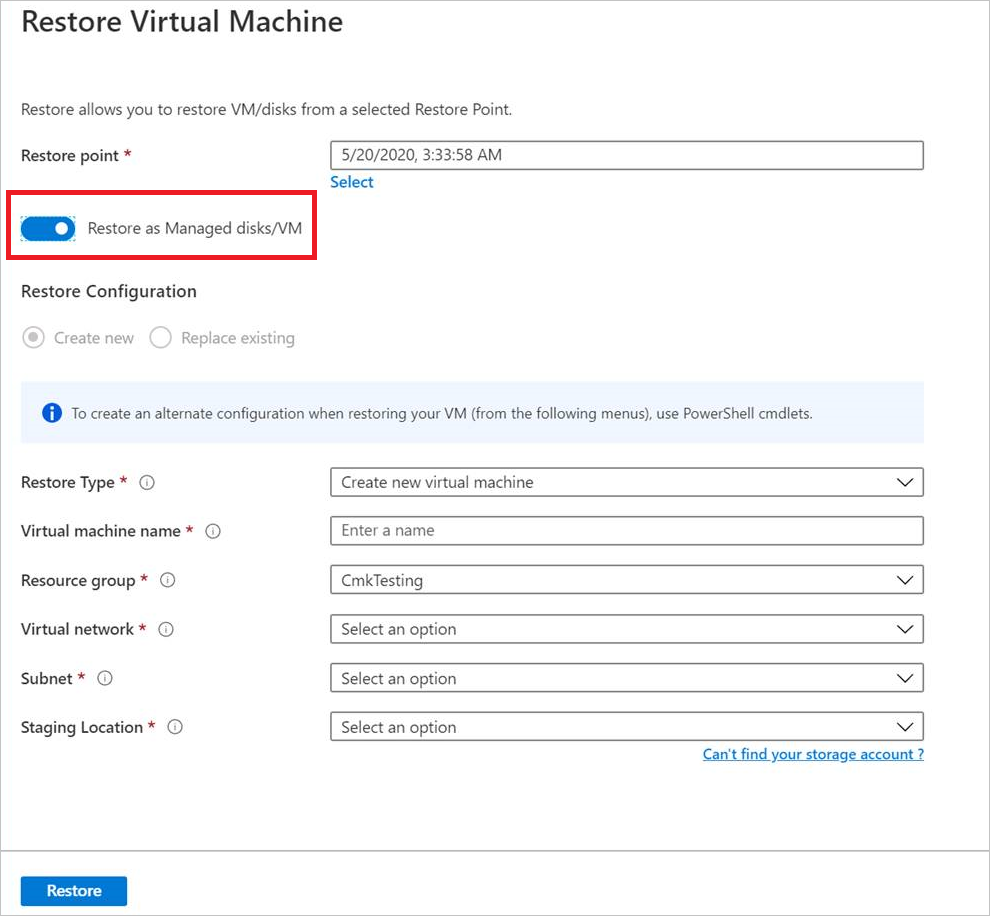
Restoring unmanaged VMs and disks as managed
You're provided with an option to restore unmanaged disks as managed disks during restore. By default, the unmanaged VMs / disks are restored as unmanaged VMs / disks. However, if you choose to restore as managed VMs / disks, it's now possible to do so. These restore operations aren't triggered from the snapshot phase but only from the vault phase. This feature isn't available for unmanaged encrypted VMs.
Restore VMs with special configurations
There are many common scenarios in which you might need to restore VMs.
| Scenario | Guidance |
|---|---|
| Restore VMs using Hybrid Use Benefit | If a Windows VM uses Hybrid Use Benefit (HUB) licensing, restore the disks, and create a new VM using the provided template (with License Type set to Windows_Server), or PowerShell. This setting can also be applied after creating the VM. |
| Restore VMs during an Azure datacenter disaster | If the vault uses GRS and the primary datacenter for the VM goes down, Azure Backup supports restoring backed-up VMs to the paired datacenter. You select a storage account in the paired datacenter, and restore as normal. Azure Backup uses the compute service in the paired region to create the restored VM. Learn more about datacenter resiliency. If the vault uses GRS, you can choose the new feature, Cross Region Restore. This lets you restore to a second region in either full or partial outage scenarios, or even if there's no outage at all. |
| Bare-metal restore | The major difference between Azure VMs and on-premises hypervisors is that there's no VM console available in Azure. A console is required for certain scenarios, such as recovering by using a bare-metal recovery (BMR)-type backup. However, VM restore from the vault is a full replacement for BMR. |
| Restore VMs with special network configurations | Special network configurations include VMs using internal or external load balancing, using multiple NICS, or multiple reserved IP addresses. You restore these VMs by using the restore disk option. This option makes a copy of the VHDs into the specified storage account, and you can then create a VM with an internal or external load balancer, multiple NICS, or multiple reserved IP addresses, in accordance with your configuration. |
| Network Security Group (NSG) on NIC/Subnet | Azure VM backup supports Backup and Restore of NSG information at vnet, subnet, and NIC level. |
| Zone Pinned VMs | If you back up an Azure VM that's pinned to a zone (with Azure Backup), then you can restore it in the same zone where it was pinned. Learn more |
| Restore VM in any availability set | When you restore a VM from the portal, there's no option to choose an availability set. A restored VM doesn't have an availability set. If you use the restore disk option, then you can specify an availability set when you create a VM from the disk using the provided template or PowerShell. |
| Restore special VMs such as SQL VMs | If you're backing up a SQL VM using Azure VM backup and then use the restore VM option or create a VM after restoring disks, then the newly created VM must be registered with the SQL provider as mentioned here. This will convert the restored VM into a SQL VM. |
Restore domain controller VMs
| Scenario | Guidance |
|---|---|
| Restore a single domain controller VM in a single domain | Restore the VM like any other VM. Note that: From an Active Directory perspective, the Azure VM is like any other VM. Directory Services Restore Mode (DSRM) is also available, so all Active Directory recovery scenarios are viable. Learn more about backup and restore considerations for virtualized domain controllers. |
| Restore multiple domain controller VMs in a single domain | If other domain controllers in the same domain can be reached over the network, the domain controller can be restored like any VM. If it's the last remaining domain controller in the domain, or a recovery in an isolated network is performed, use a forest recovery. |
| Restore a single domain controller VM in a multiple domain configuration | Restore the disks and create a VM by using PowerShell |
| Restore multiple domains in one forest | We recommend a forest recovery. |
For more information, see Back up and restore Active Directory domain controllers.
Restore VMs with managed identities
Managed identities eliminate the need for the user to maintain the credentials. Managed identities provide an identity for applications to use when connecting to resources that support Azure Active Directory (Azure AD) authentication.
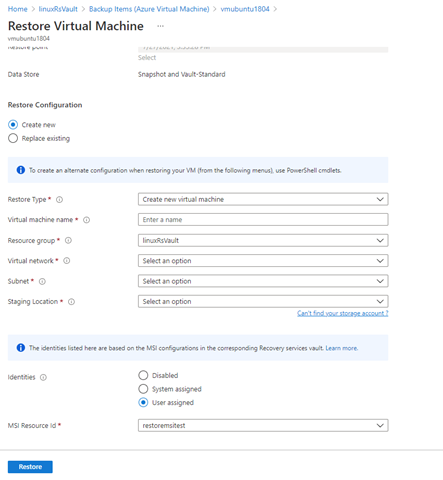
Azure Backup offers the flexibility to restore the managed Azure VM with managed identities. You can choose to select system-managed identities or user-managed identities as shown in the figure below. This is introduced as one of the input parameters in the Restore configuration blade of Azure VM. Managed identities used as one of the input parameters is only used for accessing the storage accounts, which are used as staging location during restore and not for any other Azure resource controlling. These managed identities have to be associated to the vault.
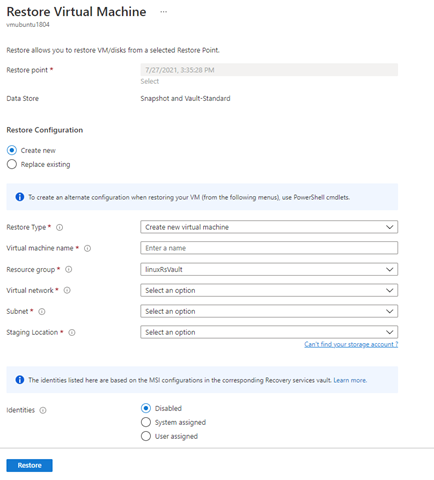
If you choose to select system-assigned or user-assigned managed identities, check for the below actions for managed identity on the target staging Storage Account.
"permissions": [
            {
                "actions": [
                    "Microsoft.Authorization/*/read",
                    "Microsoft.Storage/storageAccounts/blobServices/containers/delete",
                    "Microsoft.Storage/storageAccounts/blobServices/containers/read",
                    "Microsoft.Storage/storageAccounts/blobServices/containers/write"
                ],
                "notActions": [],
                "dataActions": [
                    "Microsoft.Storage/storageAccounts/blobServices/containers/blobs/delete",
                    "Microsoft.Storage/storageAccounts/blobServices/containers/blobs/read",
                    "Microsoft.Storage/storageAccounts/blobServices/containers/blobs/write",
                    "Microsoft.Storage/storageAccounts/blobServices/containers/blobs/add/action"
                ],
                "notDataActions": []
            }
Or, add the role assignment on the staging location (Storage Account) to have Storage account Backup Contributor and Storage Blob data Contributor for the successful restore operation.
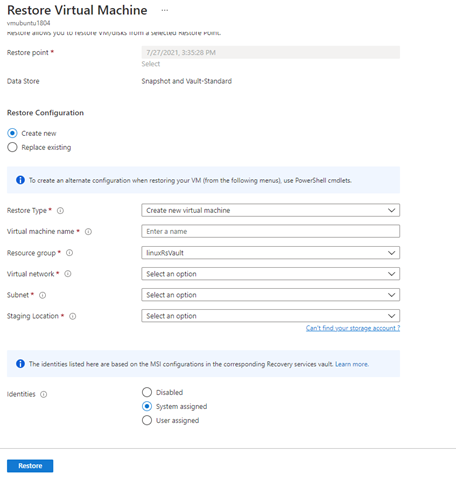
You can also select the user-managed identity by providing the input as their MSI Resource ID as provided in the figure below.
Note
The support is available for only managed VMs, and not supported for classic VMs and unmanaged VMs. For the storage accounts that are restricted with firewalls, system MSI is only supported.
Cross Region Restore isn't supported with managed identities.
Currently, this is available in all Azure public and national cloud regions.
Track the restore operation
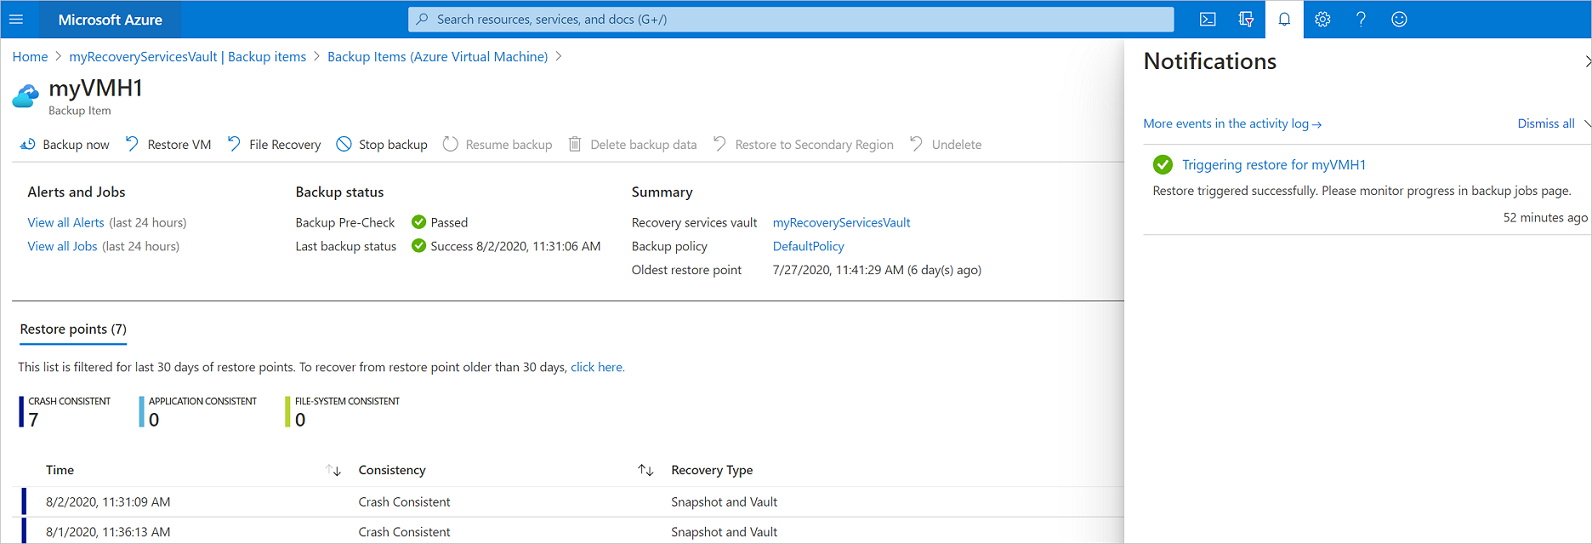
After you trigger the restore operation, the backup service creates a job for tracking. Azure Backup displays notifications about the job in the portal. If they aren't visible, select the Notifications symbol, and then select More events in the activity log to see the Restore Process Status.
Track restore as follows:
To view operations for the job, select the notifications hyperlink. Alternatively, in the vault, select Backup jobs, and then select the relevant VM.

To monitor restore progress, select any restore job with a status of In-progress. This displays the progress bar, which displays information about the restore progress:
- Estimated time of restore: Initially provides the time taken to complete the restore operation. As the operation progresses, the time taken reduces and reaches zero when the restore operation finishes.
- Percentage of restore. Shows the percentage of restore operation that's done.
- Number of bytes transferred: If you're restoring by creating a new VM, it shows the bytes that were transferred against the total number of bytes to be transferred.
Post-restore steps
There are a few things to note after restoring a VM:
Extensions present during the backup configuration are installed, but not enabled. If you see an issue, reinstall the extensions.
If the backed-up VM had a static IP address, the restored VM will have a dynamic IP address to avoid conflict. You can add a static IP address to the restored VM.
A restored VM doesn't have an availability set. If you use the restore disk option, then you can specify an availability set when you create a VM from the disk using the provided template or PowerShell.
If you use a cloud-init-based Linux distribution, such as Ubuntu, for security reasons the password is blocked after the restore. Use the VMAccess extension on the restored VM to reset the password. We recommend using SSH keys on these distributions, so you don't need to reset the password after the restore.
If you're unable to access a VM once restored because the VM has a broken relationship with the domain controller, then follow the steps below to bring up the VM:
- Attach OS disk as a data disk to a recovered VM.
- Manually install VM agent if Azure Agent is found to be unresponsive by following this link.
- Enable Serial Console access on VM to allow command-line access to VM
cmdbcdedit /store <drive letter>:\boot\bcd /enum bcdedit /store <VOLUME LETTER WHERE THE BCD FOLDER IS>:\boot\bcd /set {bootmgr} displaybootmenu yes bcdedit /store <VOLUME LETTER WHERE THE BCD FOLDER IS>:\boot\bcd /set {bootmgr} timeout 5 bcdedit /store <VOLUME LETTER WHERE THE BCD FOLDER IS>:\boot\bcd /set {bootmgr} bootems yes bcdedit /store <VOLUME LETTER WHERE THE BCD FOLDER IS>:\boot\bcd /ems {<<BOOT LOADER IDENTIFIER>>} ON bcdedit /store <VOLUME LETTER WHERE THE BCD FOLDER IS>:\boot\bcd /emssettings EMSPORT:1 EMSBAUDRATE:115200When the VM is rebuilt use Azure portal to reset local administrator account and password
Use Serial console access and CMD to disjoin VM from domain
cmdcmd /c "netdom remove <<MachineName>> /domain:<<DomainName>> /userD:<<DomainAdminhere>> /passwordD:<<PasswordHere>> /reboot:10 /Force"
Once the VM is disjoined and restarted, you'll be able to successfully RDP to the VM with local admin credentials and rejoin VM back to domain successfully.
Backing up restored VMs
- If you restored a VM to the same resource group with the same name as the originally backed-up VM, backup continues on the VM after restore.
- If you restored the VM to a different resource group or you specified a different name for the restored VM, you need to set up backup for the restored VM.